How to use the Lenovo XClarity Essentials OneCLI serase command to securely erase hard disk drive data
How to use the Lenovo XClarity Essentials OneCLI serase command to securely erase hard disk drive data
How to use the Lenovo XClarity Essentials OneCLI serase command to securely erase hard disk drive data
Description
Lenovo offers users a tool to securely erase hard disk drives (HDDs) and solid-state drives (SSDs) in compliance with COMMISSION REGULATION (EU) 2019/424 on secure data deletion.
From v2.8.0 onward, Lenovo XClarity Essentials OneCLI (OneCLI) will support the secure erasure of data from any SATA/SAS/NVMe drive attached to the backplane, managed by a RAID controller, or connected with an HBA adapter on Lenovo ThinkSystem servers. Secure erasure is defined as follows: The effective erasure of all traces of existing data from a data storage device, overwriting the data completely in such a way that access to the original data, or parts of them, becomes infeasible for a given level of effort.
This article introduces the procedure used to run the OneCLI serase command through a bare metal update (BMU) solution.
Applicable Systems
Lenovo ThinkSystem
- Lenovo ThinkSystem D2 Enclosure
- Lenovo ThinkSystem SD530
- Lenovo ThinkSystem SD650
- Lenovo ThinkSystem SN550
- Lenovo ThinkSystem SN850
- Lenovo ThinkSystem SR530
- Lenovo ThinkSystem SR550
- Lenovo ThinkSystem SR570
- Lenovo ThinkSystem SR590
- Lenovo ThinkSystem SR630
- Lenovo ThinkSystem SR650
- Lenovo ThinkSystem SR670
- Lenovo ThinkSystem SR850
- Lenovo ThinkSystem SR860
- Lenovo ThinkSystem SR950
- Lenovo ThinkSystem ST550
- Lenovo ThinkSystem ST50
- Lenovo ThinkSystem SR250
- Lenovo ThinkSystem ST250
- Lenovo ThinkSystem SR635
- Lenovo ThinkSystem SR655
Lenovo ThinkServer
- Lenovo ThinkServer TS150
Lenovo System x
- Lenovo System x3650 M5
Configuration Applications
OneCLI v2.8.0 or later
Operating Systems
Windows, Linux
Prerequisites
- An SFTP server, and you must aslo ensure that port 6990 is enabled for SFTP/SSH
- A OneCLI-supported operation system version must be installed on an Internet-connected workstation/laptop
- OneCLI must be installed on your workstation/laptop
- The workstation/laptop must have direct network access to XCC on the target server
- Users must have access to run OneCLI with administrator or root privileges
Procedures
- Go to https://support.lenovo.com/solutions/lnvo-tcli, find the appropriate OS section, and download the requested ZIP or TGZ file.
- Unzip the file and copy the contents to a specified folder.
For Windows:
Unzip and copy the contents to a specified folder.
For Linux:
(1) Open Terminal and ensure the user has root privileges.
(2) Use the tar command to unzip the filetar xvf "Zipfile.tgz" -C /path/foldername,
Where Zipfile.tgz is the downloaded file, and -C is the path and folder where the files will be extracted. - Follow the procedures set out below to launch OneCLI.
For Windows:
(1) Open a command prompt window with administrator privileges.
(2) Go to the directory where you saved the utility – e.g. C:\onecli.
For Linux:
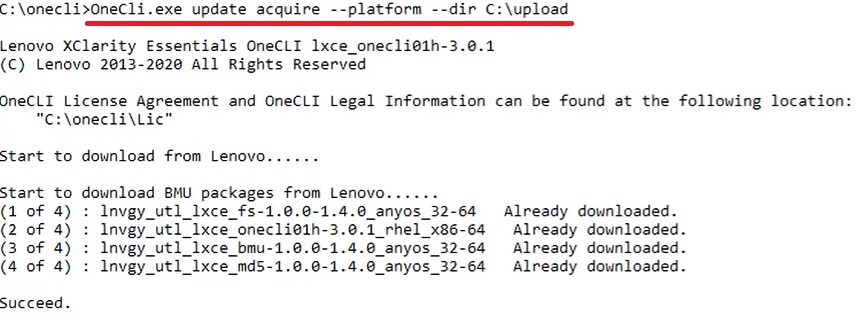
Go to the directory where you saved the utility – e.g. /root/Desktop/onecli. - Prepare the BMU environment using the following command:
onecli update acquire --platform --dir C:\uploadwhere C:\upload is the directory you want to download the files into.
- Run the OneCLI serase command to launch the BMU solution:
onecli misc serase --bmc USERID:PASSWORD@BMCIPAddress --sftp USERNAME:PASSWORD@SFTPIPAddress:6990 --dir C:\upload
where- USERID:PASSWORD@BMCIPAddress is the XCC access information on the target server
- USERNAME:PASSWORD@SFTPIPAddress is the SFTP access information
Note: Ensure that port 6990 is enabled for SFTP/SSH - port 22, the default SFTP port, will not work.
- OneCLI will boot the target host to the maintenance mode OS.
- After booting into the maintenance OS, OneCLI will scan all the available disks on the target sever, and the Disk(s) table will be displayed.

- Follow the hints to select the target disk and erase method. Enter ALL to select all the disks and use the simple erase method on them. You can also specify a specific disk and use the data erase method.
For example, to erase the first disk and choose the normal erase method, enter 1-2.

- Enter Yes to confirm the data deletion. The erasure of disks will take some time; a percentage progress figure will be displayed. Ensure that the OneCLI commands remain active during the procedure or the task might be interrupted with an error.

- When the operation is complete, the disk erase result will be displayed. Follow the hints to exit the maintenance OS or select another disk for data erasure.

Table. 1 OneCLI global parametersApplication Command Parameter Description Update acquire --platform Download the maintenance image and OneCLI tool for BMU secure erase and platform flash --dir Specifies the path name of the directory that the files will be downloaded into
misc serase --bmc Specifies the access information of the target BMC to run OneCLI in out-of-band mode
- For IPv4 address, the format is USERID:PASSWORD@IPv4Address:port
- For IPv6 address, the format is USERID:PASSWORD@IPv6Address:port
--dir Specifies the path name of the directory that the files will be downloaded into --sftp Specifies the SFTP connection information
The format is USERNAME:PASSWORD@SFTPIPAddress:6990/dir
The address is used to upload the maintenance OS boot file and the OneCLI package file.
