How to use the Lenovo XClarity Essentials UpdateXpress to update your system
How to use the Lenovo XClarity Essentials UpdateXpress to update your system
How to use the Lenovo XClarity Essentials UpdateXpress to update your system
Description
Lenovo XClarity Essentials (LXCE) UpdateXpress is a portable, GUI software for firmware and device driver updates. Its functions are similar to those provided by the LXCE OneCLI update command. However, LXCE UpdateXpress is a user-friendly interface that works with a wizard-style GUI.
This article describes the steps to run the LXCE UpdateXpress to acquire and apply UpdateXpress System Packs (UXSP), or individual updates to your local or remote systems. UXSPs simplify downloading and installing all the online driver and firmware updates for a given system. UXSPs ensure that you always work with a complete and up-to-date set of updates tested together and bundled by Lenovo.
Applicable Systems
Click here to view the supported server models
System Is Configured With
Lenovo XClarity Essentials (LXCE) - UpdateXpress System Packs (UXSP)
Operating Systems
Click here to view the supported operating system.
Limitations
Note: You must have administrator or root-equivalent operating-system privileges to use UpdateXpress.
Solution
Choose one of the options to manage the servers and / or perform updates:
Download and launch UpdateXpress
- Go to https://support.lenovo.com/solutions/lnvo-xpress, find the appropriate OS section, and download the requested ZIP file.
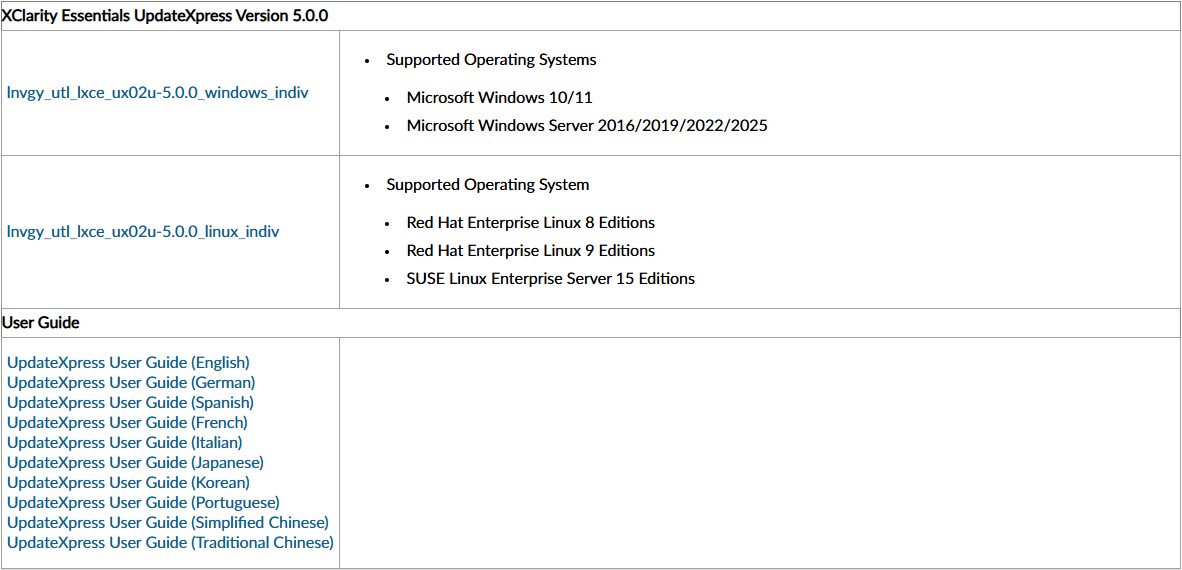
- Unzip the file and copy the contents to a specified folder.
- For Windows:
Copy the contents to a local folder. Please ensure sure that the target folder already exists, or you will need to create it.
- For Linux:
(1) Open the Terminal and ensure the user has root privileges.
(2) Use the mkdir command to create a folder where the contents of the files will be copied.
mkdir /path/foldername
(3) Use the tar command to unzip the file.
tar xvf Zipfile.tgz -C /path/foldername
Where Zipfile.tgz is the downloaded TGZ file, and -C is the path and folder to extract all the files. Please ensure the target folder exists, or you must create it.
- Follow the procedure below to launch UpdateXpress.
- For Windows:
Go to the folder where you saved the utility, right-click lxce_ux.exe and select Run as administrator.
- For Linux:
Go to the directory where you saved the utility and type the following command in Terminal:
./start_lxce_ux.sh
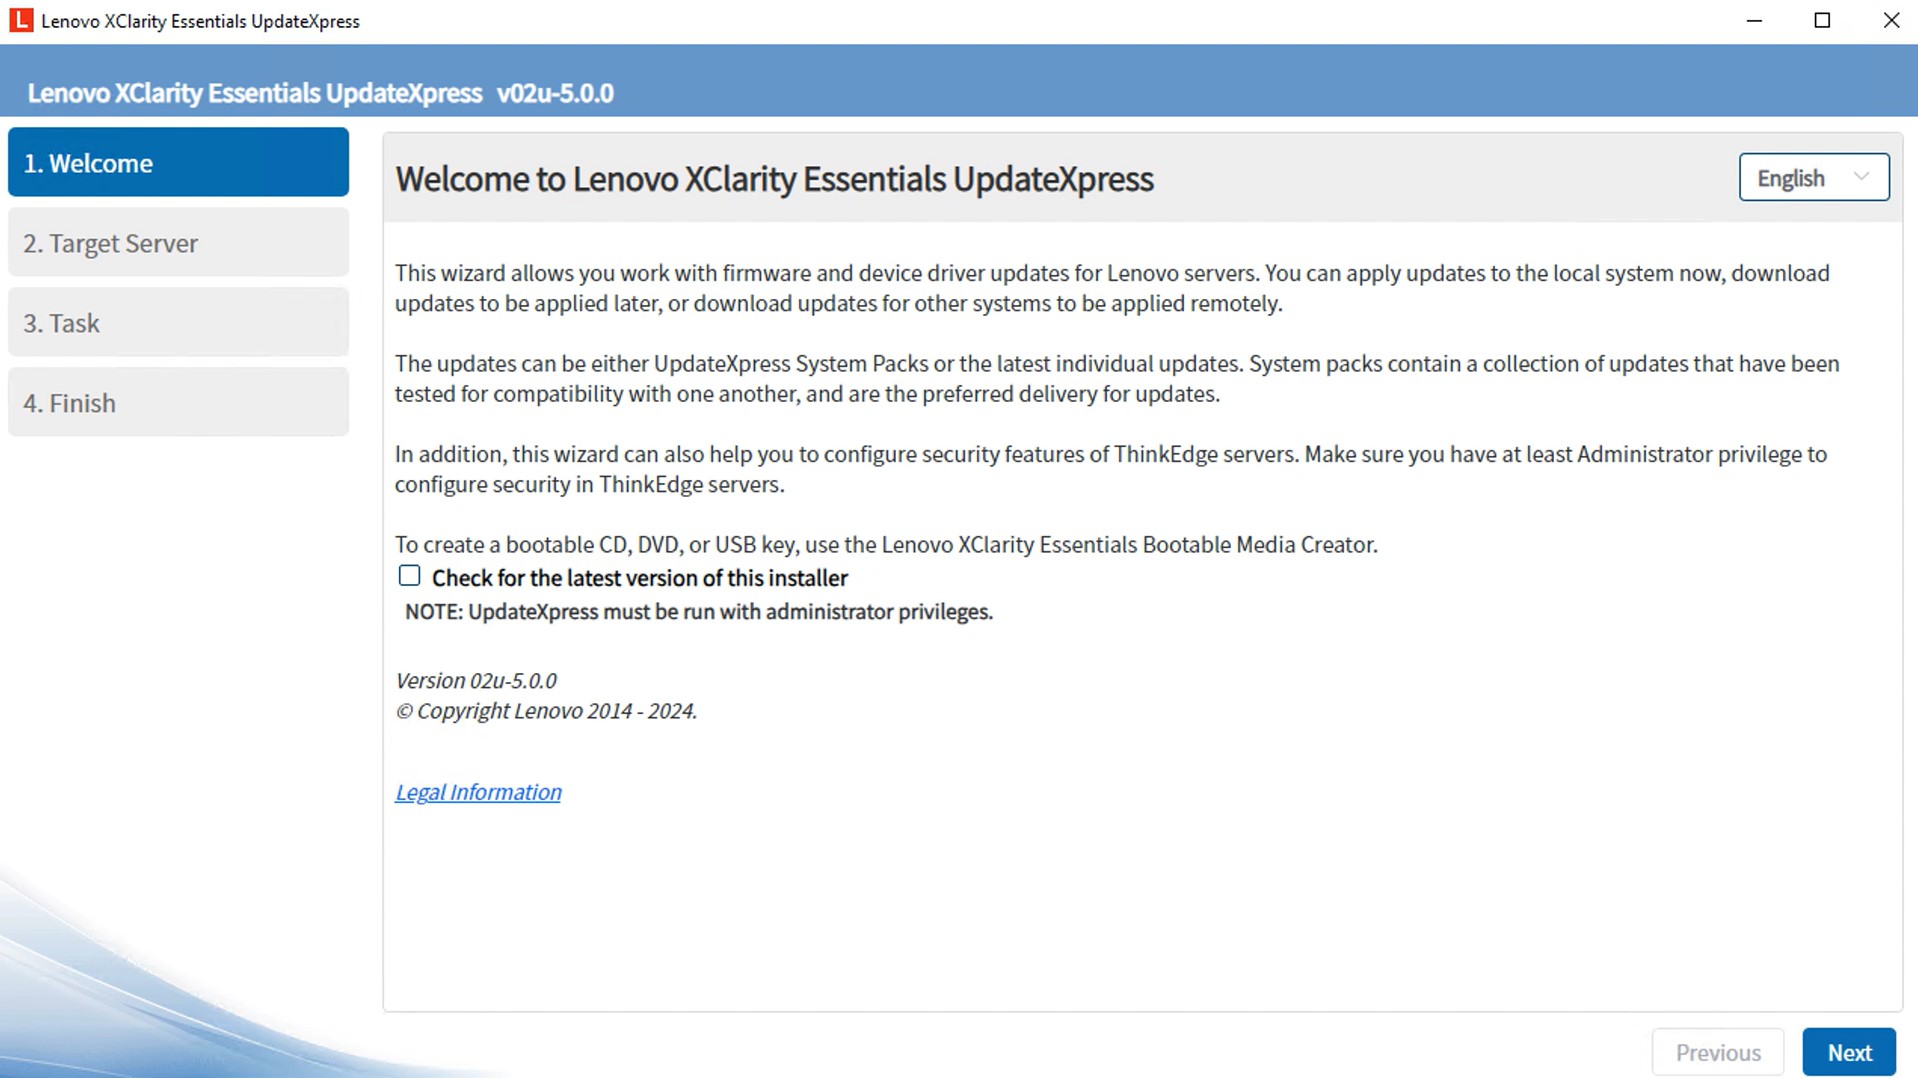
- The Lenovo XClarity Essentials UpdateXpress application opens.
Update a local machine from the Lenovo Support site
In this video, we will show you how to use the LXCE UpdateXpress to update the local machine from the Lenovo Support page.
If you prefer written instructions, work through the following steps:
- In the Welcome window, click Next.

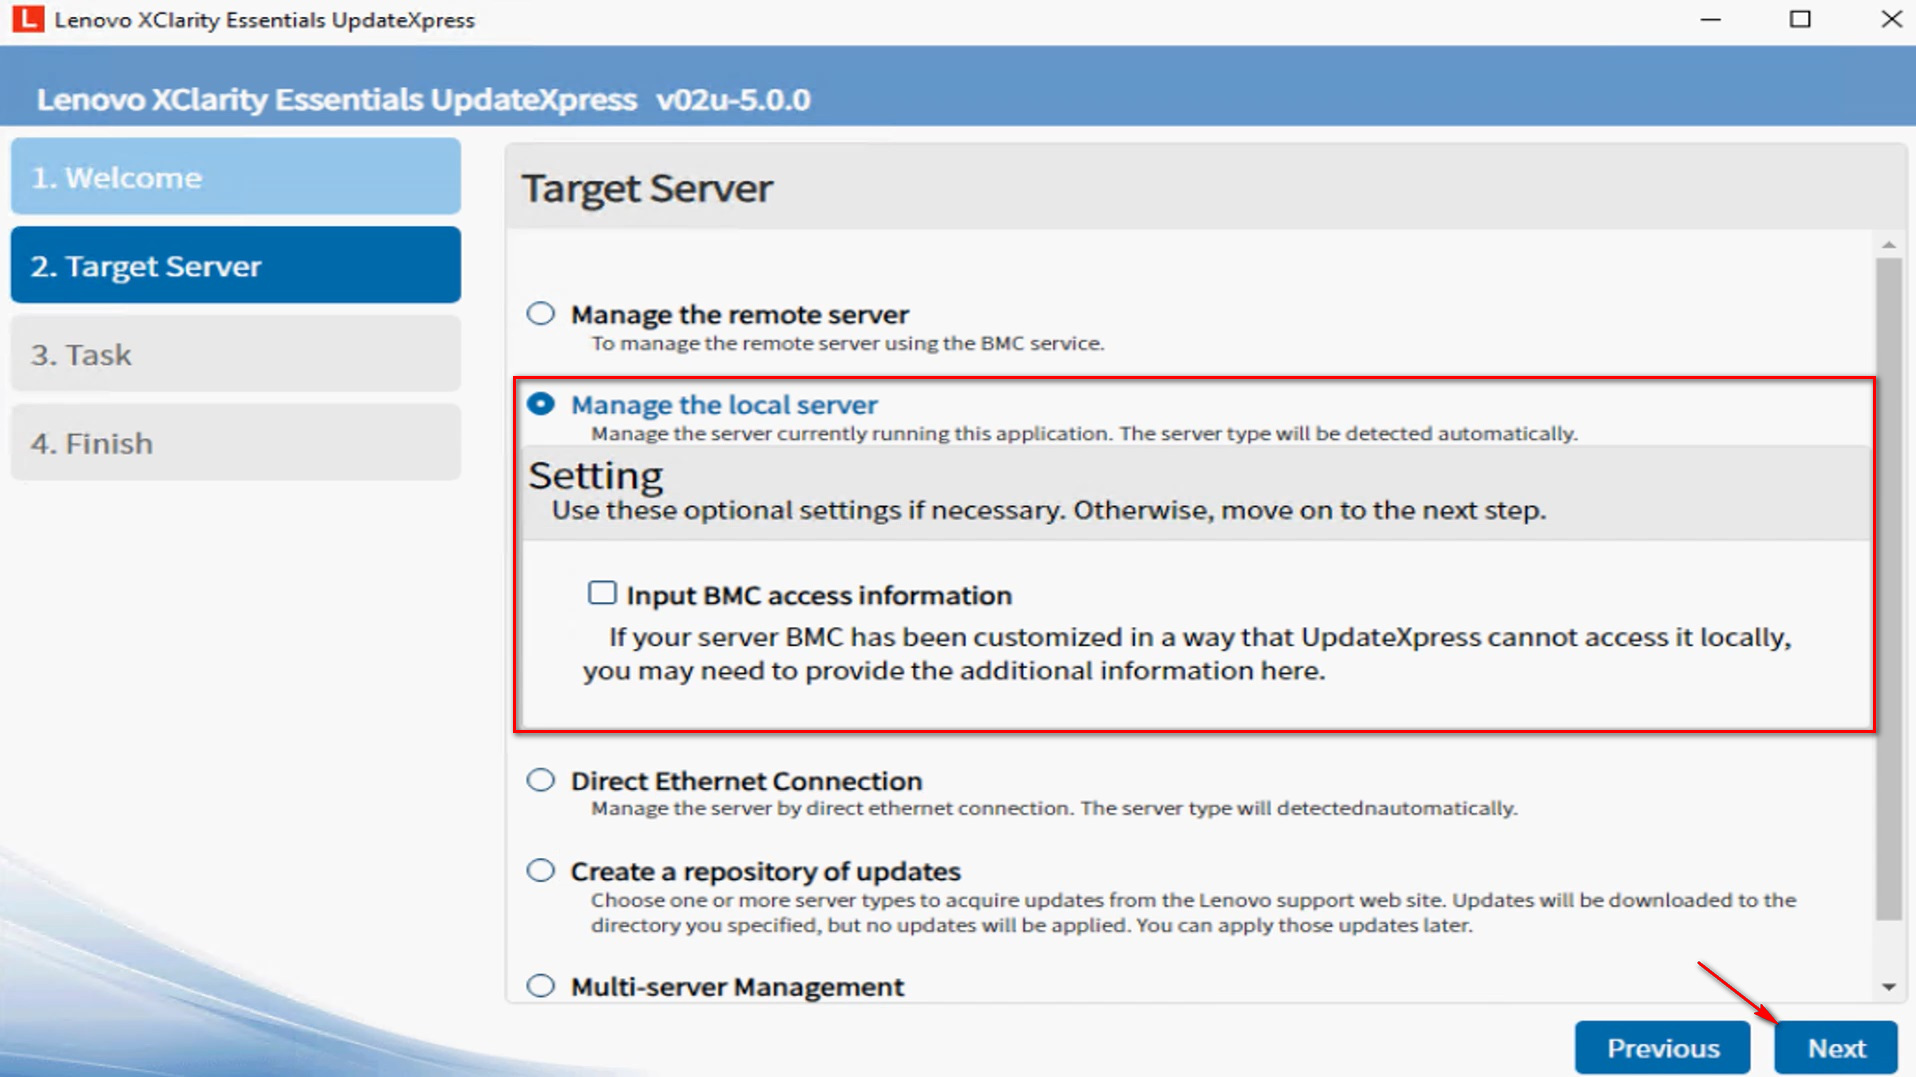
- In the Target Server window, select Manage the local server. If the Input BMC access information setting is selected, input the BMC information if necessary. Click Next.
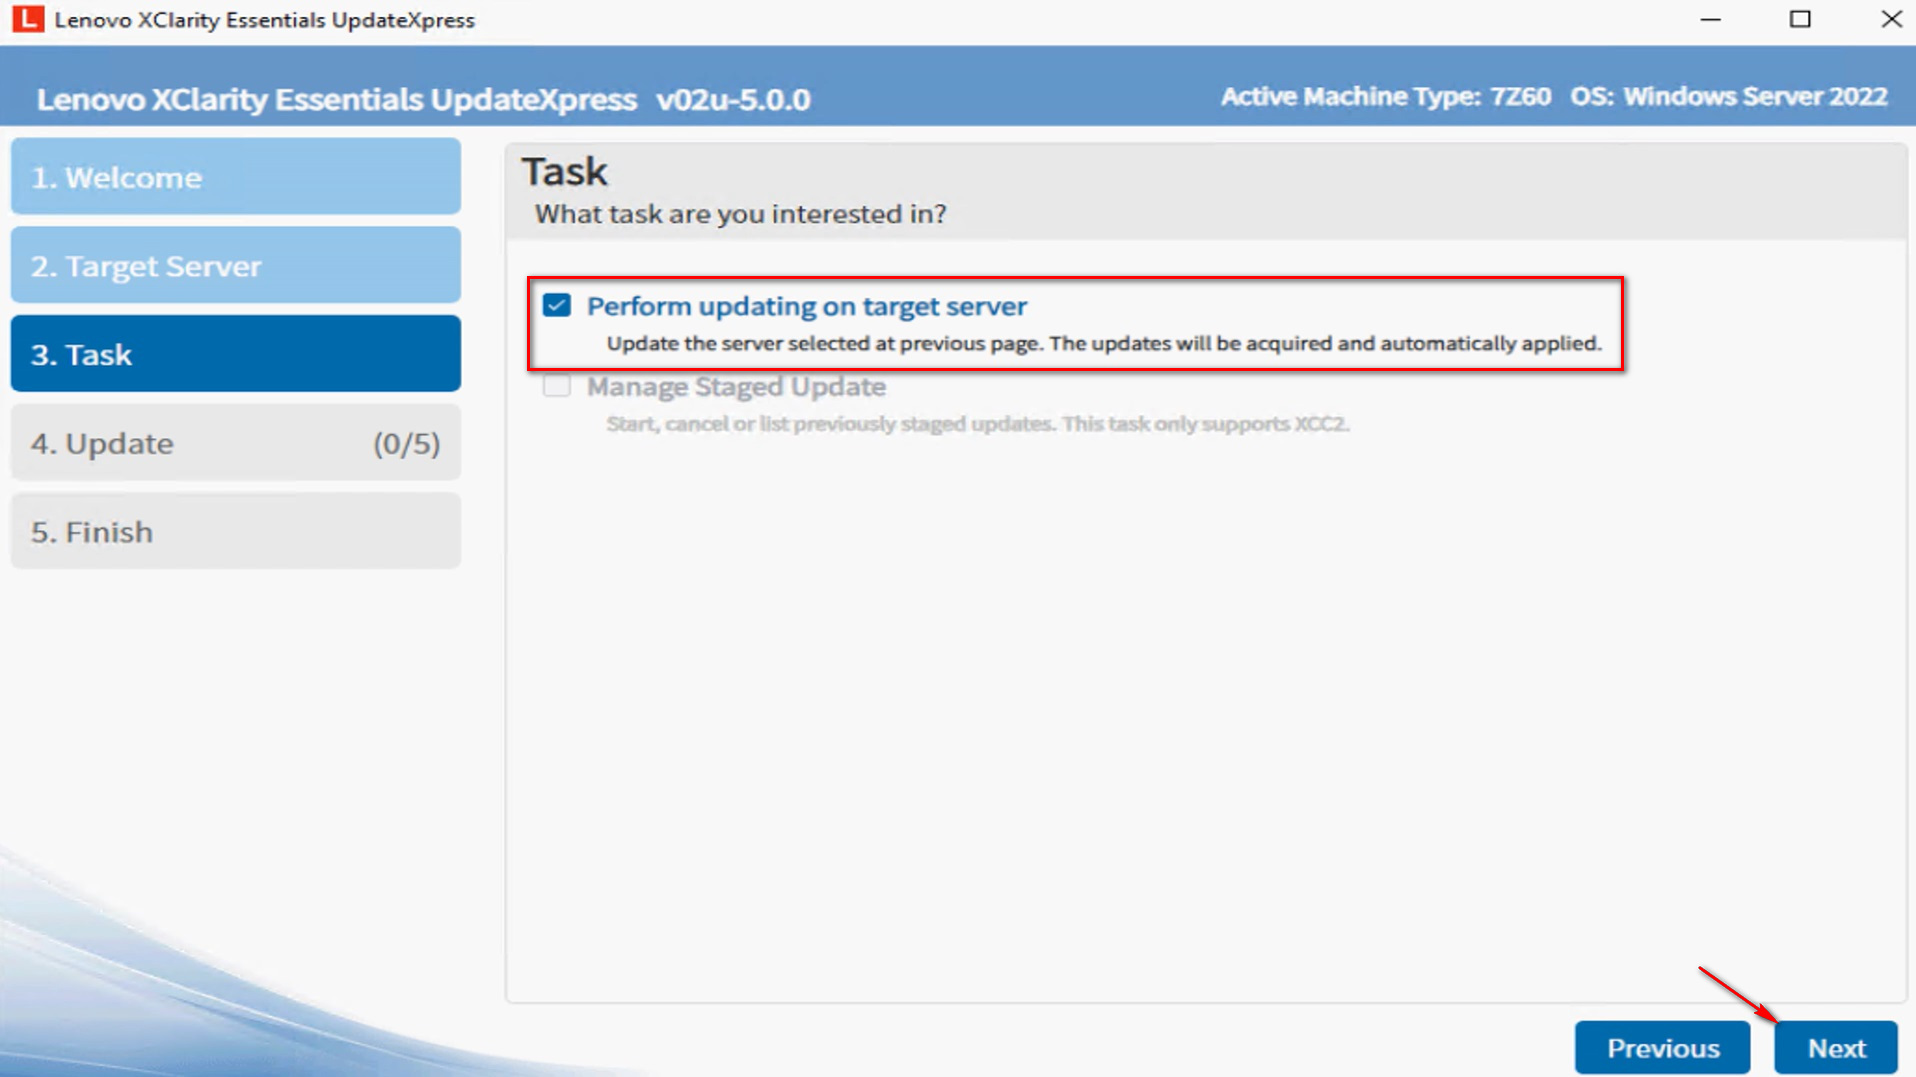
- In the Task window, select Perform updating on target server. Click Next.
- In the Update Setting window, to upgrade the backup system firmware, select Only update the backup image of the BMC (and UEFI where applicable). Click Next.
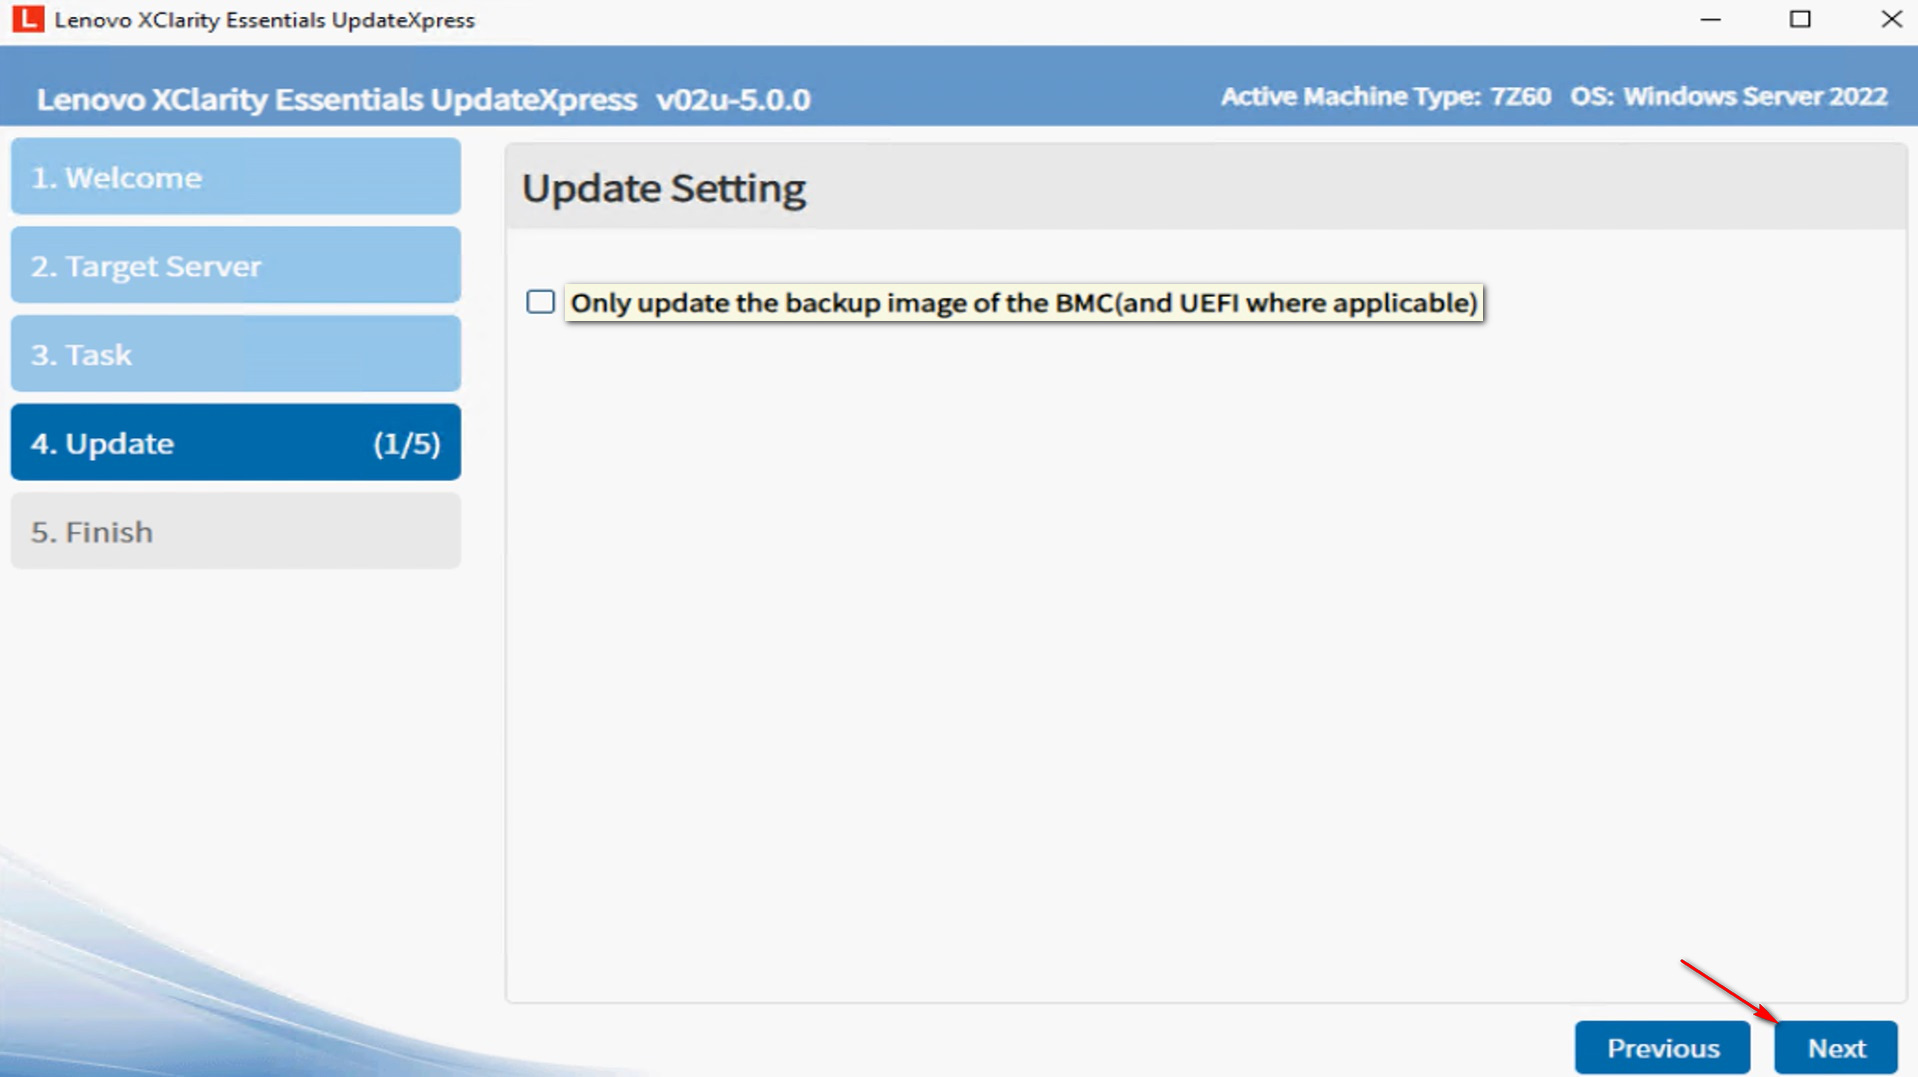
- In the Update Location window, select Check the Lenovo support website. Click Next.
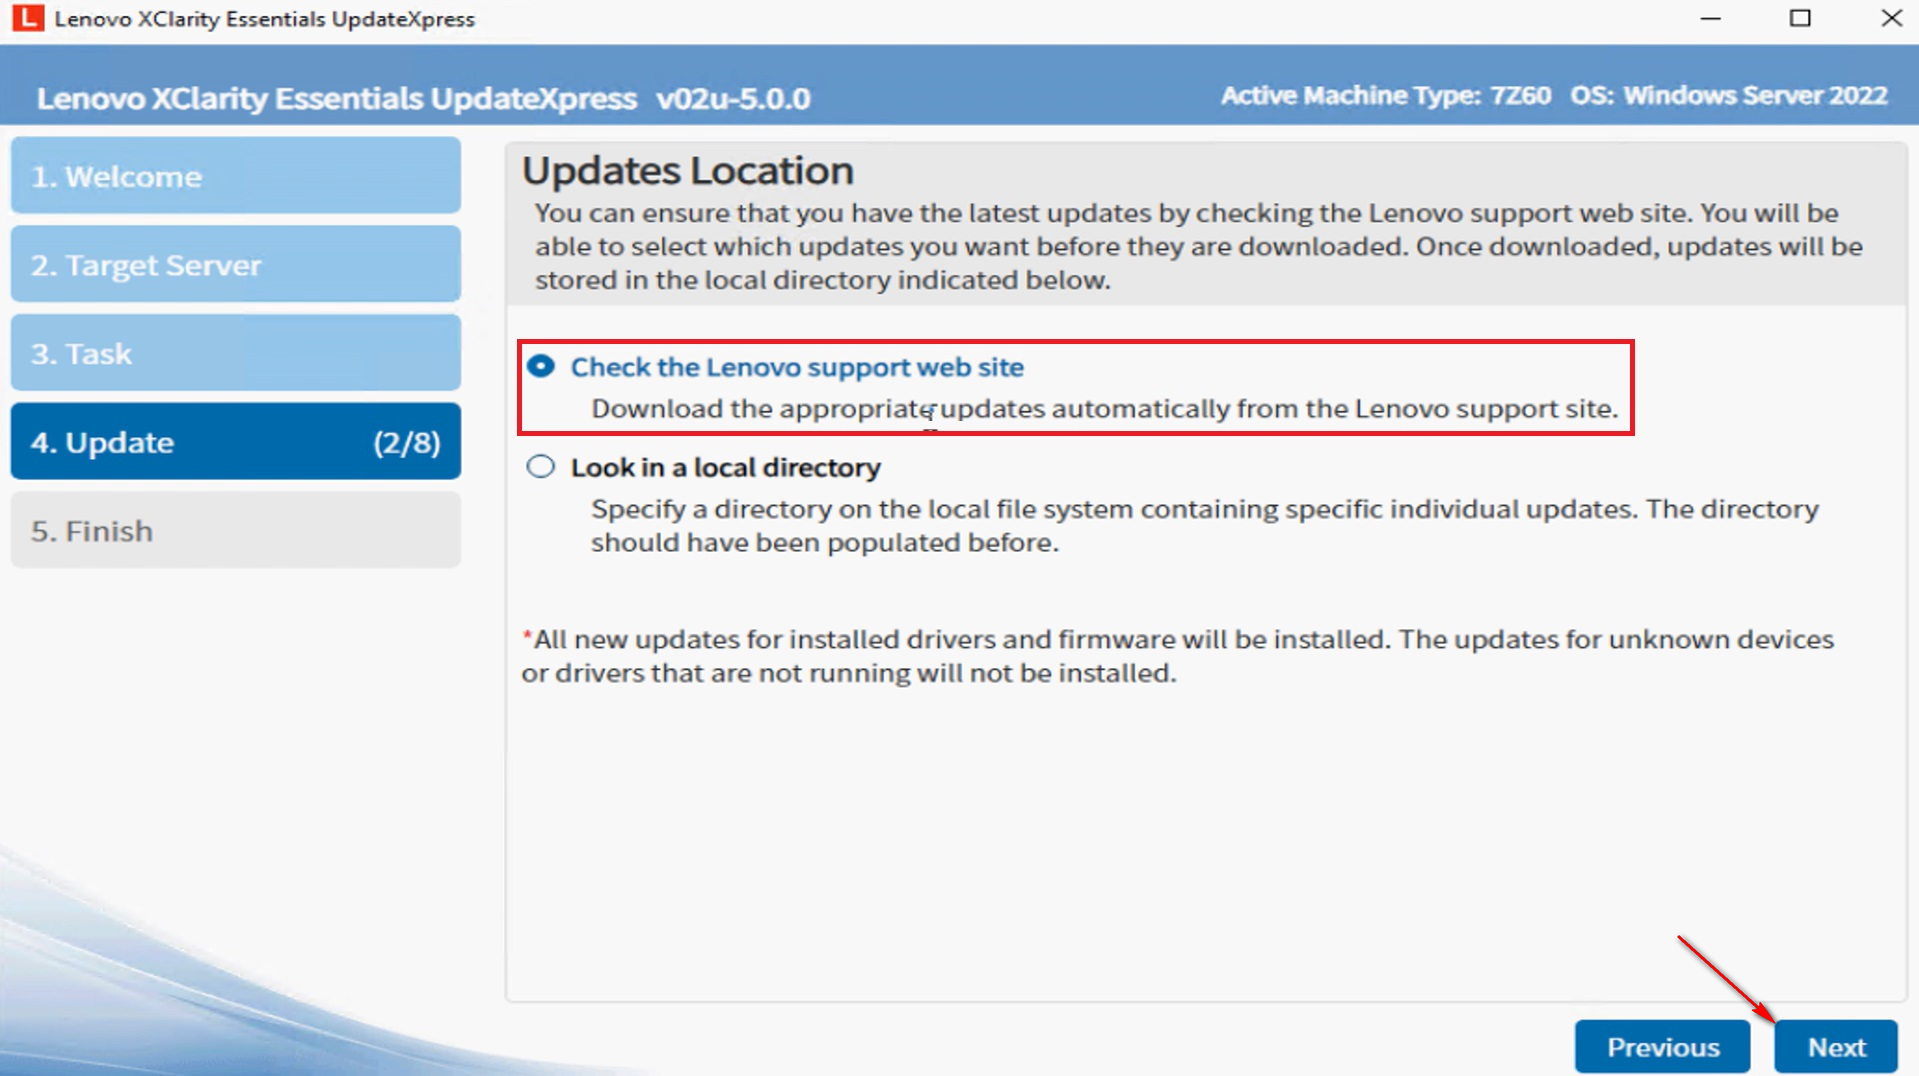
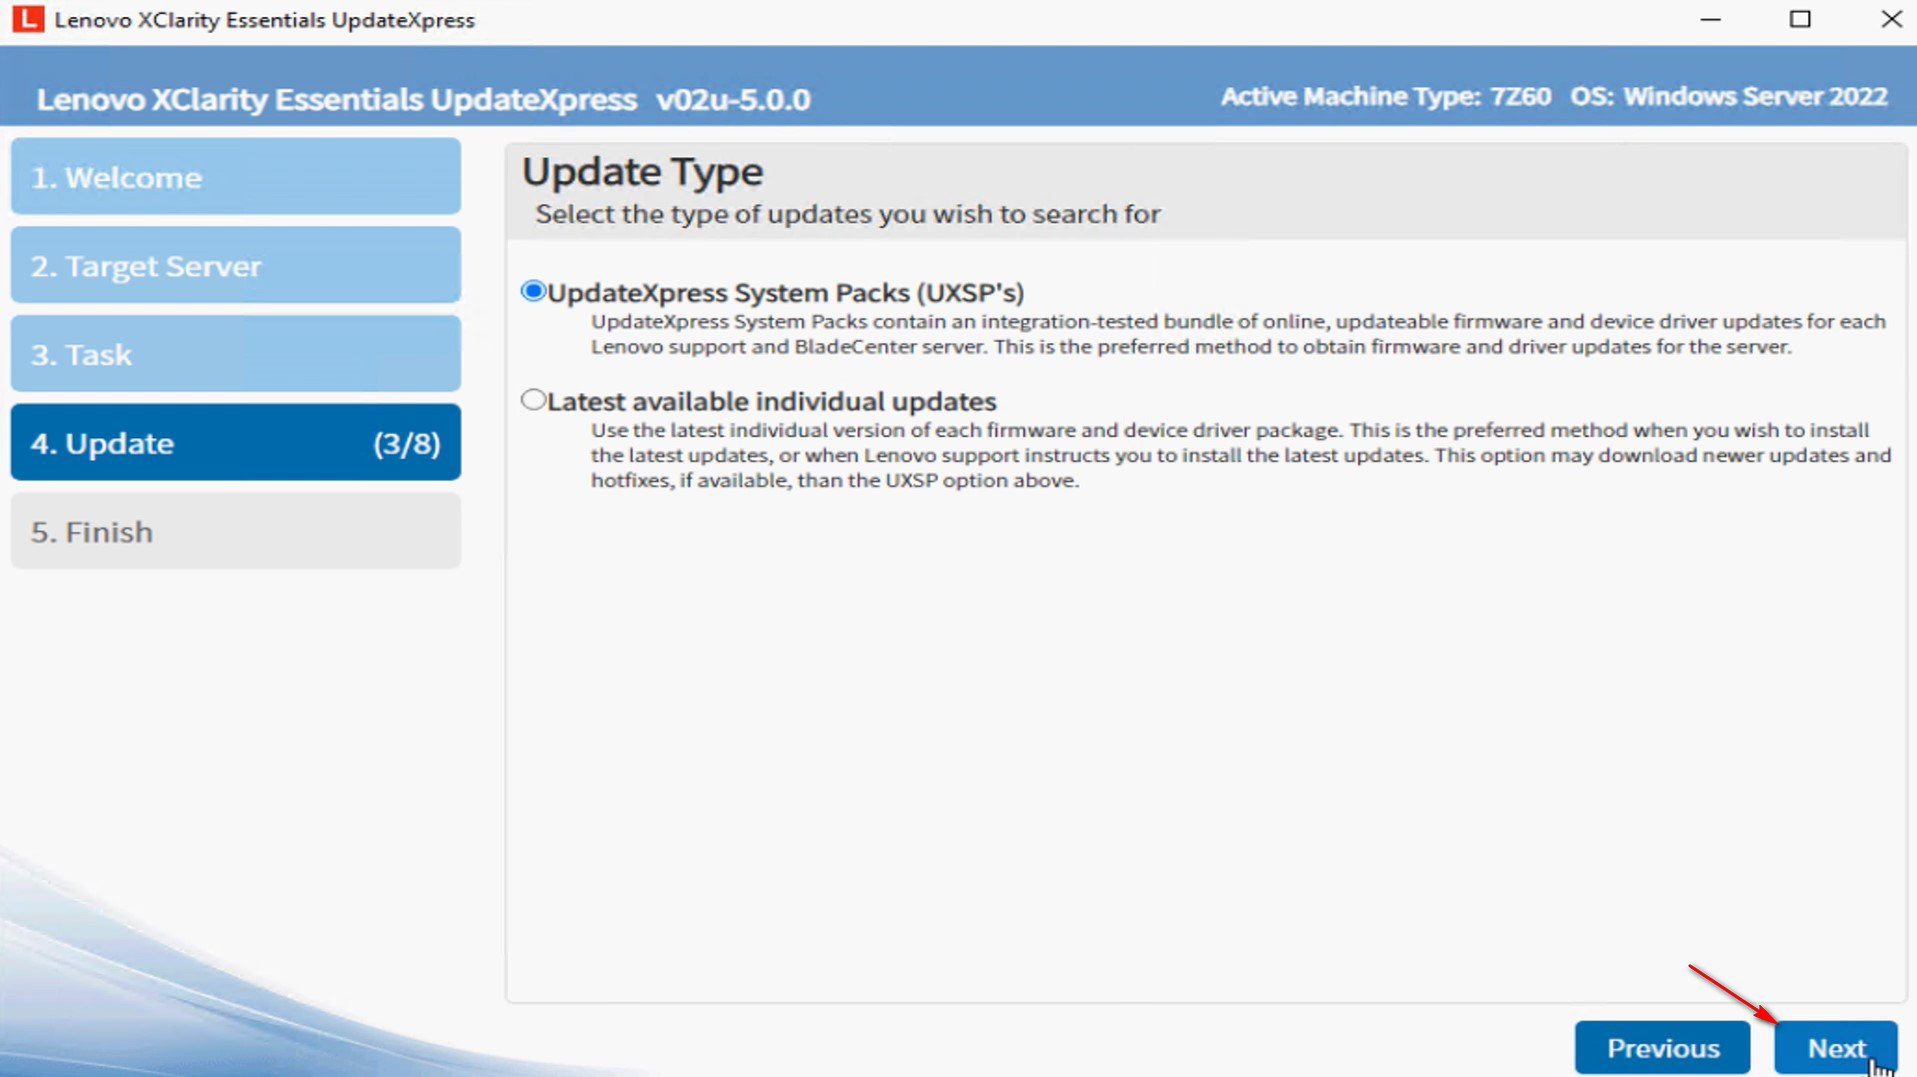
- In the Update Type window, select the update types you want to acquire.
- UpdateXpress System Packs (UXSP’s): This is the preferred method to obtain firmware and driver updates for the server. If you select this option, the Update Selection window will be skipped, and all the UXSP packages will be downloaded.
- Latest available individual updates: This is the preferred method when you want to install the latest updates, or when Lenovo support instructs you to install the latest updates. This option might give you newer updates and hotfixes, depending on their availability, than the UXSP option above. If you select this option, you will need to choose the packages to be downloaded in the next Update Selection window.
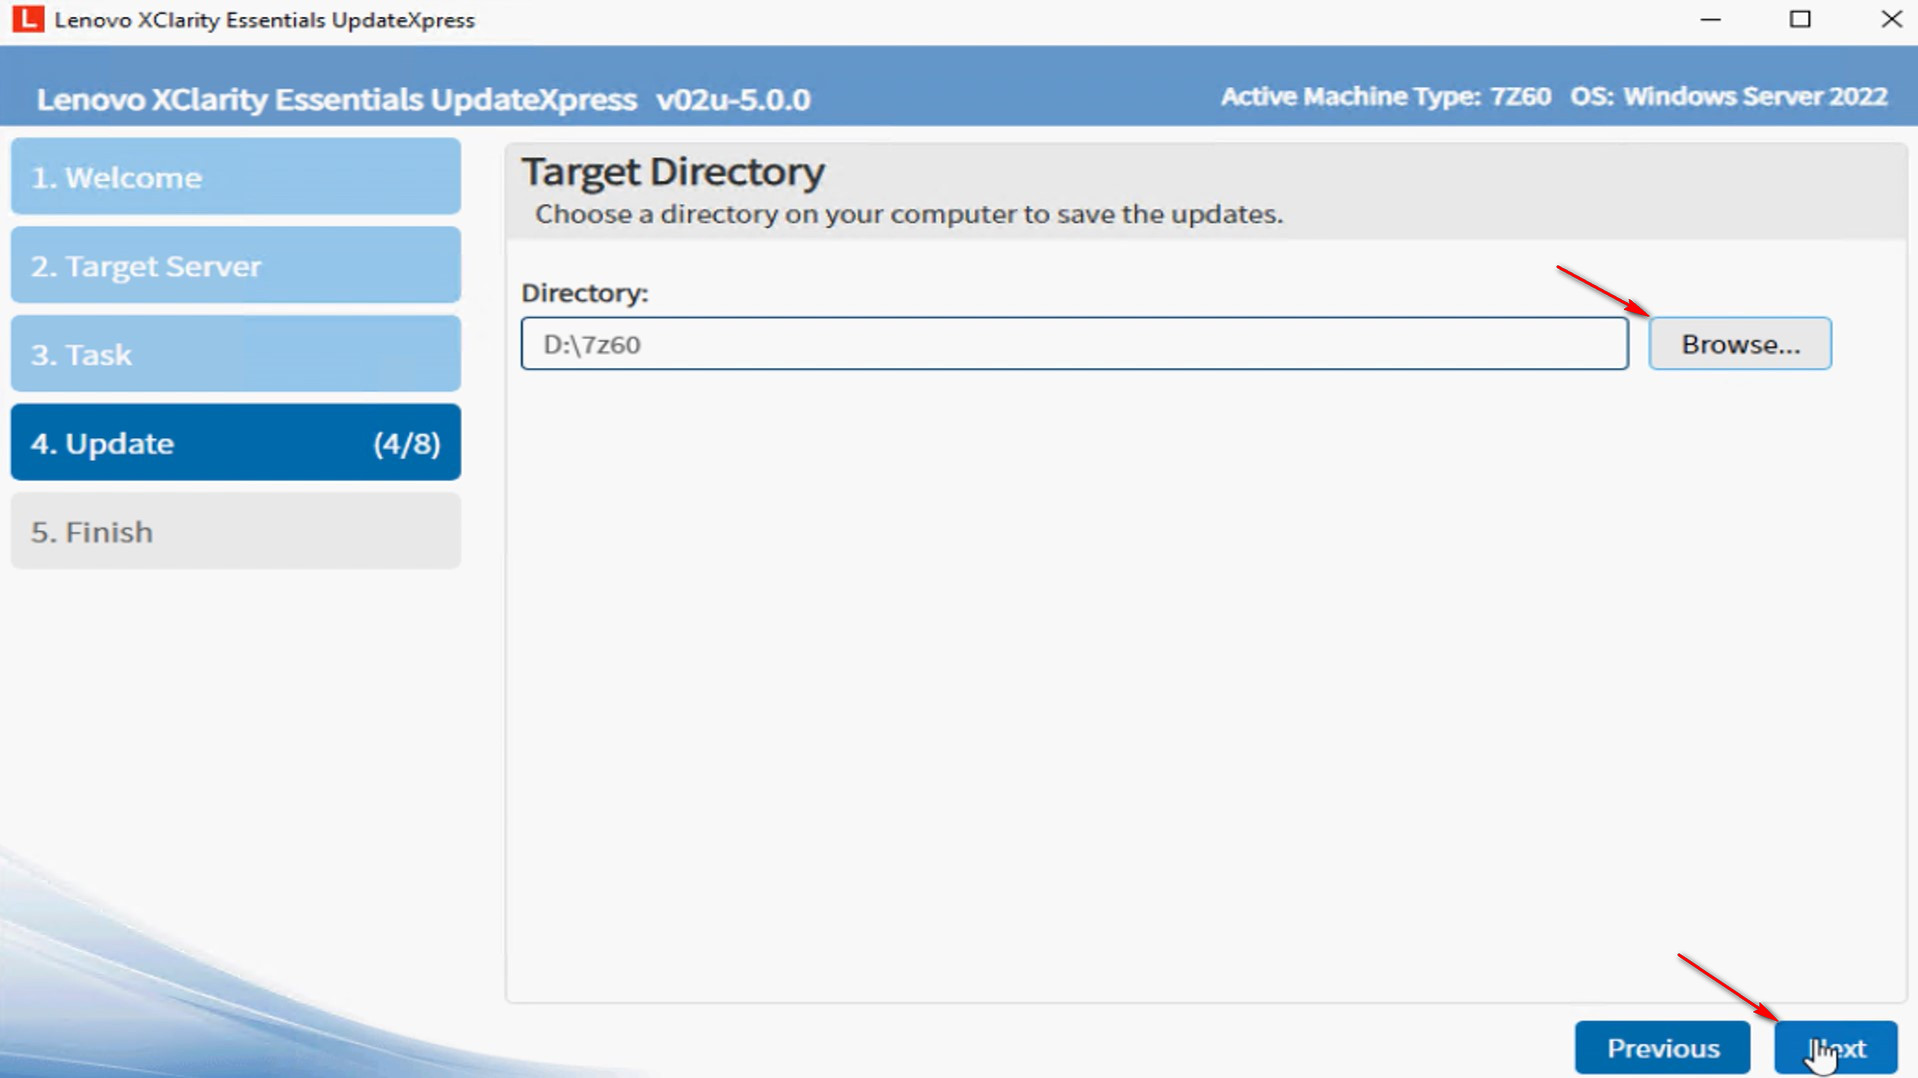
- In the Target Directory window, click Browse to specify which folder you want downloaded updates to be saved in, and then click Next.
- In the Internet Access window, specify proxy information or custom URL security configuration if necessary. You can click Test Connection to test the availability of the proxy or the custom URL settings.
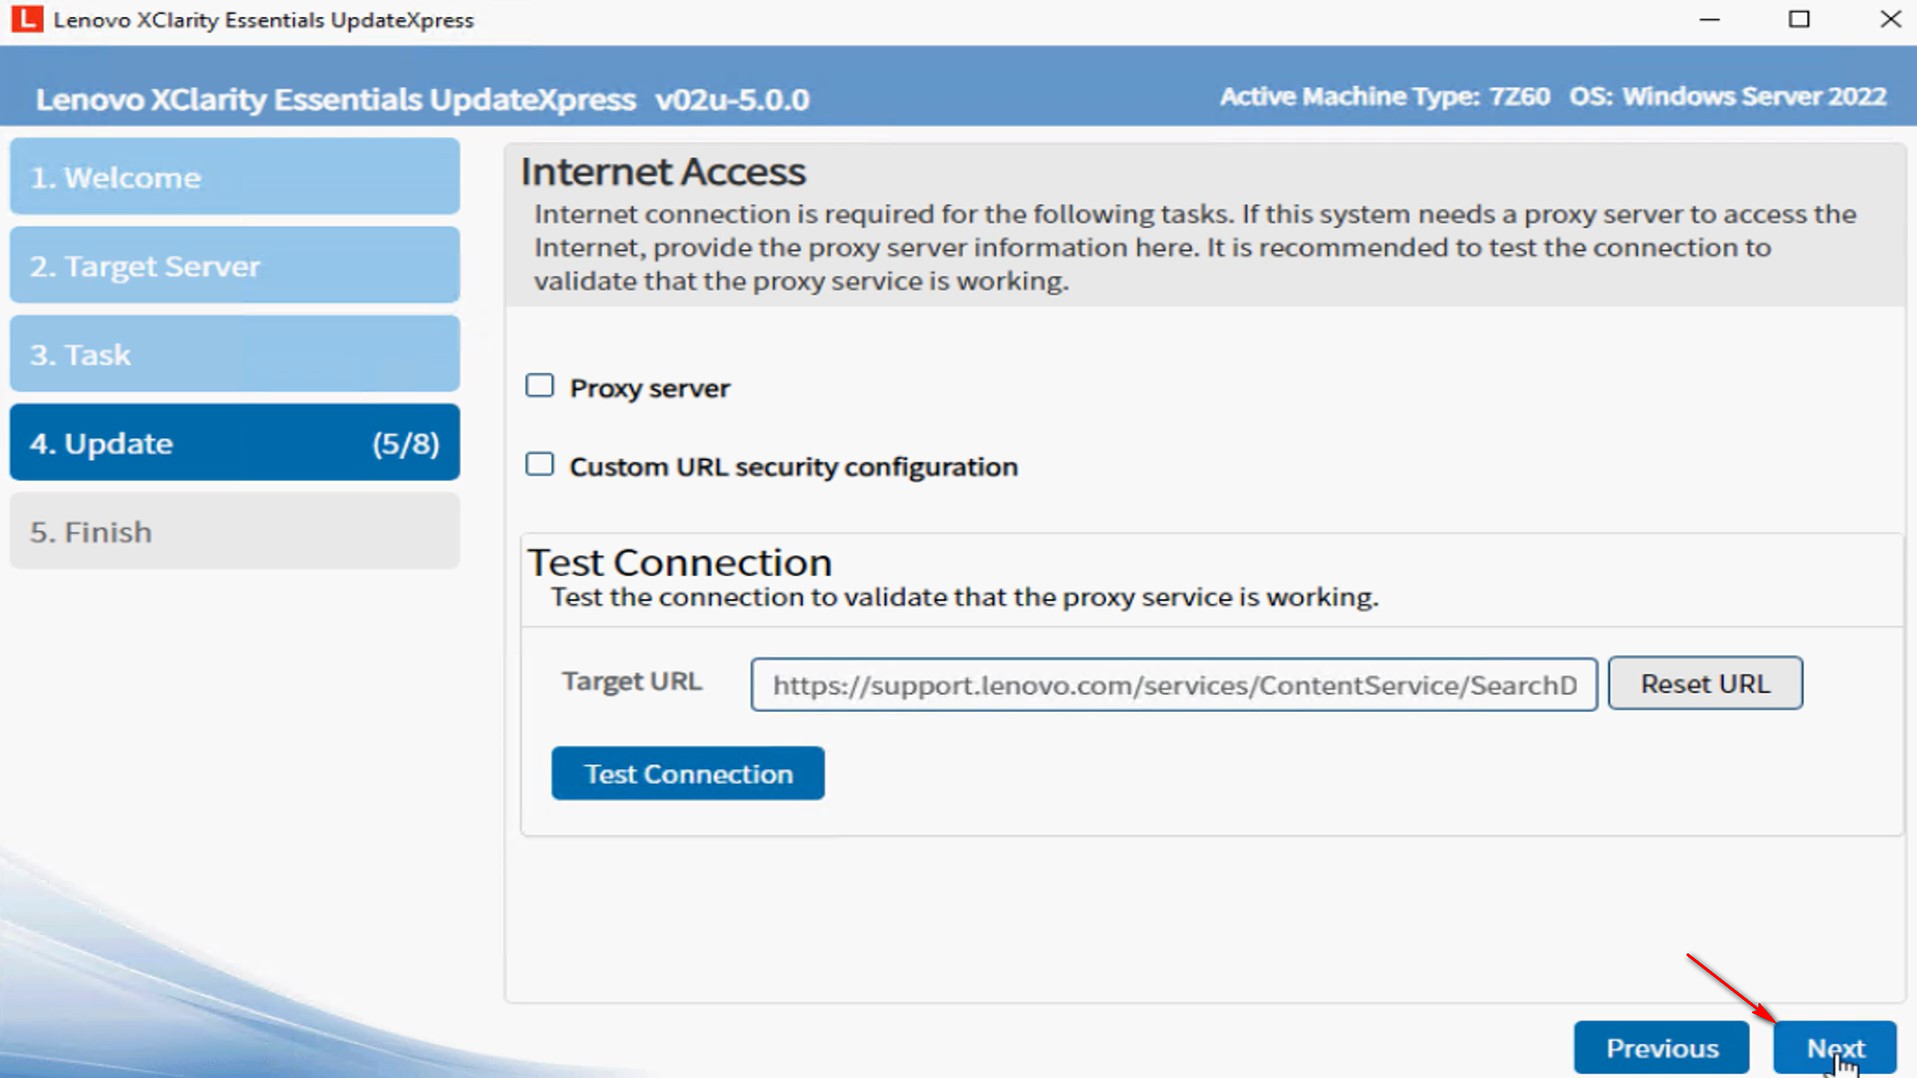
- In the Update Recommendation window, click Begin to acquire updates.
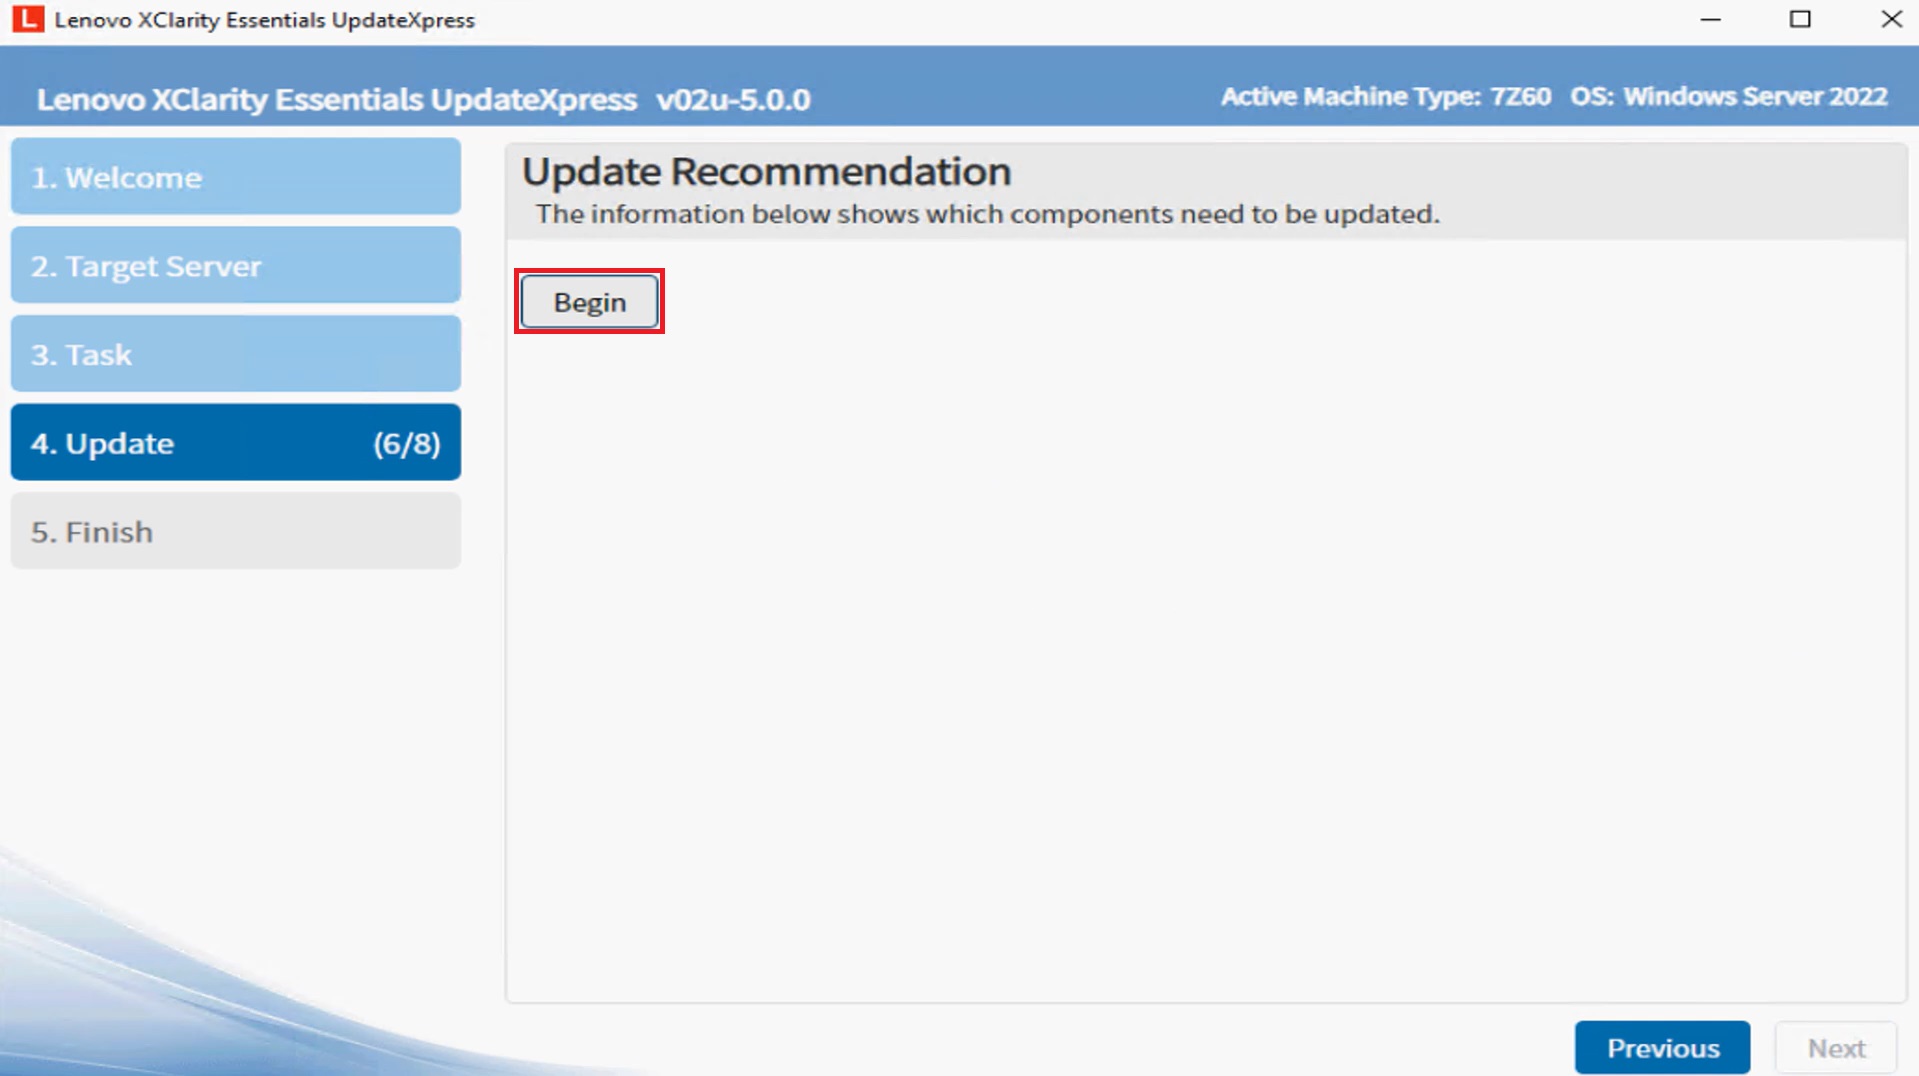
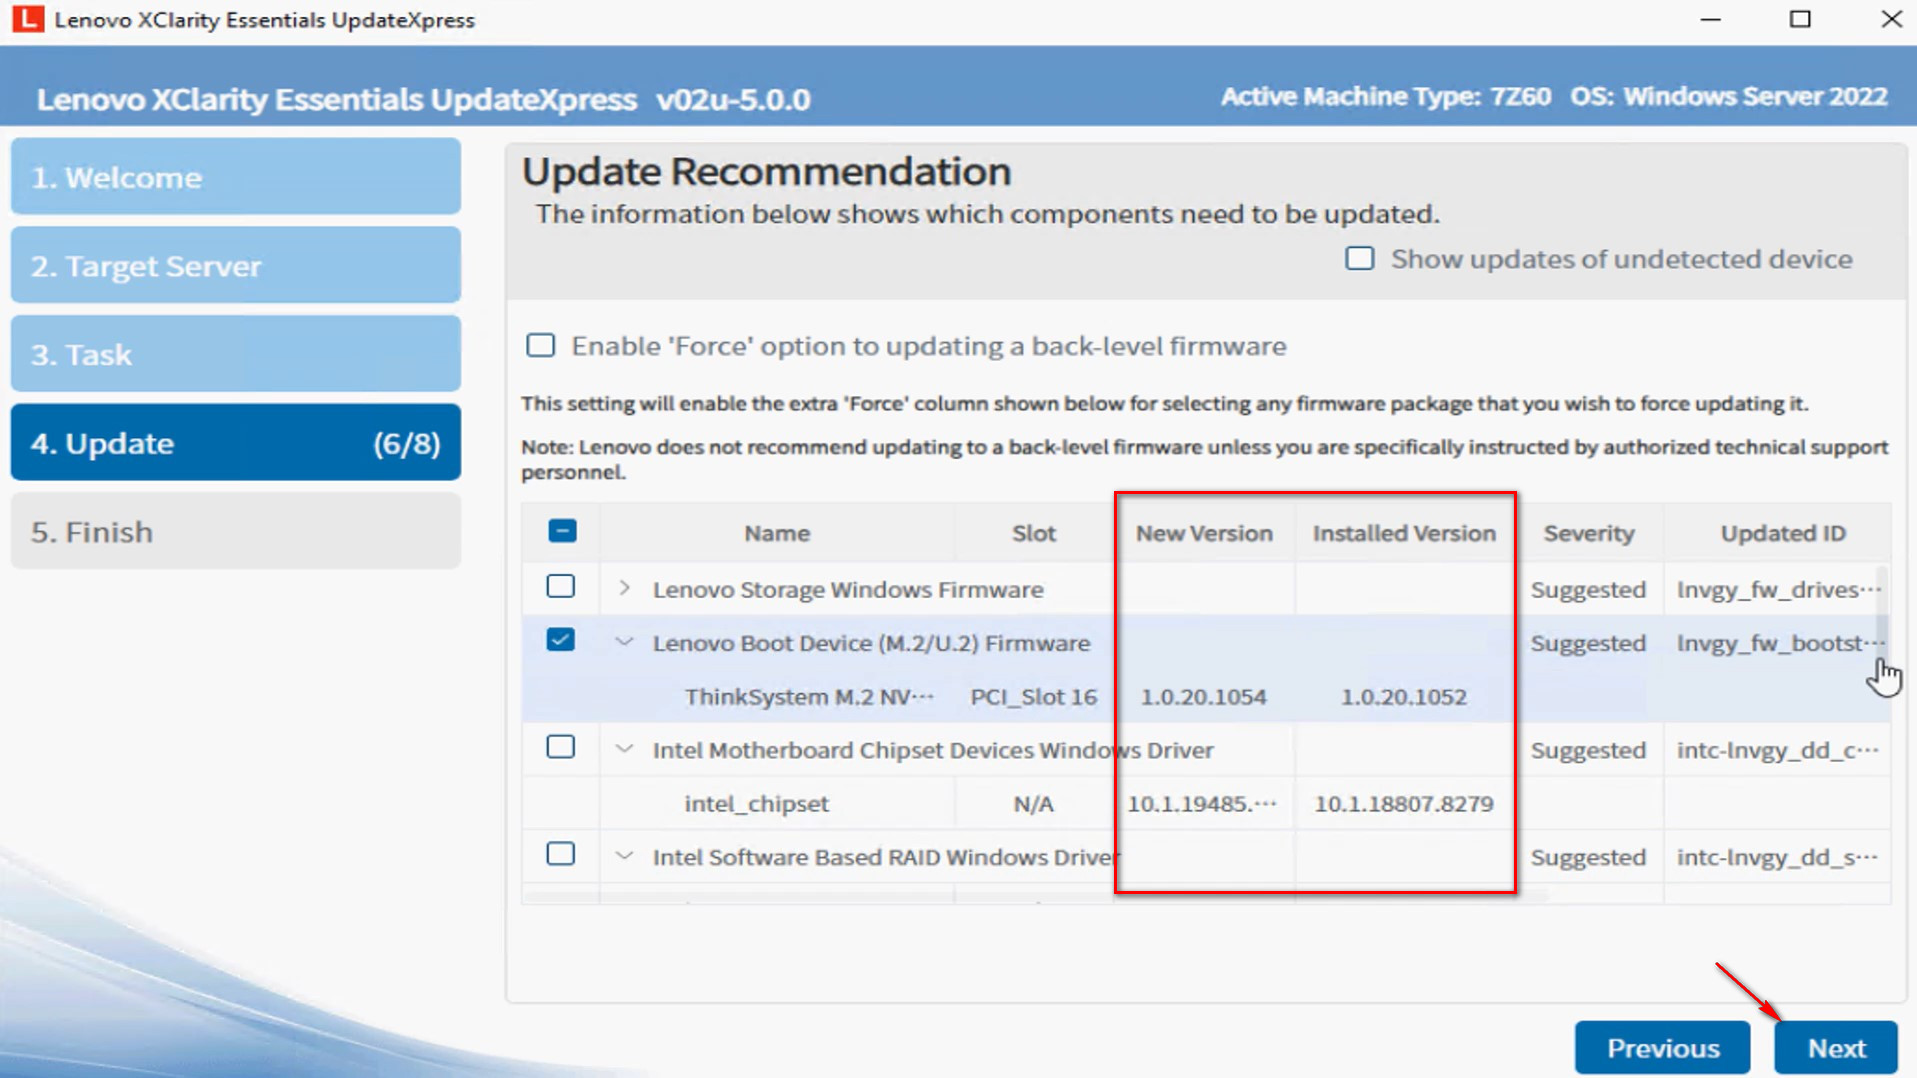
- The utility will list packages, giving details about currently installed component versions and versions now available. Select the packages you want to upgrade and click Next.
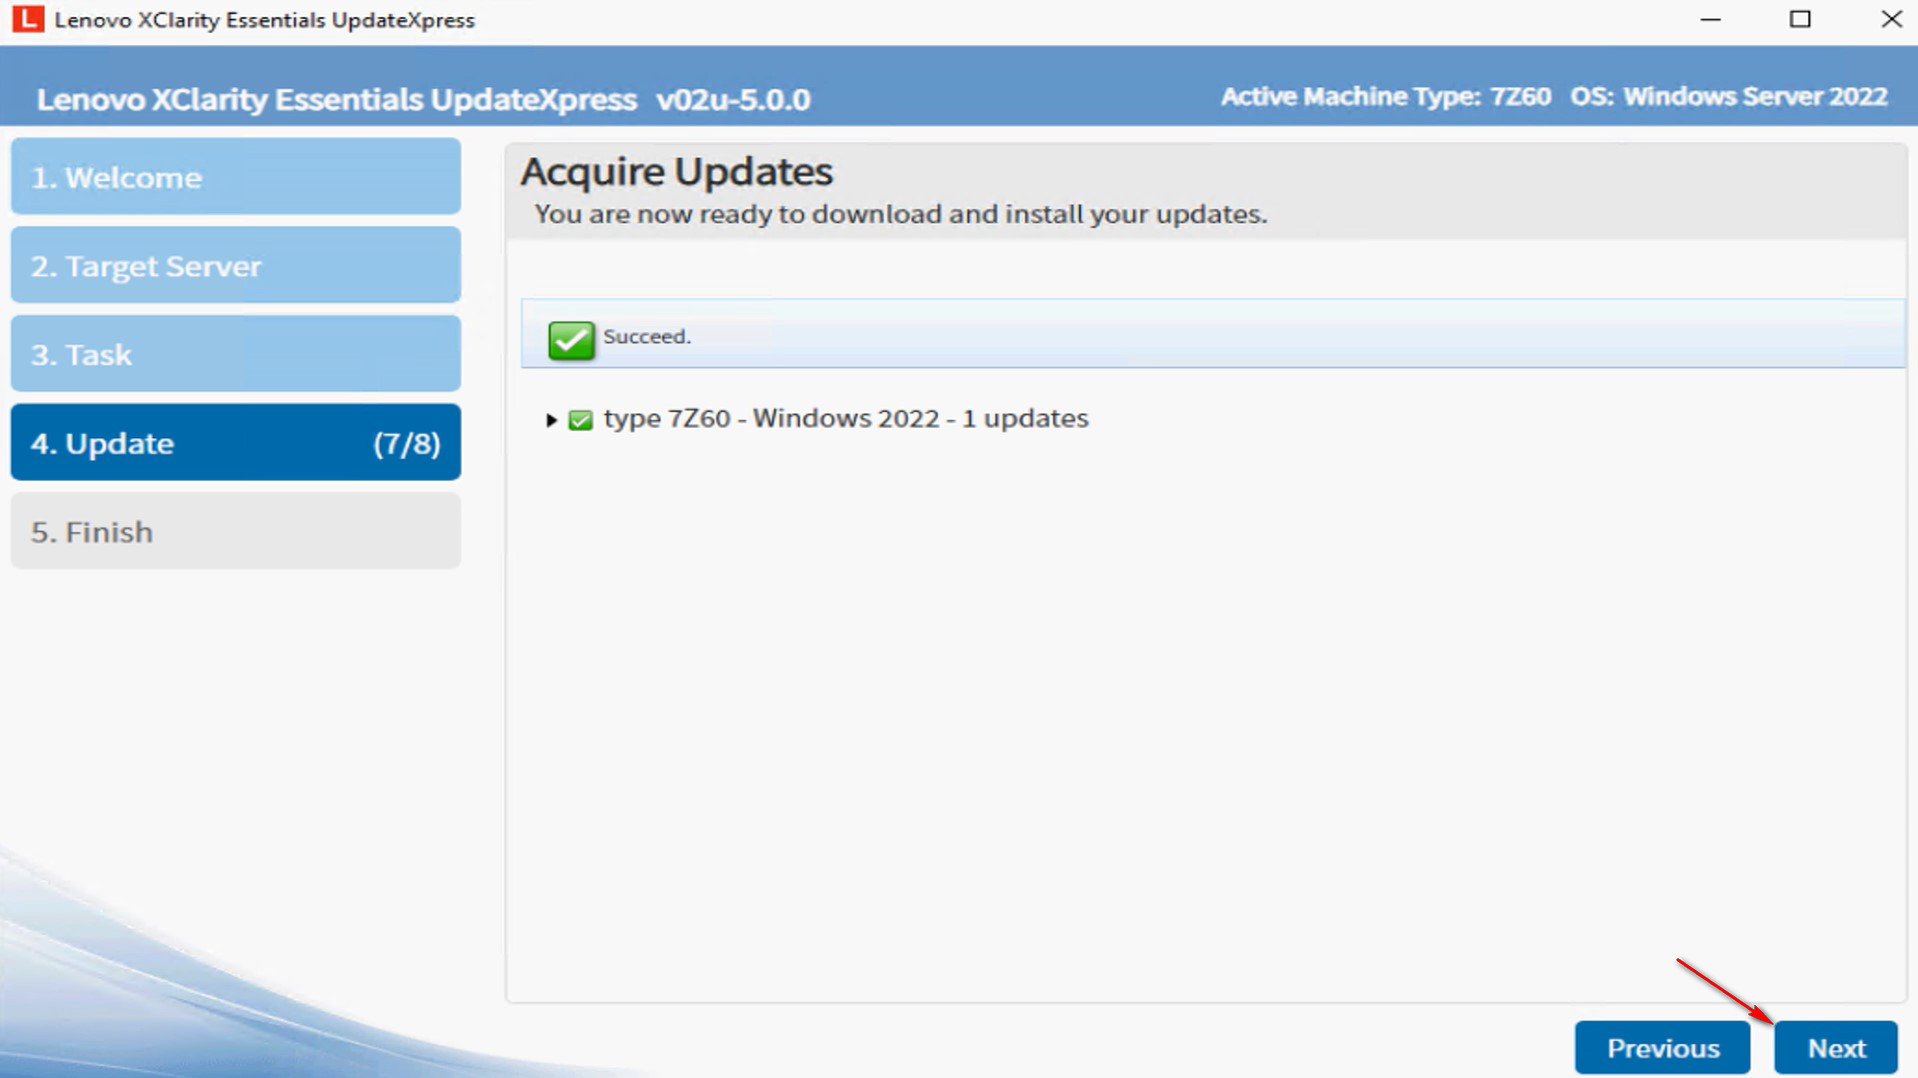
- In the Acquire Updates window, a download progress bar will be displayed. When the downloads are complete, click Next.
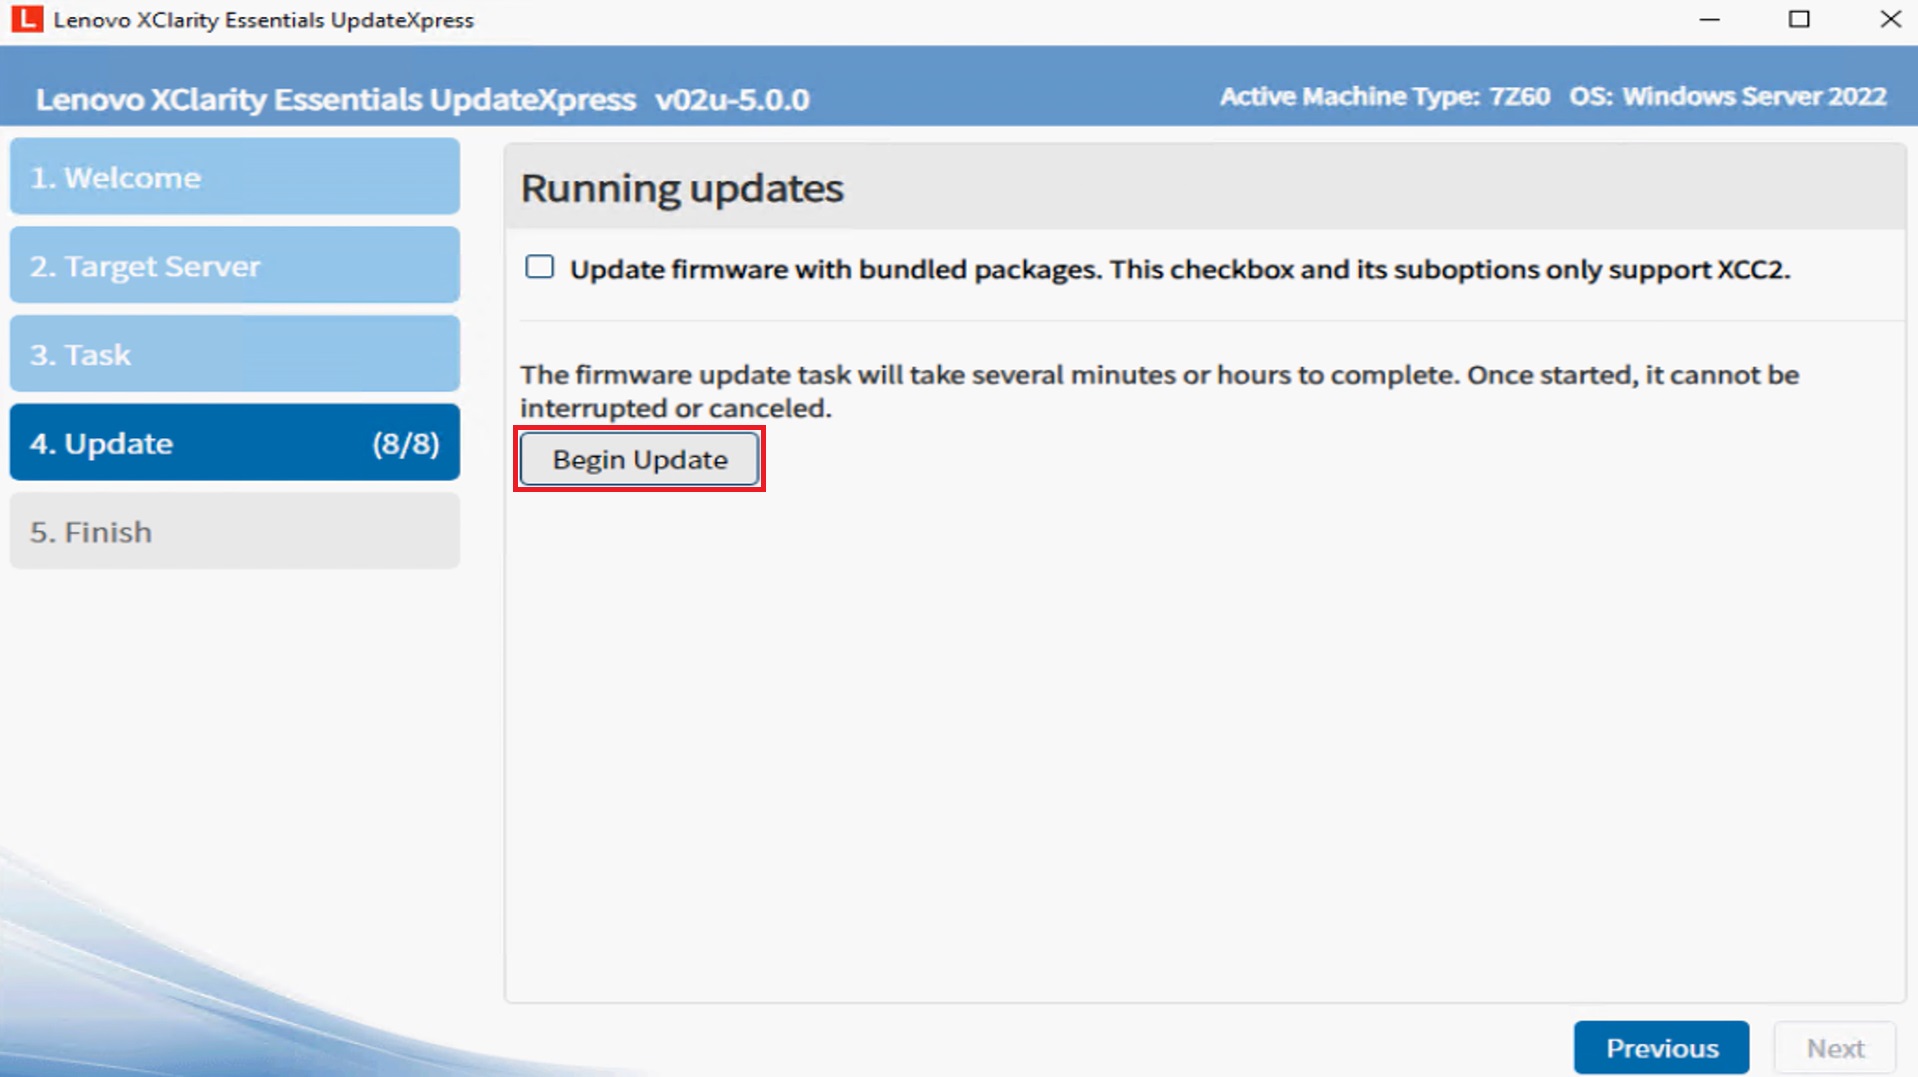
- In the Running updates window, click Begin Update to start updating the packages. Optionally choose Update firmware with bundle packages if the target server supports XCC2.
 .
.
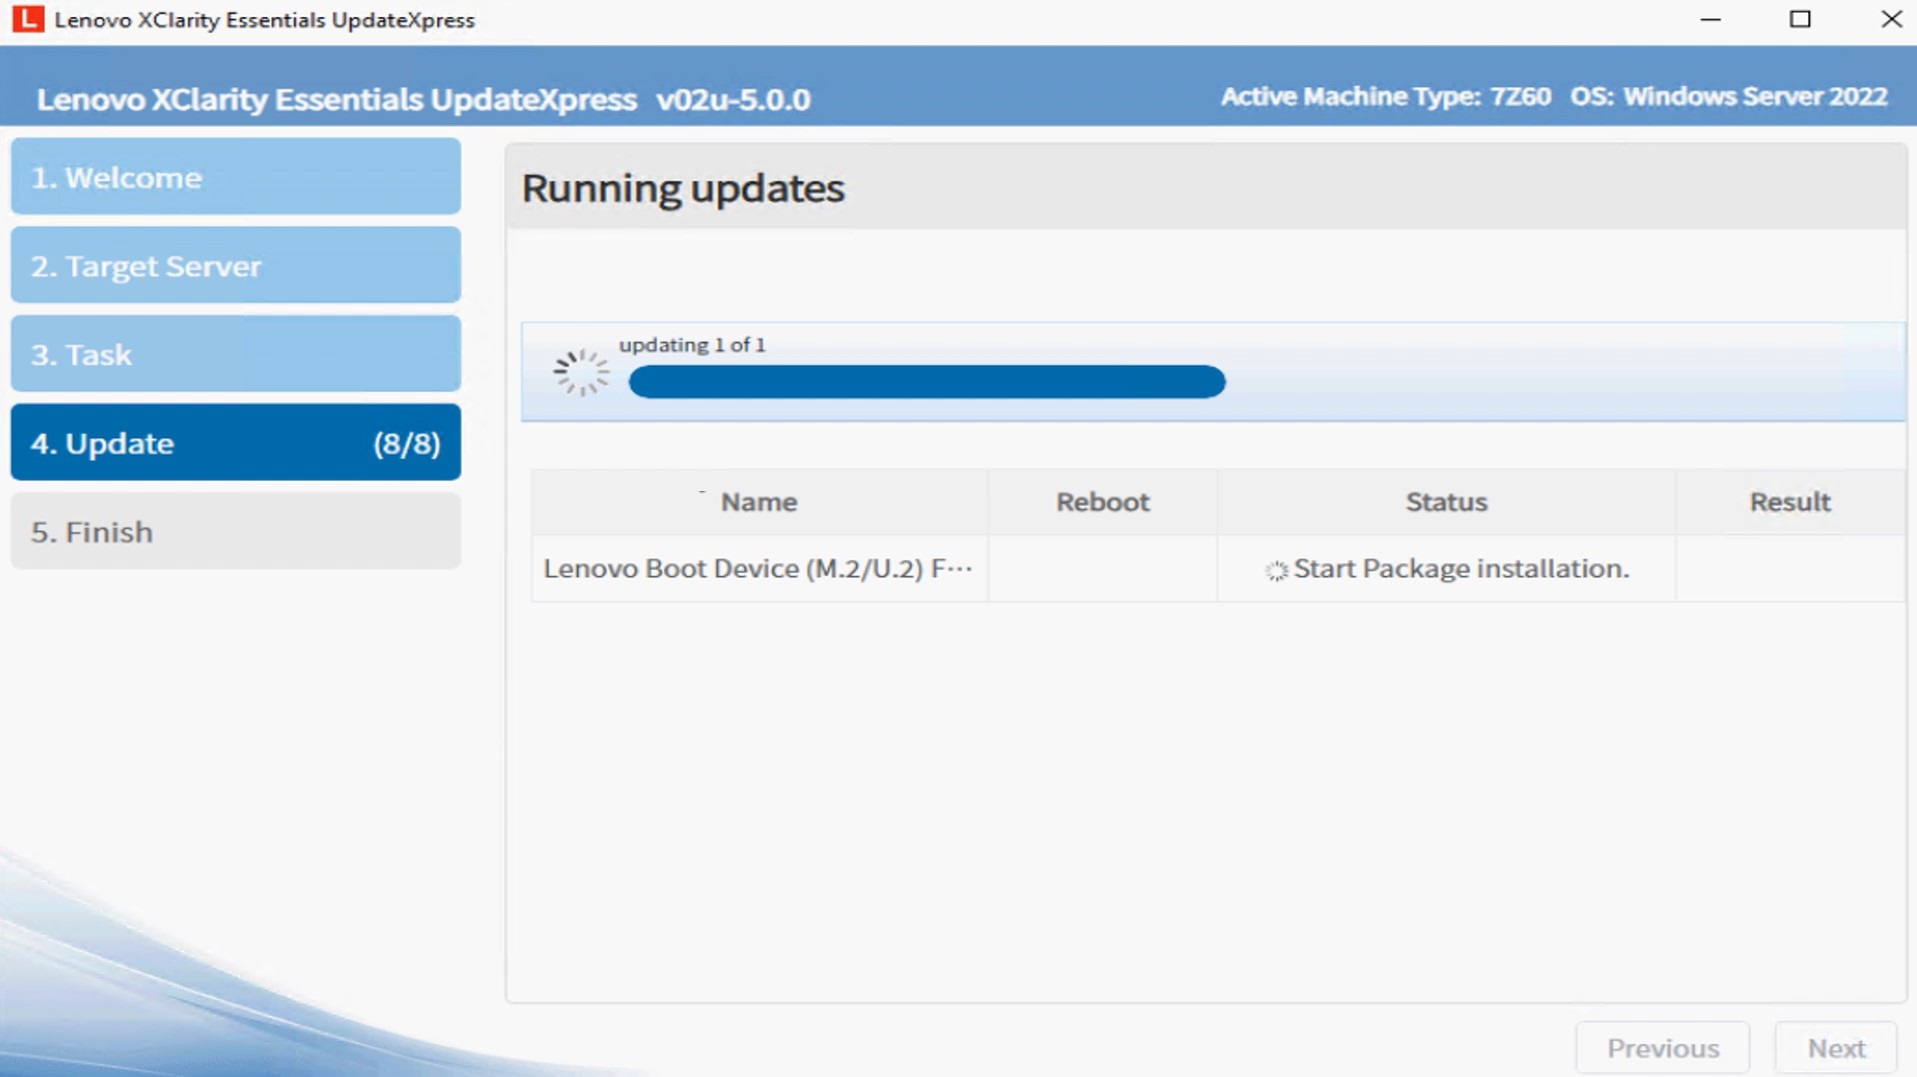
- The execution table displays the package's upgrade progress.
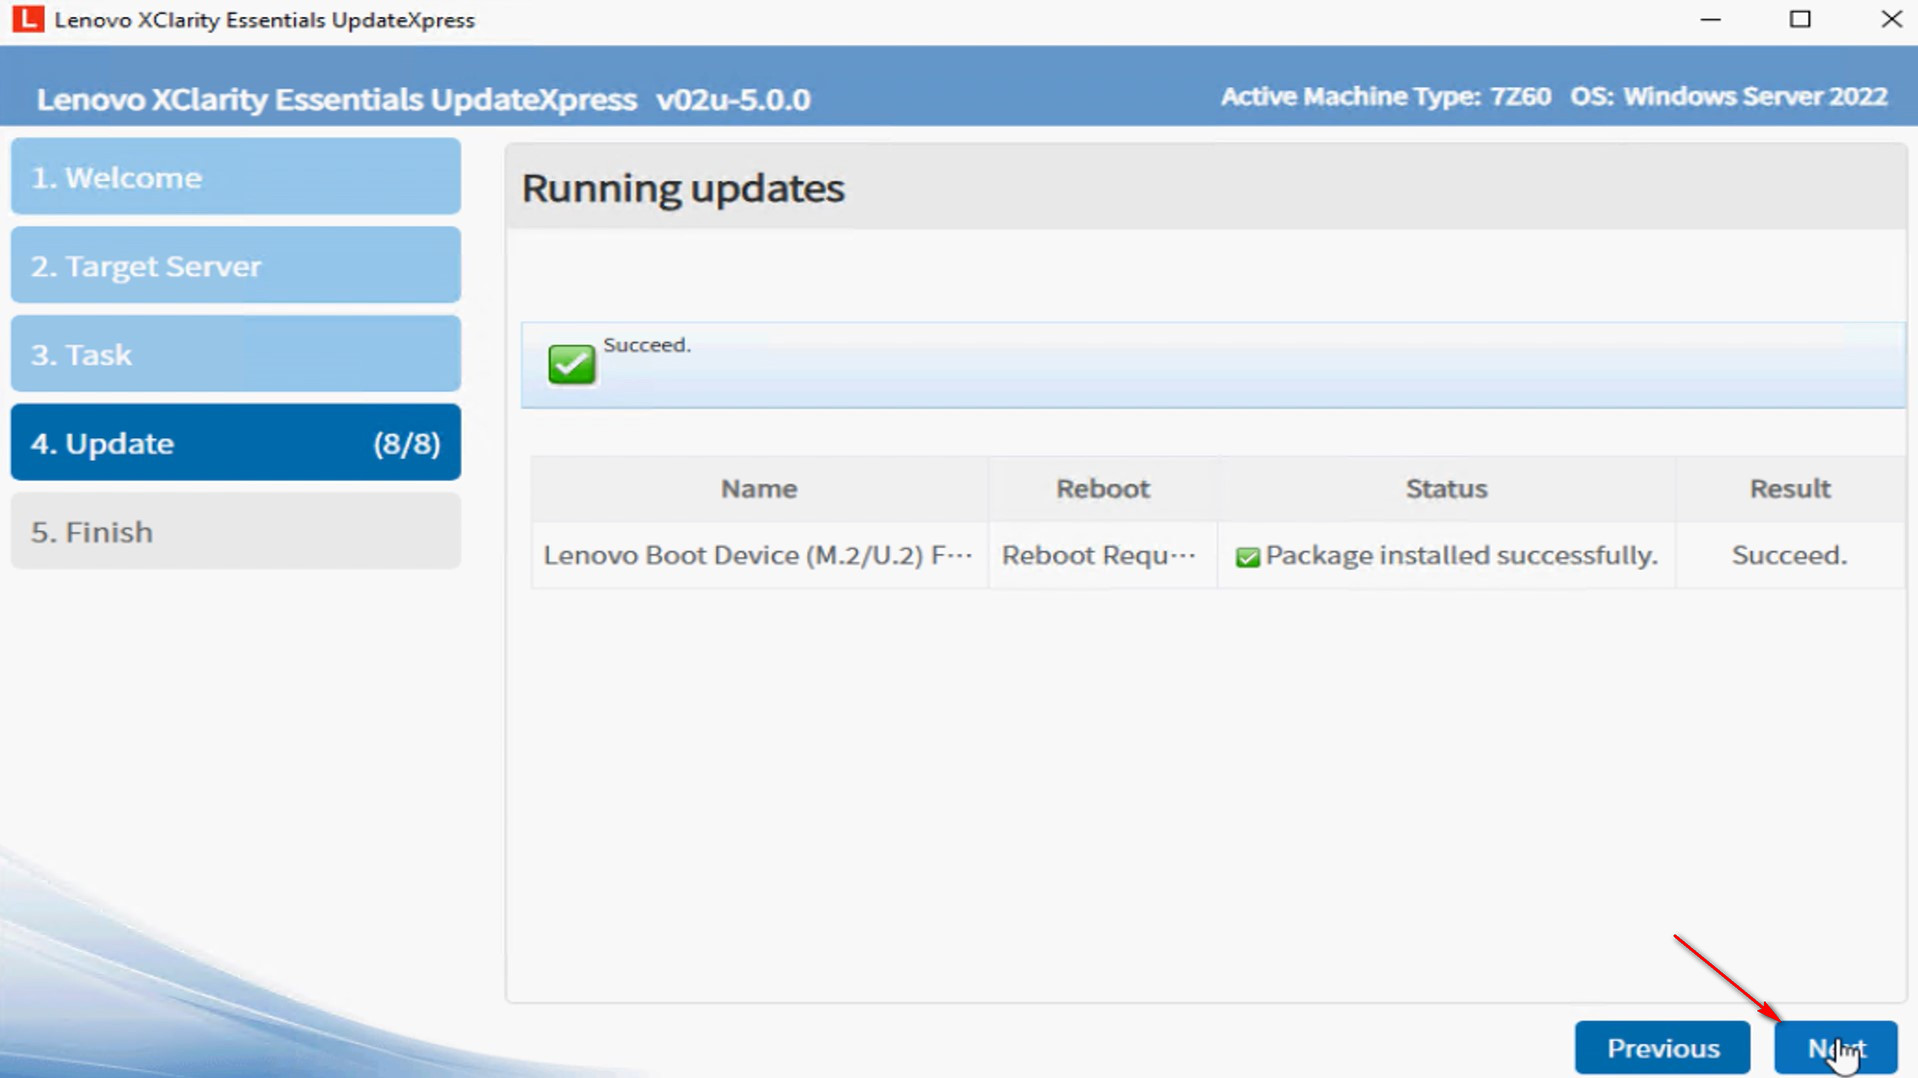
- When the upgrade progress is completed, click Next.
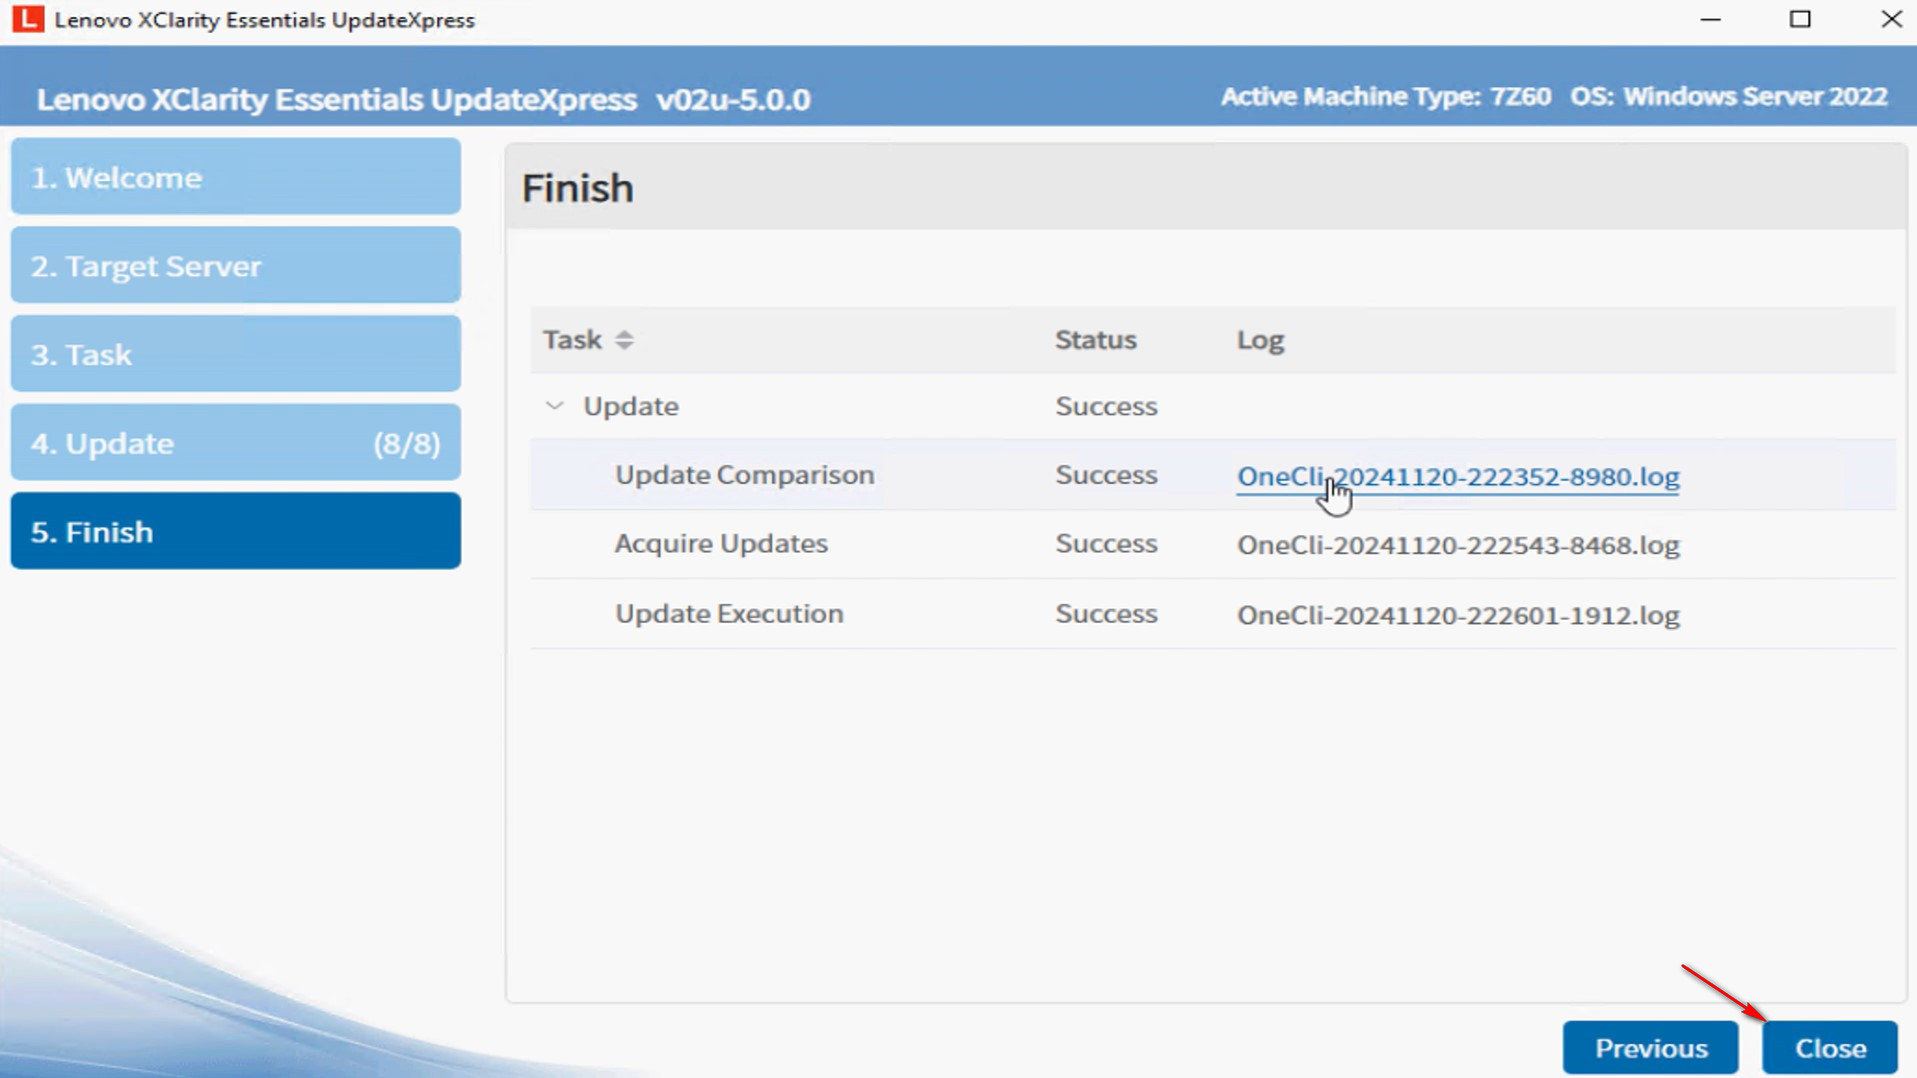
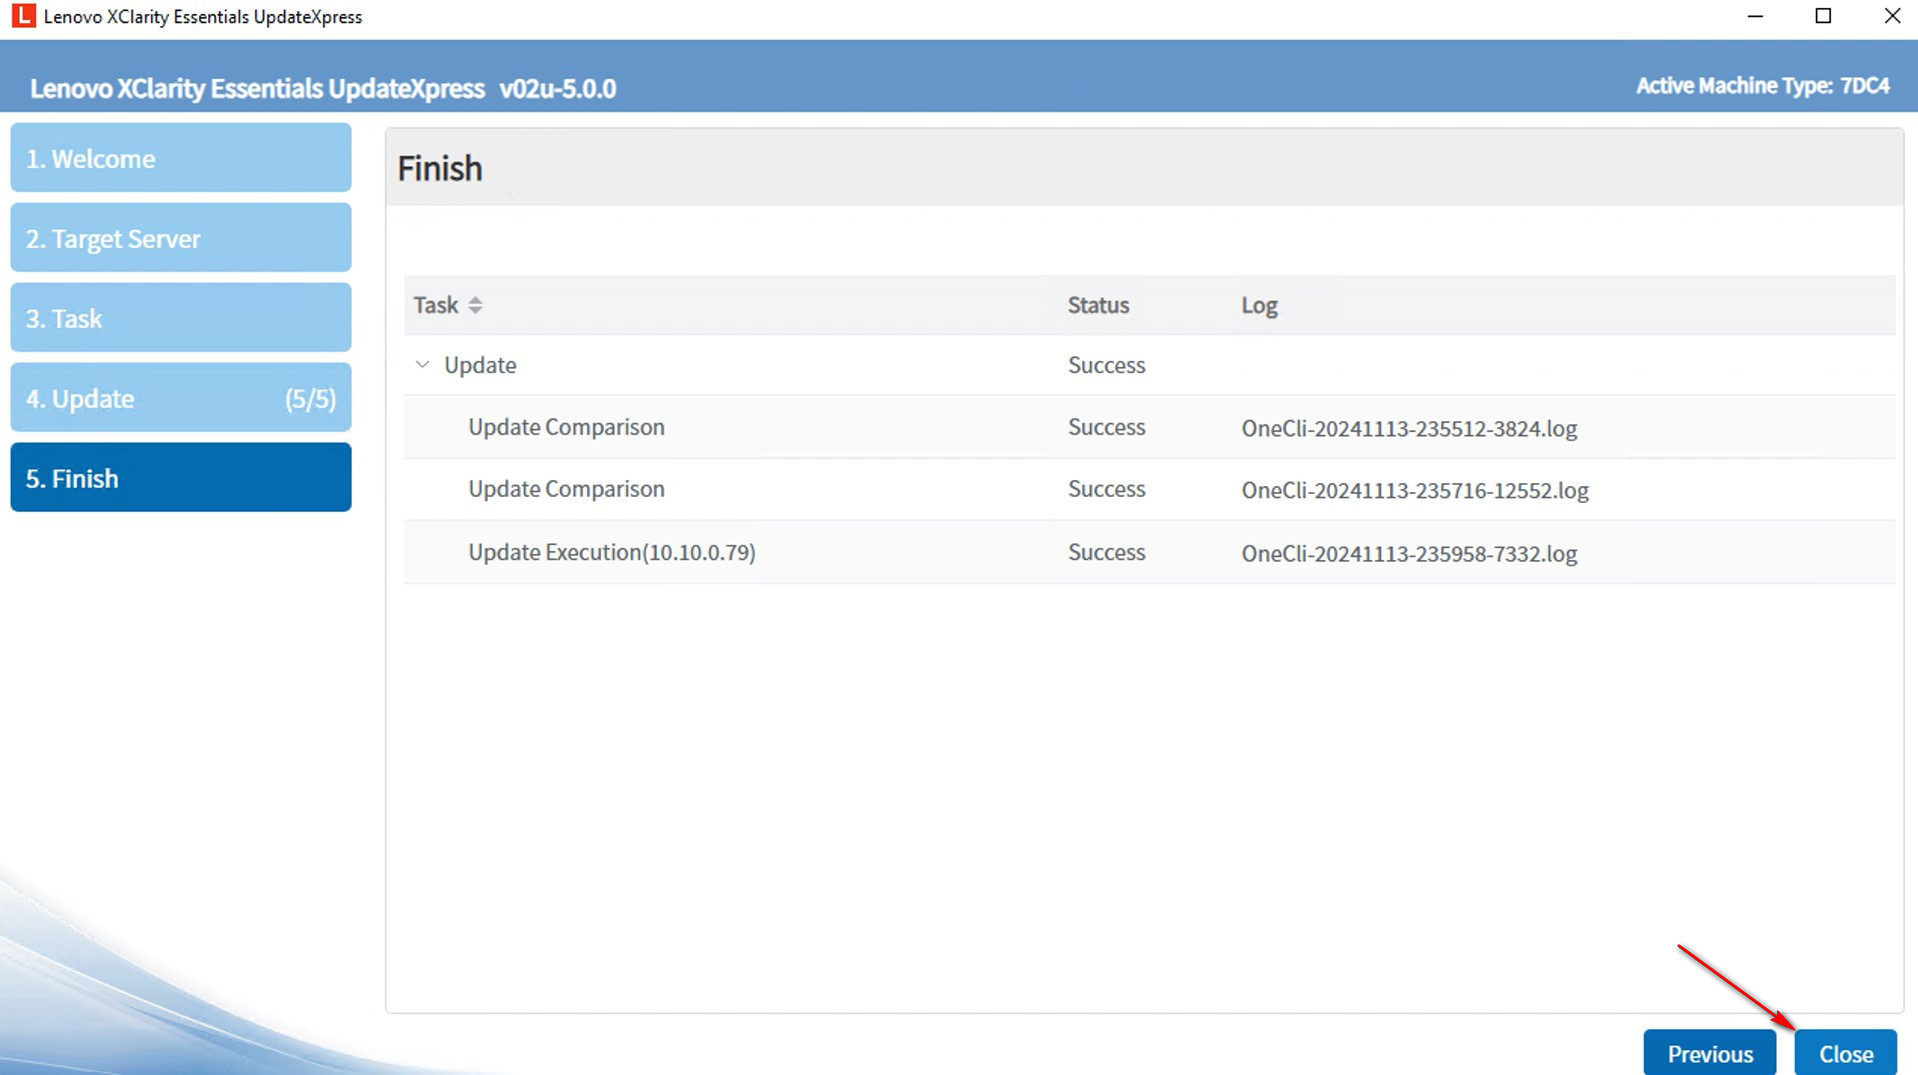
- In the Finish window, click the logs to check the upgrade log and click Close to exit.
Update a remote machine from the Lenovo Support site
In this video, we will show you how to use the LXCE UpdateXpress to update a remote machine from the Lenovo Support page.
If you prefer written instructions, work through the following steps:
- In the Welcome window, click Next.

- In the Target Server window, select Manage the remote server and enter the BMC connection settings. Click Next.
BMC Setting
- IP address or Hostname: The BMC IP address or hostname of the target system
- User Name: The BMC user name of the target system
- Password: The BMC password for the target system
- CIM port: The BMC port number - if you do not input a port number, the default port will be used
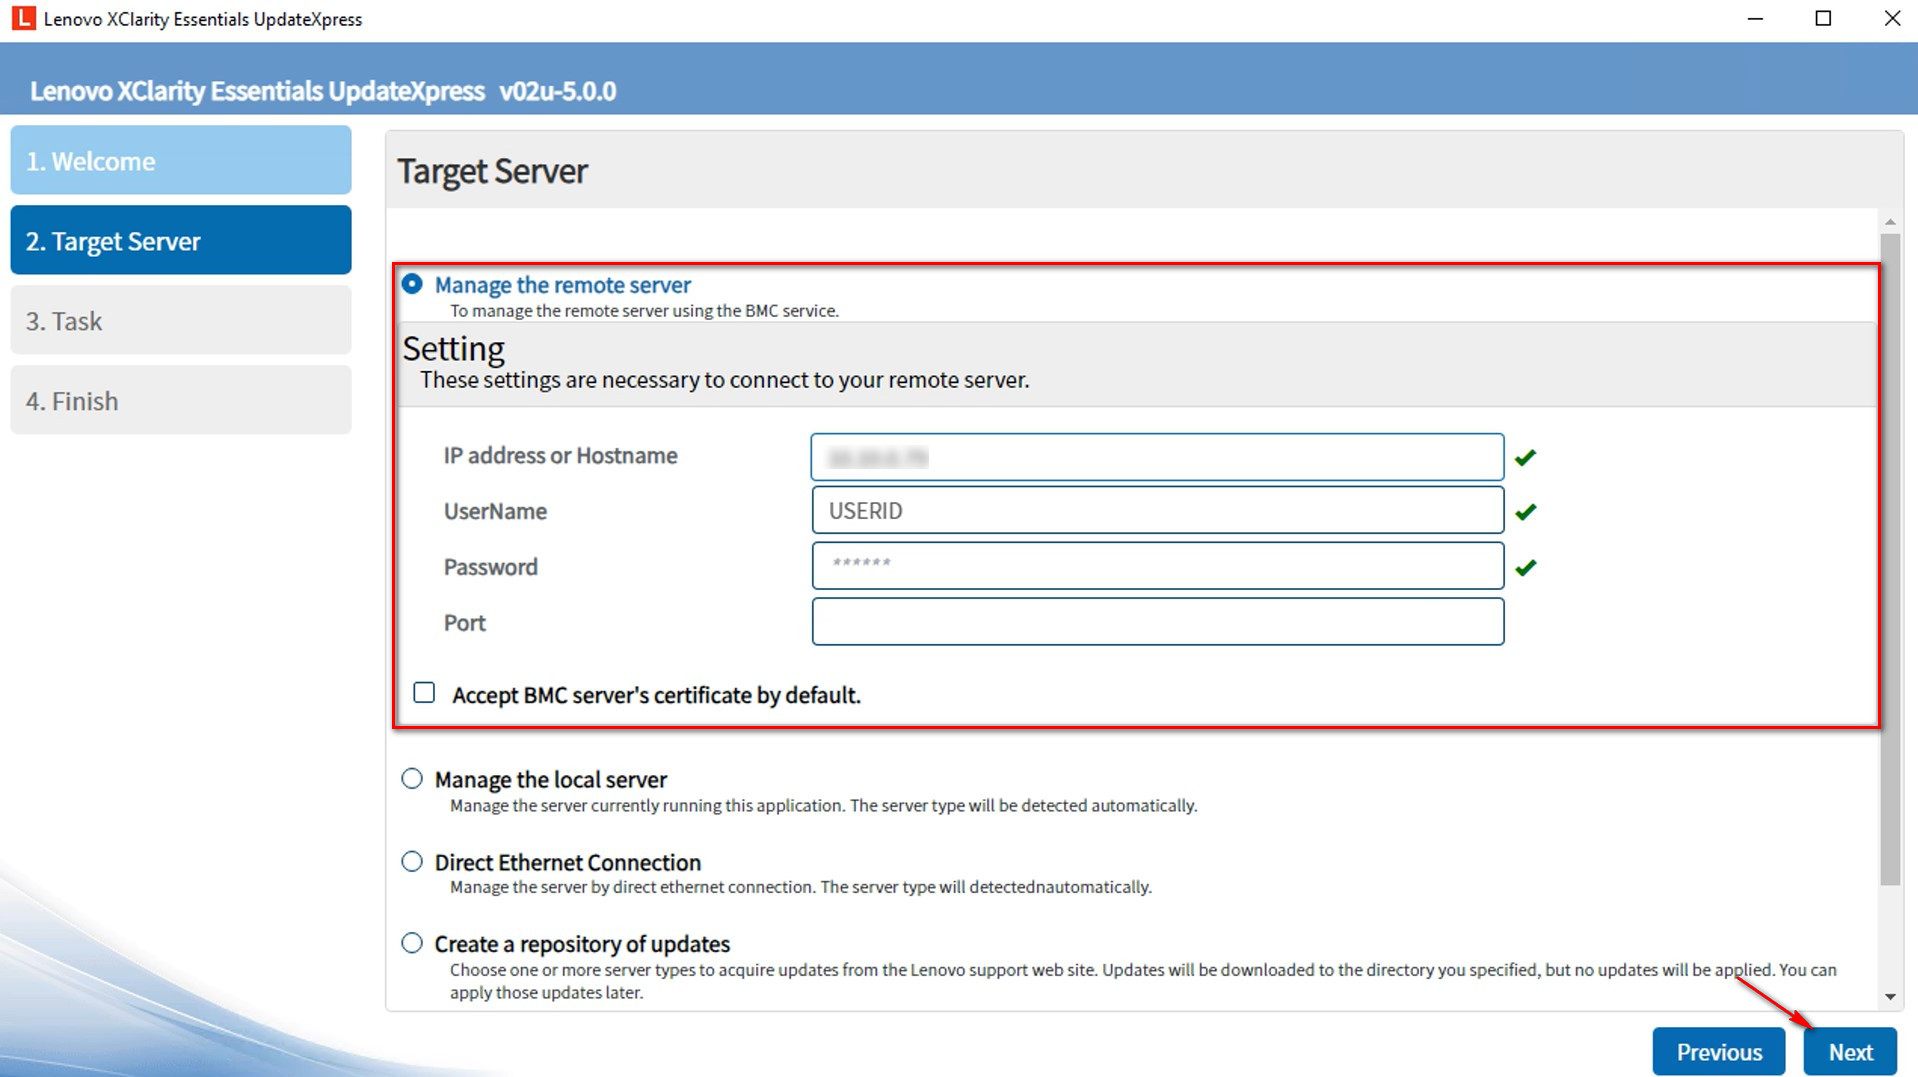
Note: If you do not want to check the BMC server’s certificate, select the Accept BMC server's certificate by default checkbox, and then click Next.
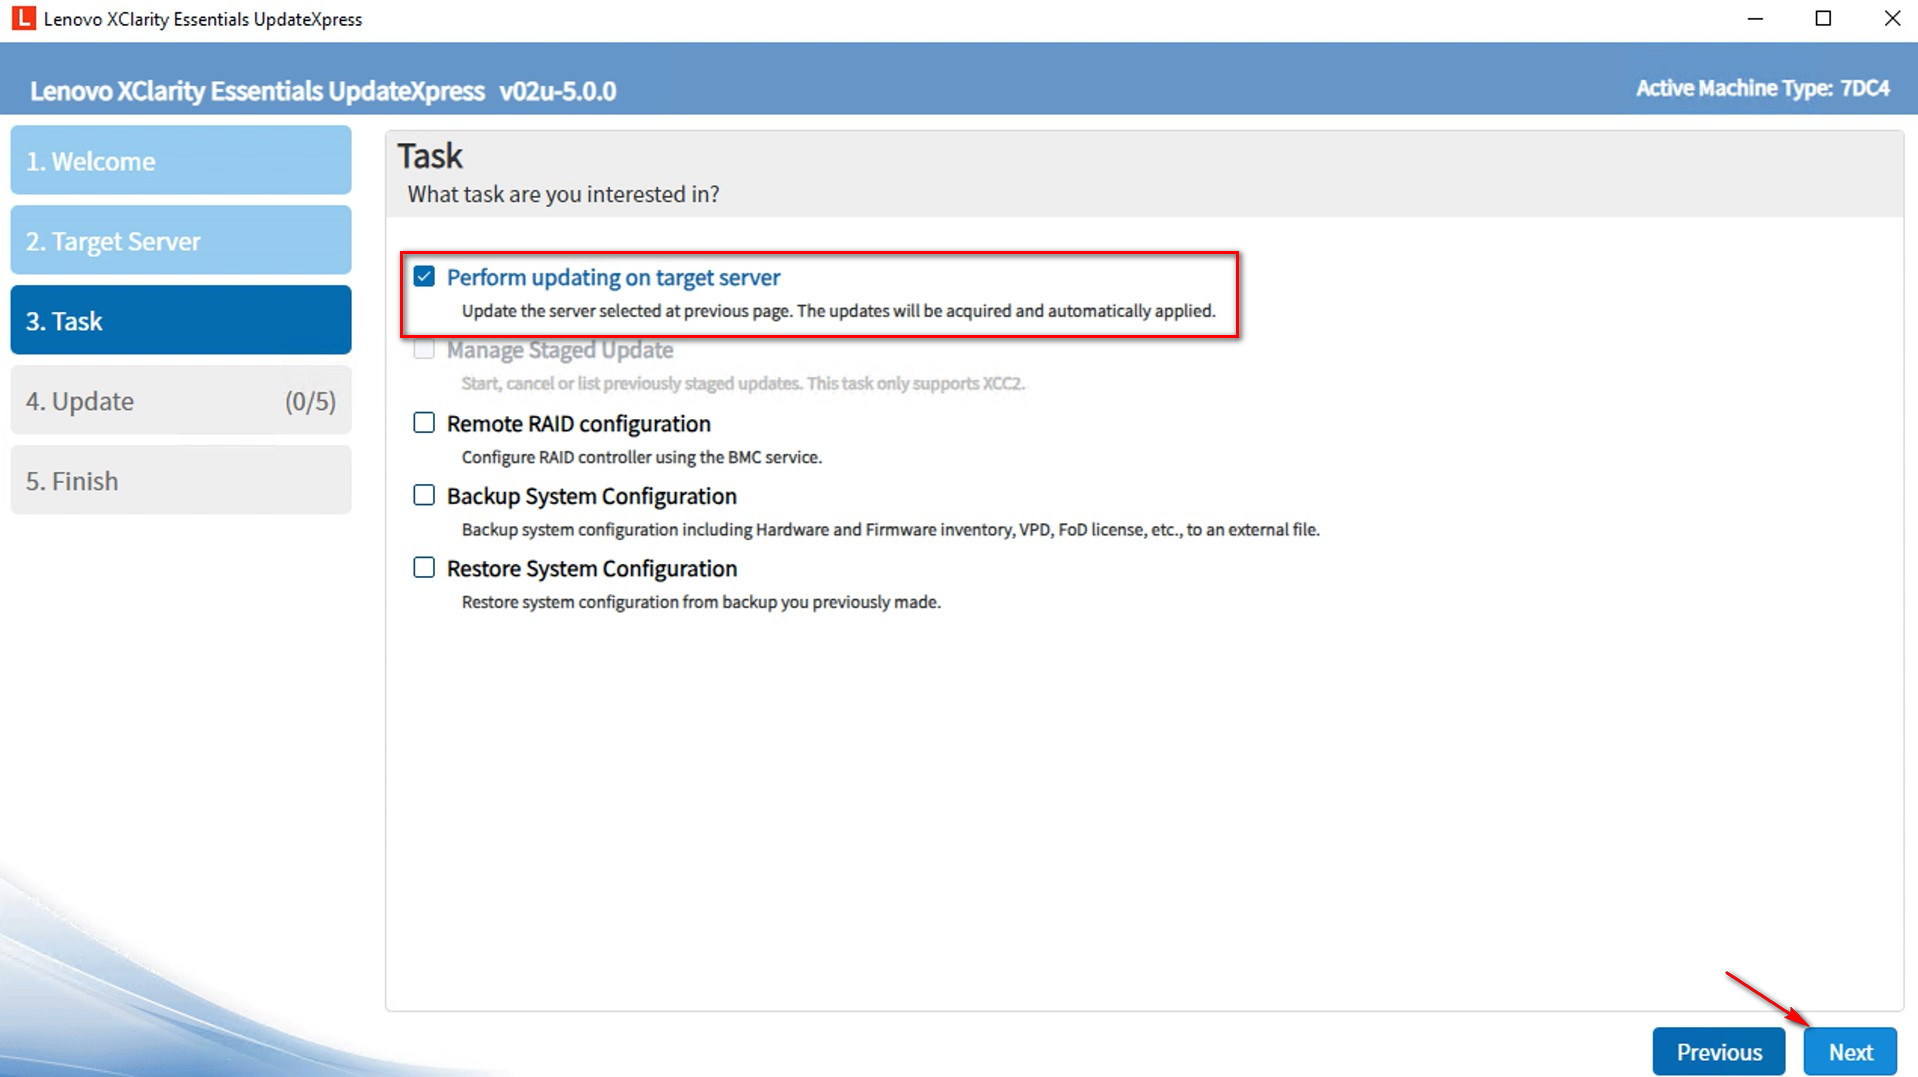
- In the Task window, select Perform updating on the target server. Click Next.
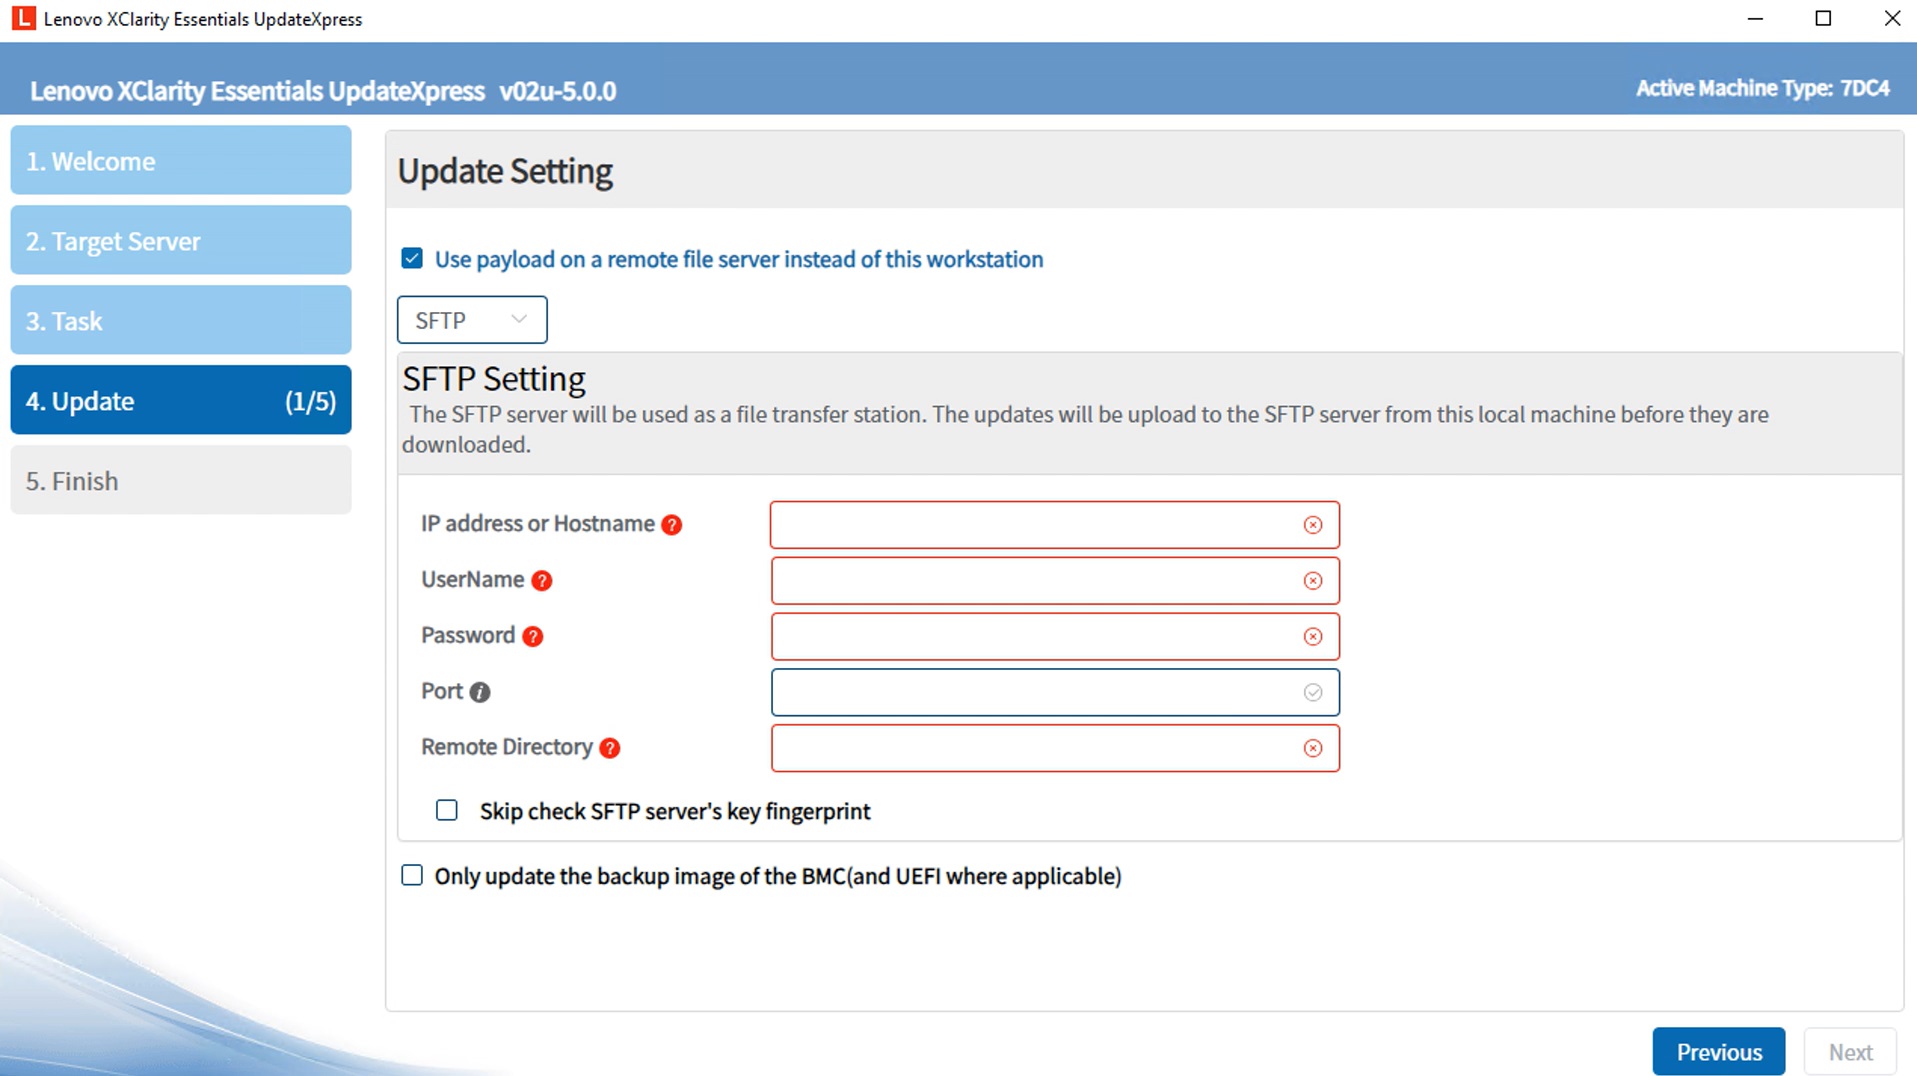
- In the Update Setting window, select one or more of the options.
- To use a separate remote server instead of BMC one is selected, enter the following information:
SFTP/HTTP/HTTPS/FTP Setting- IP address or Hostname: The IP address or hostname of the server
- User Name: The user name of the server
- Password: The password of the server
- Port: The port number of the server - if you do not input a port number, the default port will be used
- Remote Directory: Input a full path on the server where update packages were saved, for example, /upload.
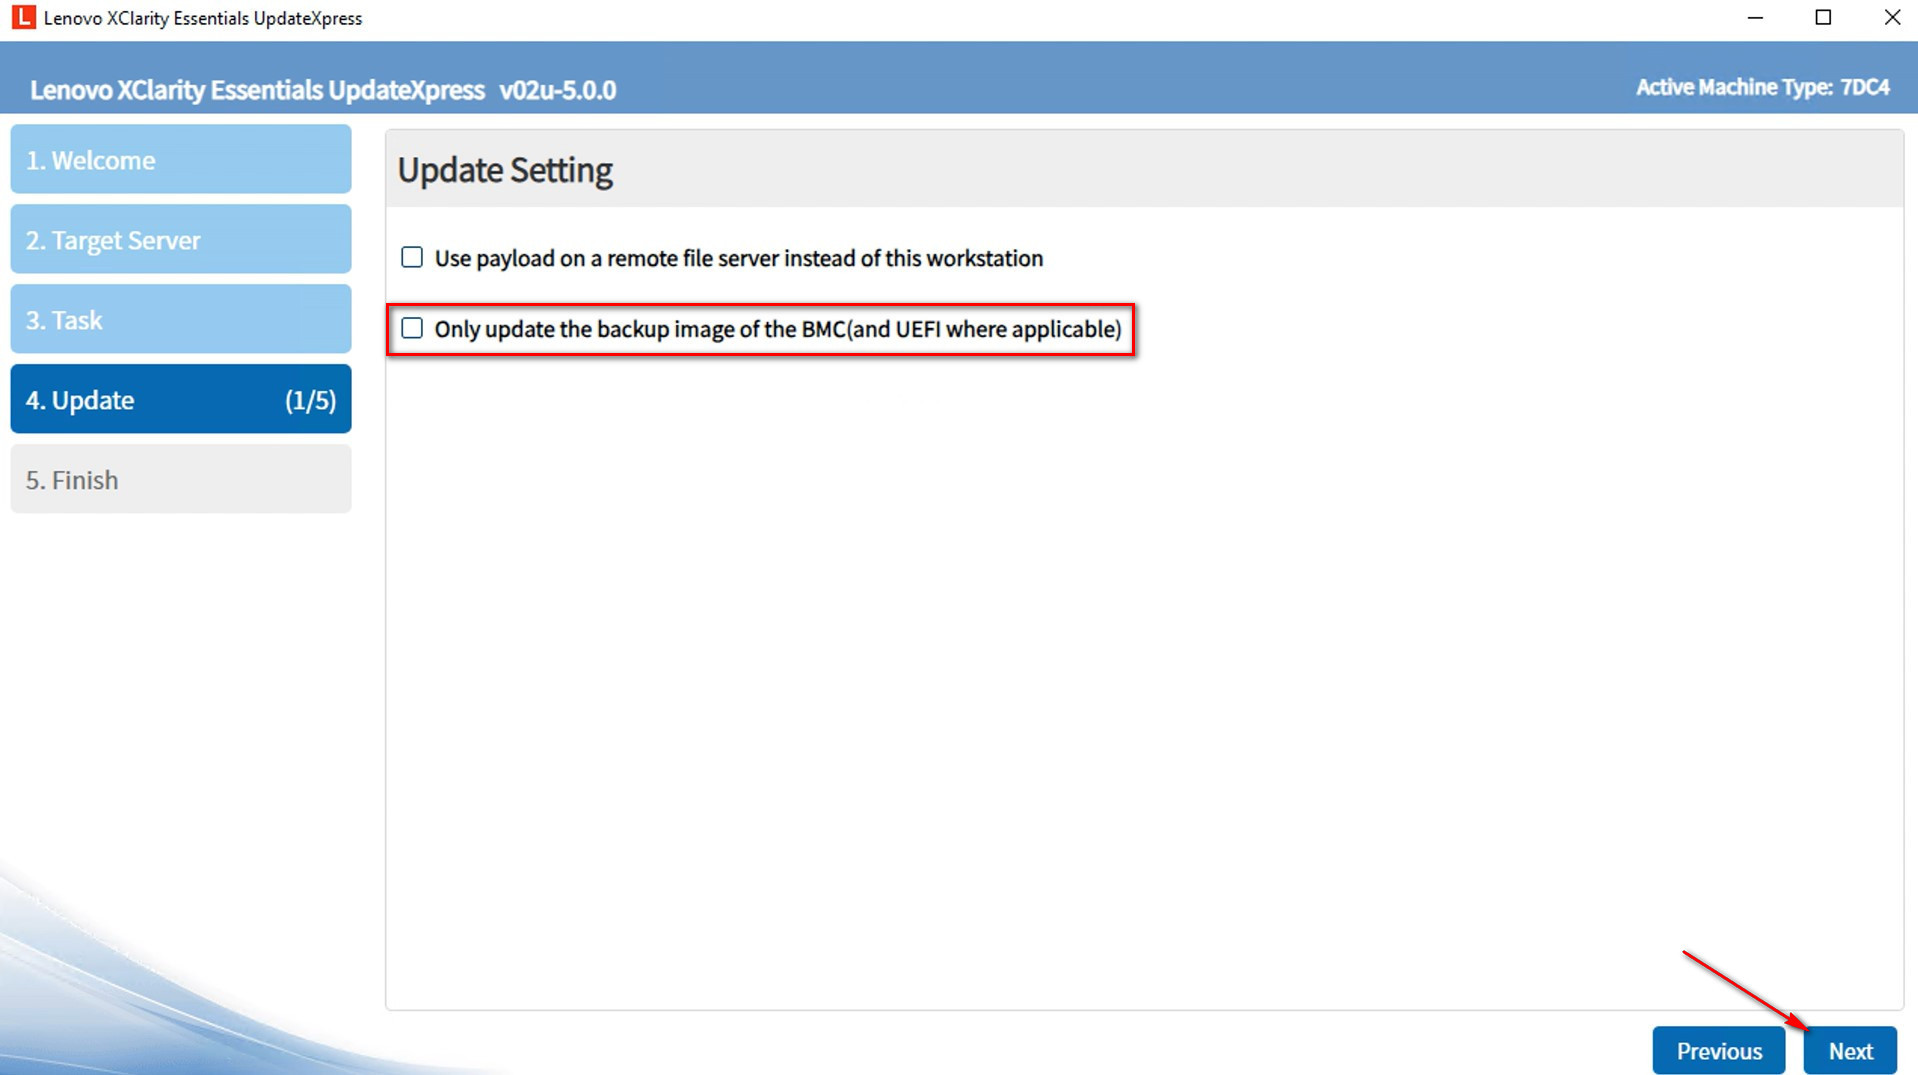
- To upgrade the backup system firmware, select Only update the backup image of the BMC (and UEFI where applicable).
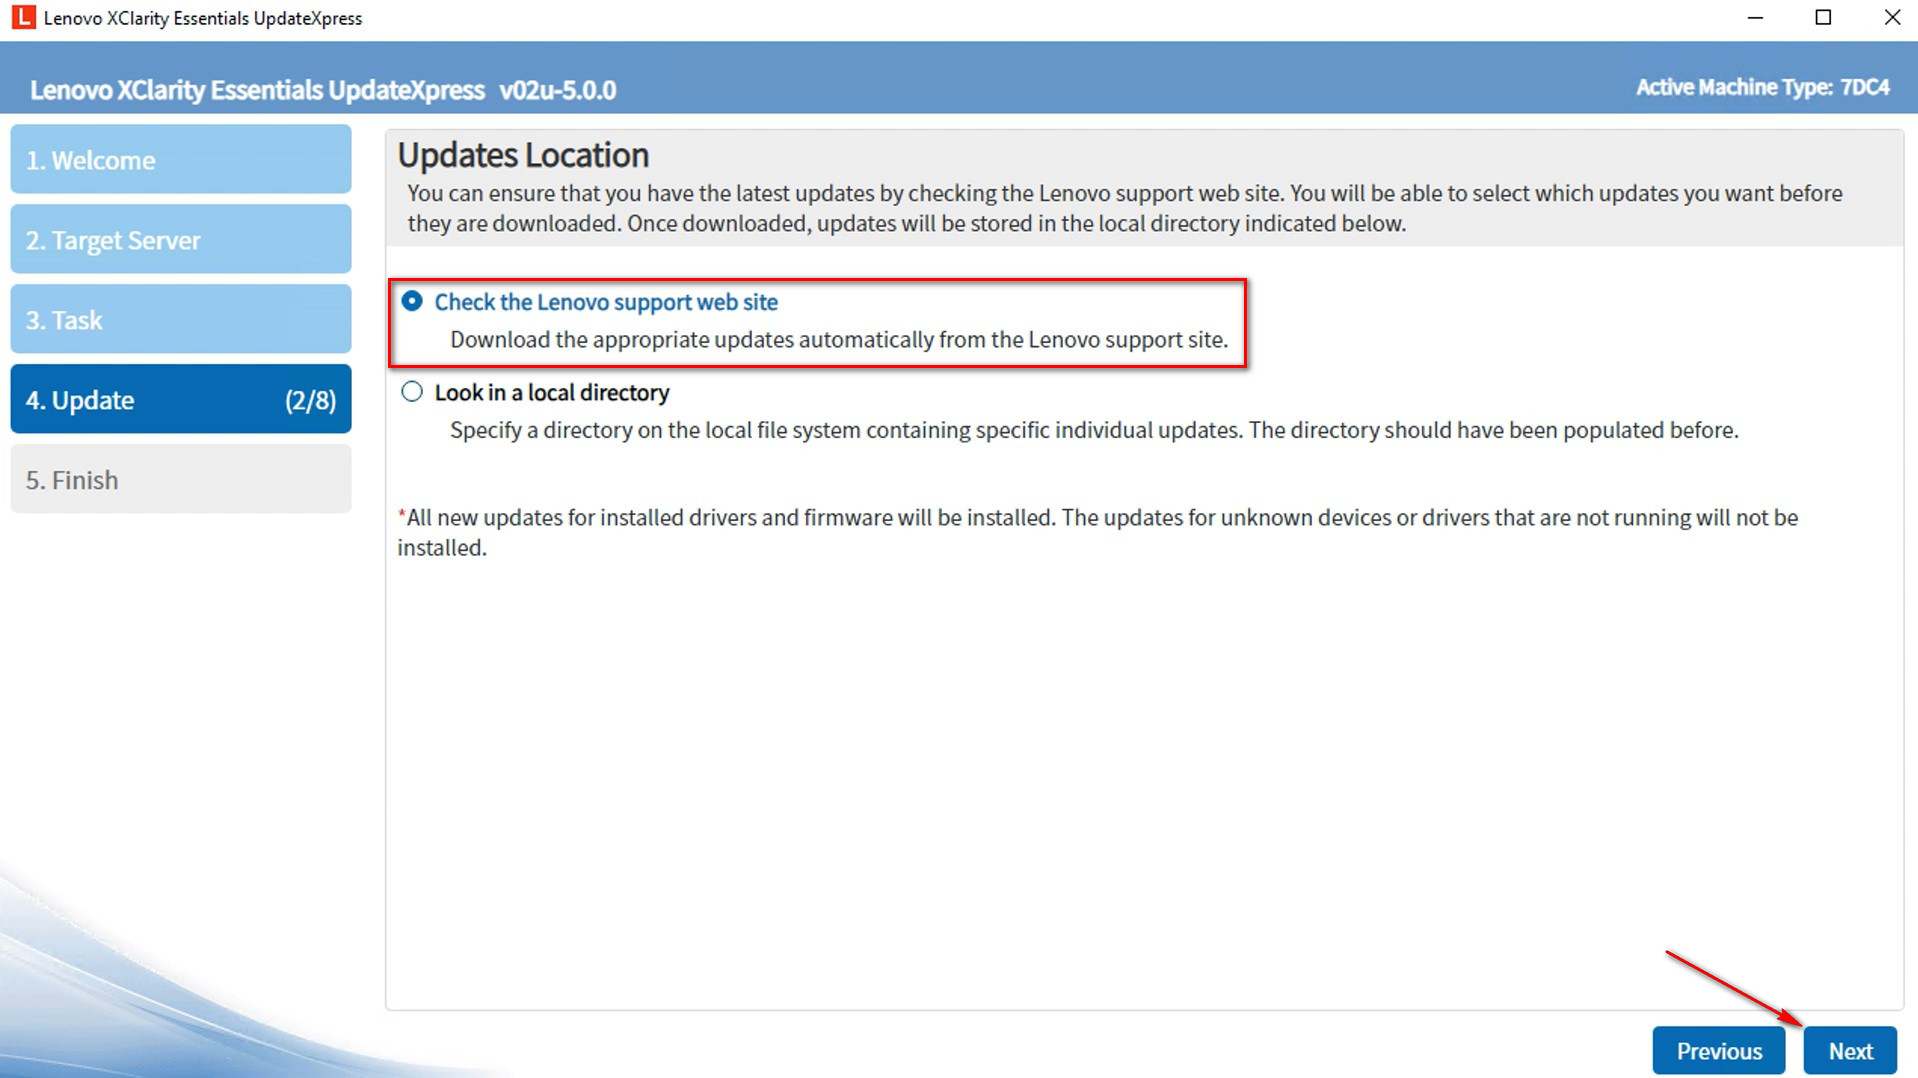
- In the Update Location window, select Check the Lenovo support website. Click Next.
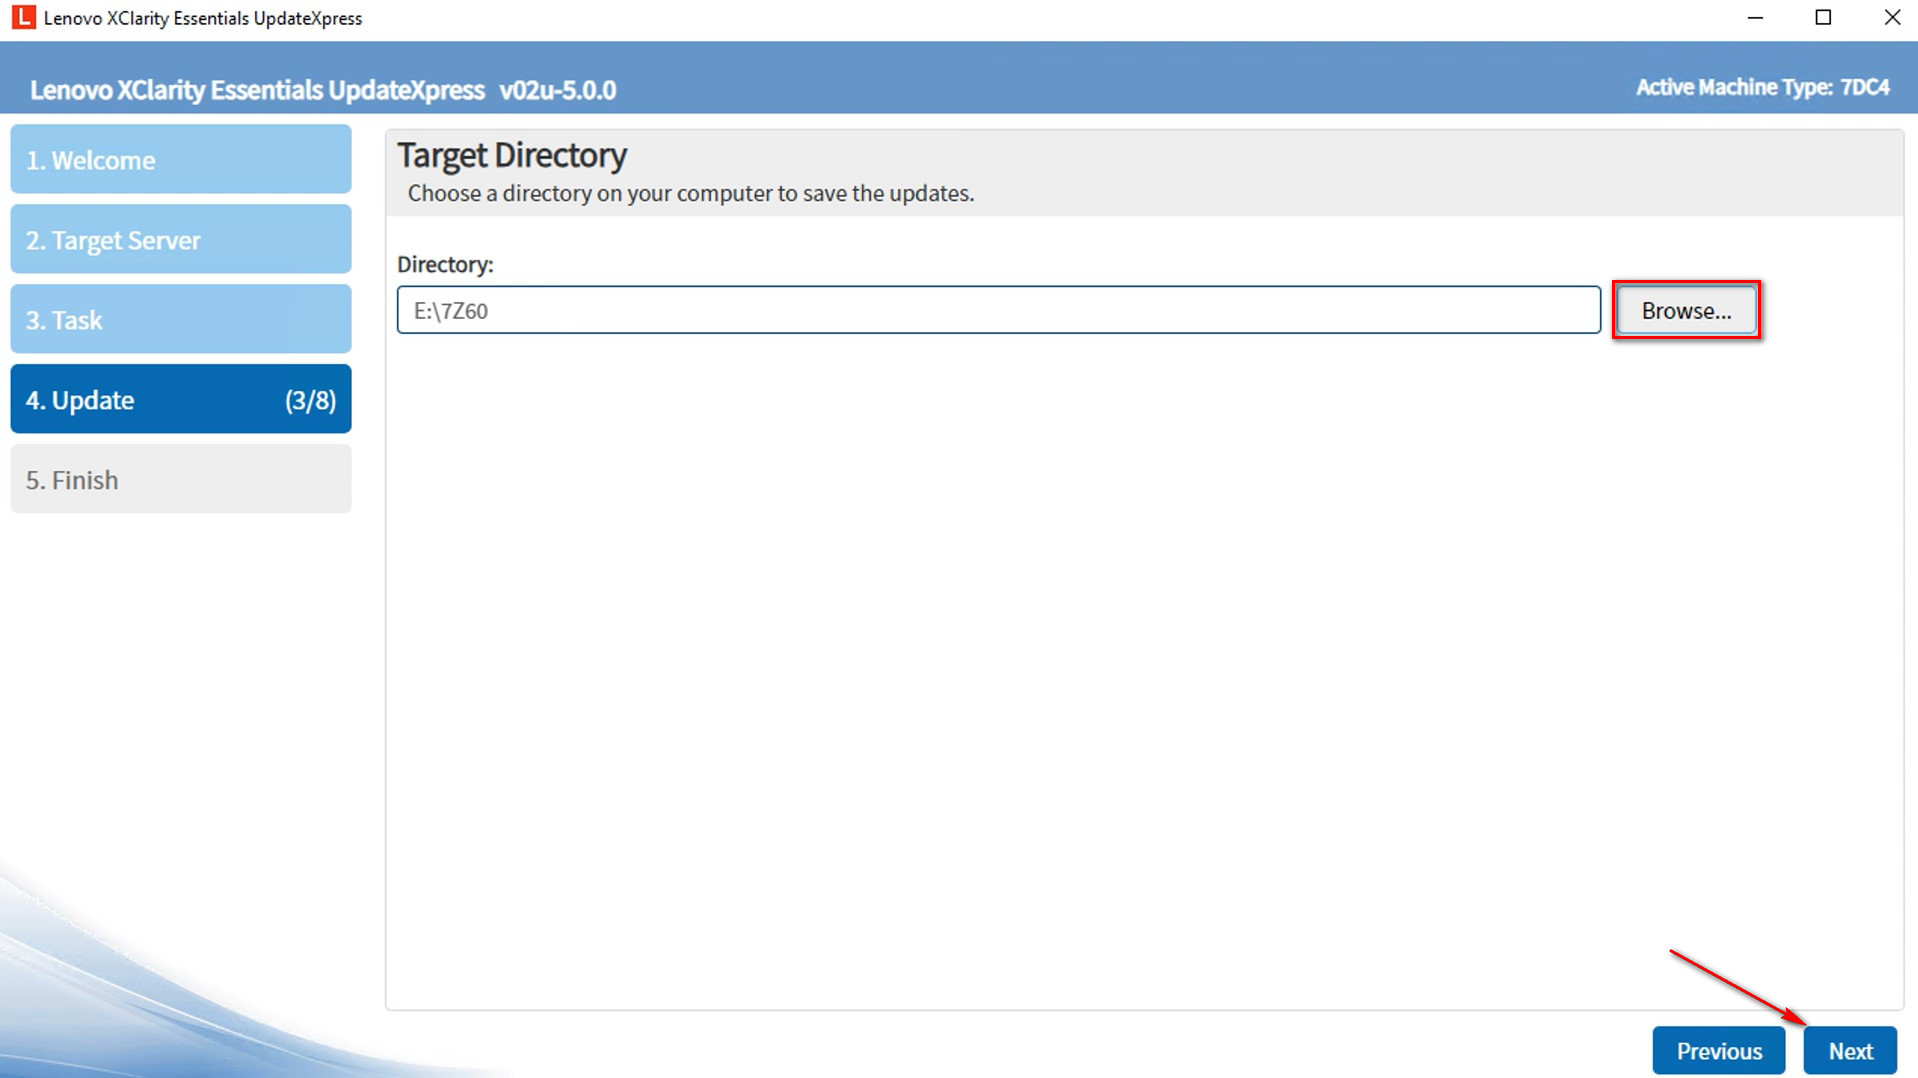
- In the Target Directory window, click Browse to specify which folder you want downloaded updates to be saved in, and then click Next.
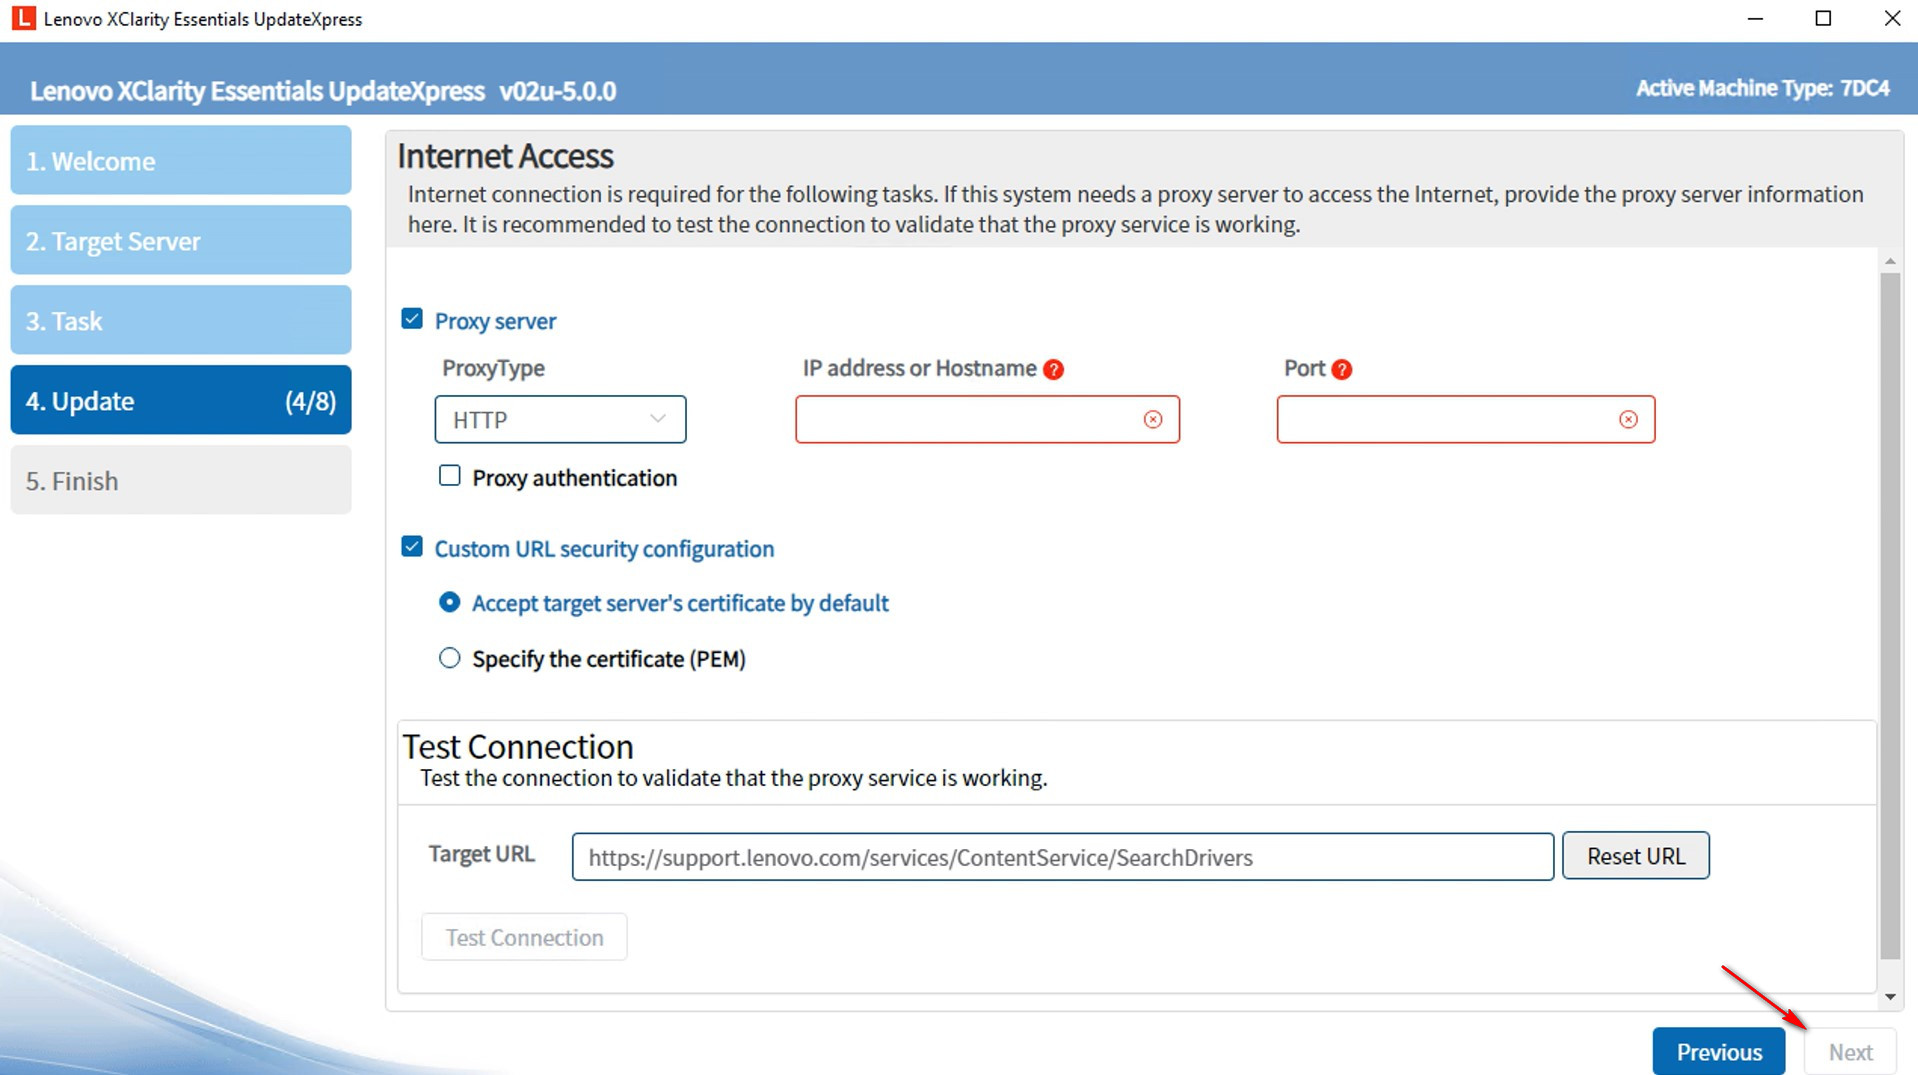
- In the Internet Access window, specify proxy server information or custom URL security configuration if necessary. You can click Test Connection to test the availability of the proxy or the custom URL settings. Click Next.
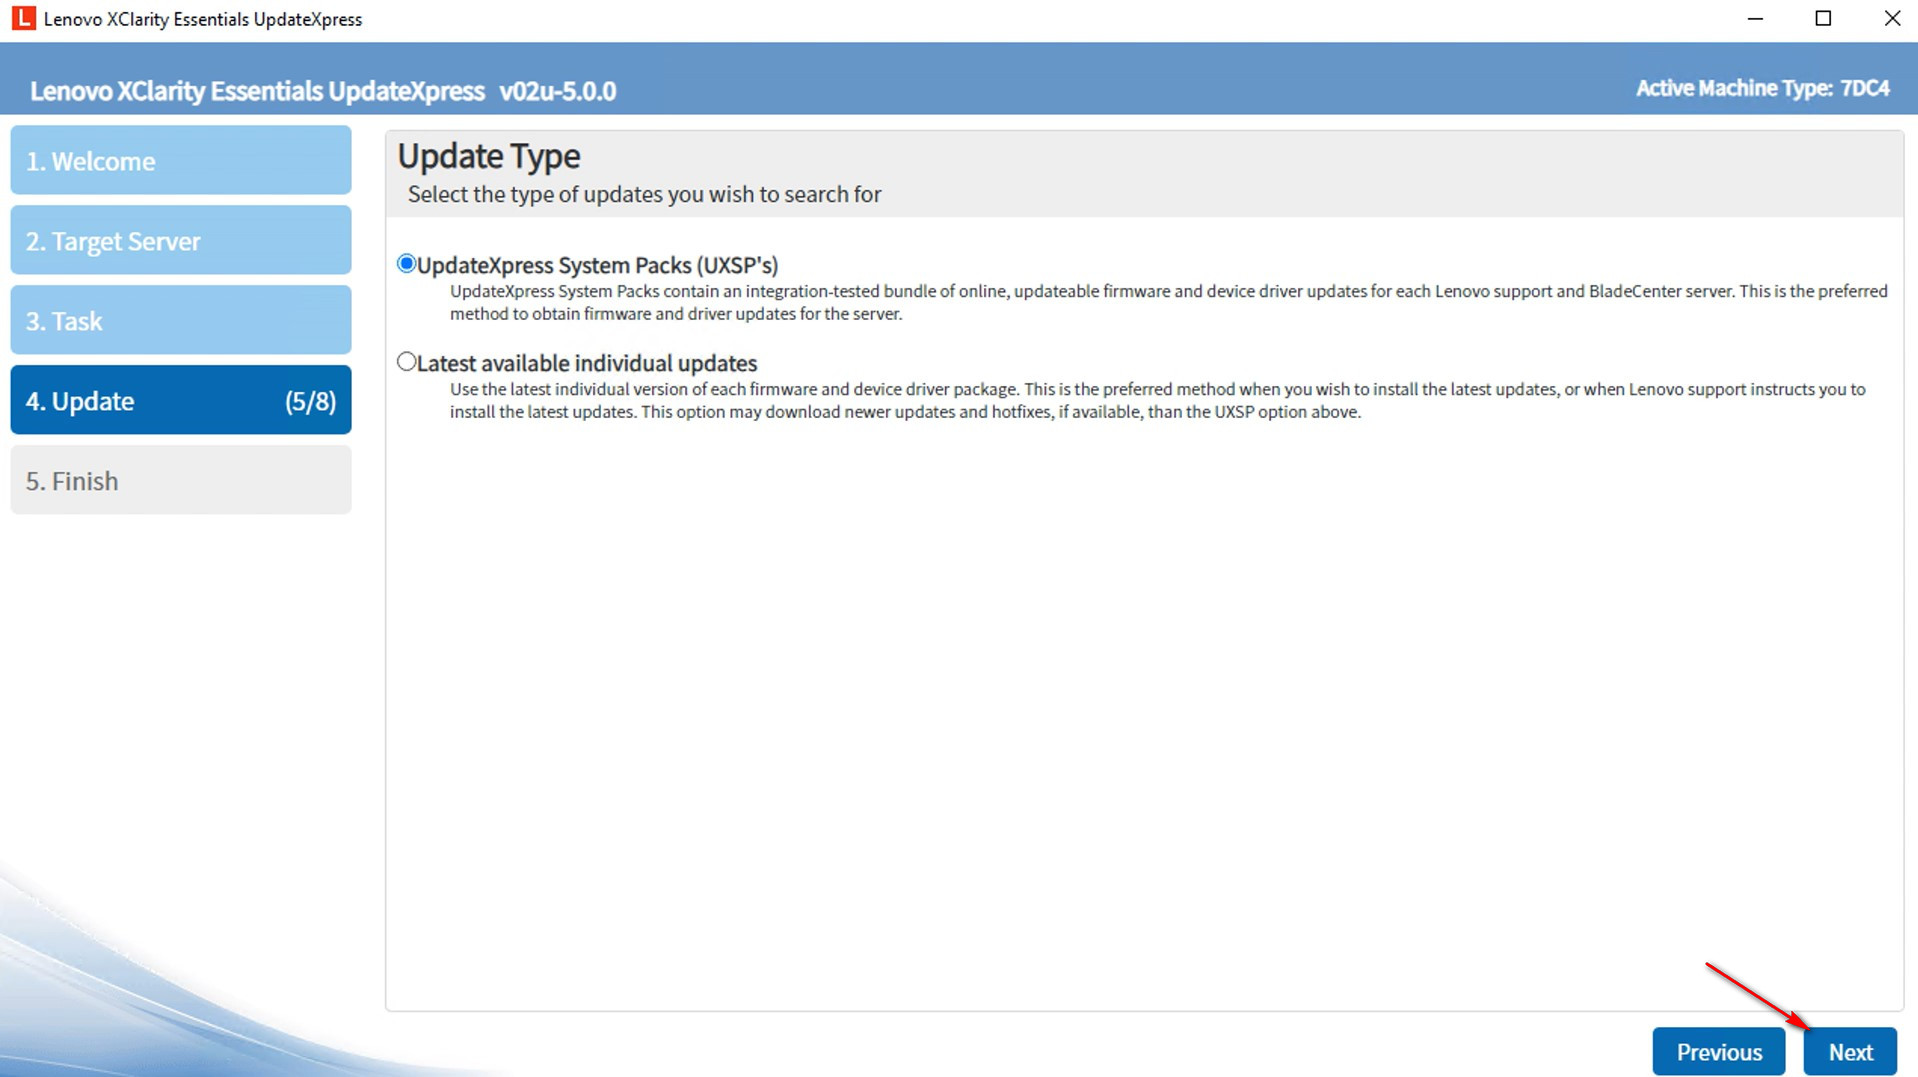
- In the Update Type window, select the update types you want to acquire.
- UpdateXpress System Packs (UXSP’s): This is the preferred method to obtain firmware and driver updates for the server. If you select this option, the Update Selection window will be skipped, and all the UXSP packages will be downloaded.
- Latest available individual updates: This is the preferred method when you want to install the latest updates, or when Lenovo support instructs you to install the latest updates. This option might give you newer updates and hotfixes, depending on their availability, than the UXSP option above. If you select this option, you will need to choose the packages to be downloaded in the next Update Selection window.
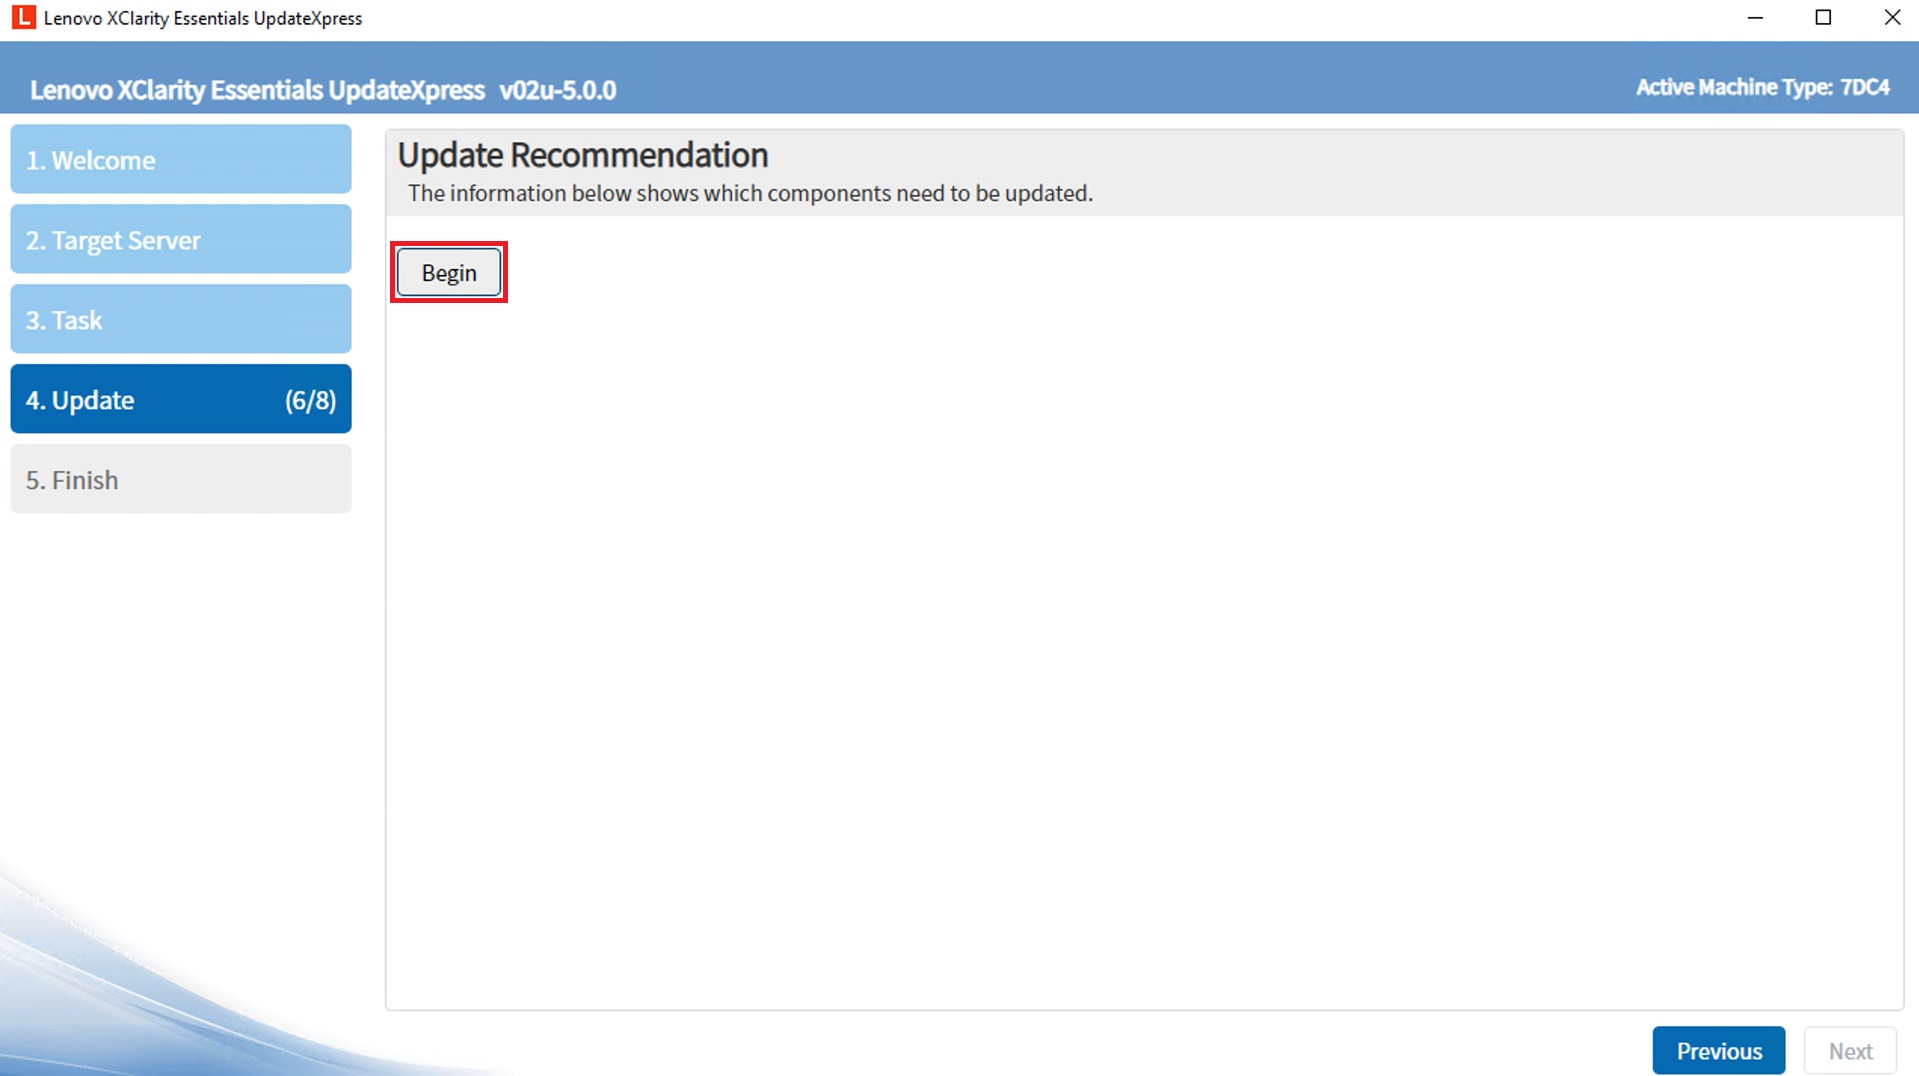
- In the Update Recommendation window, click Begin to acquire updates.
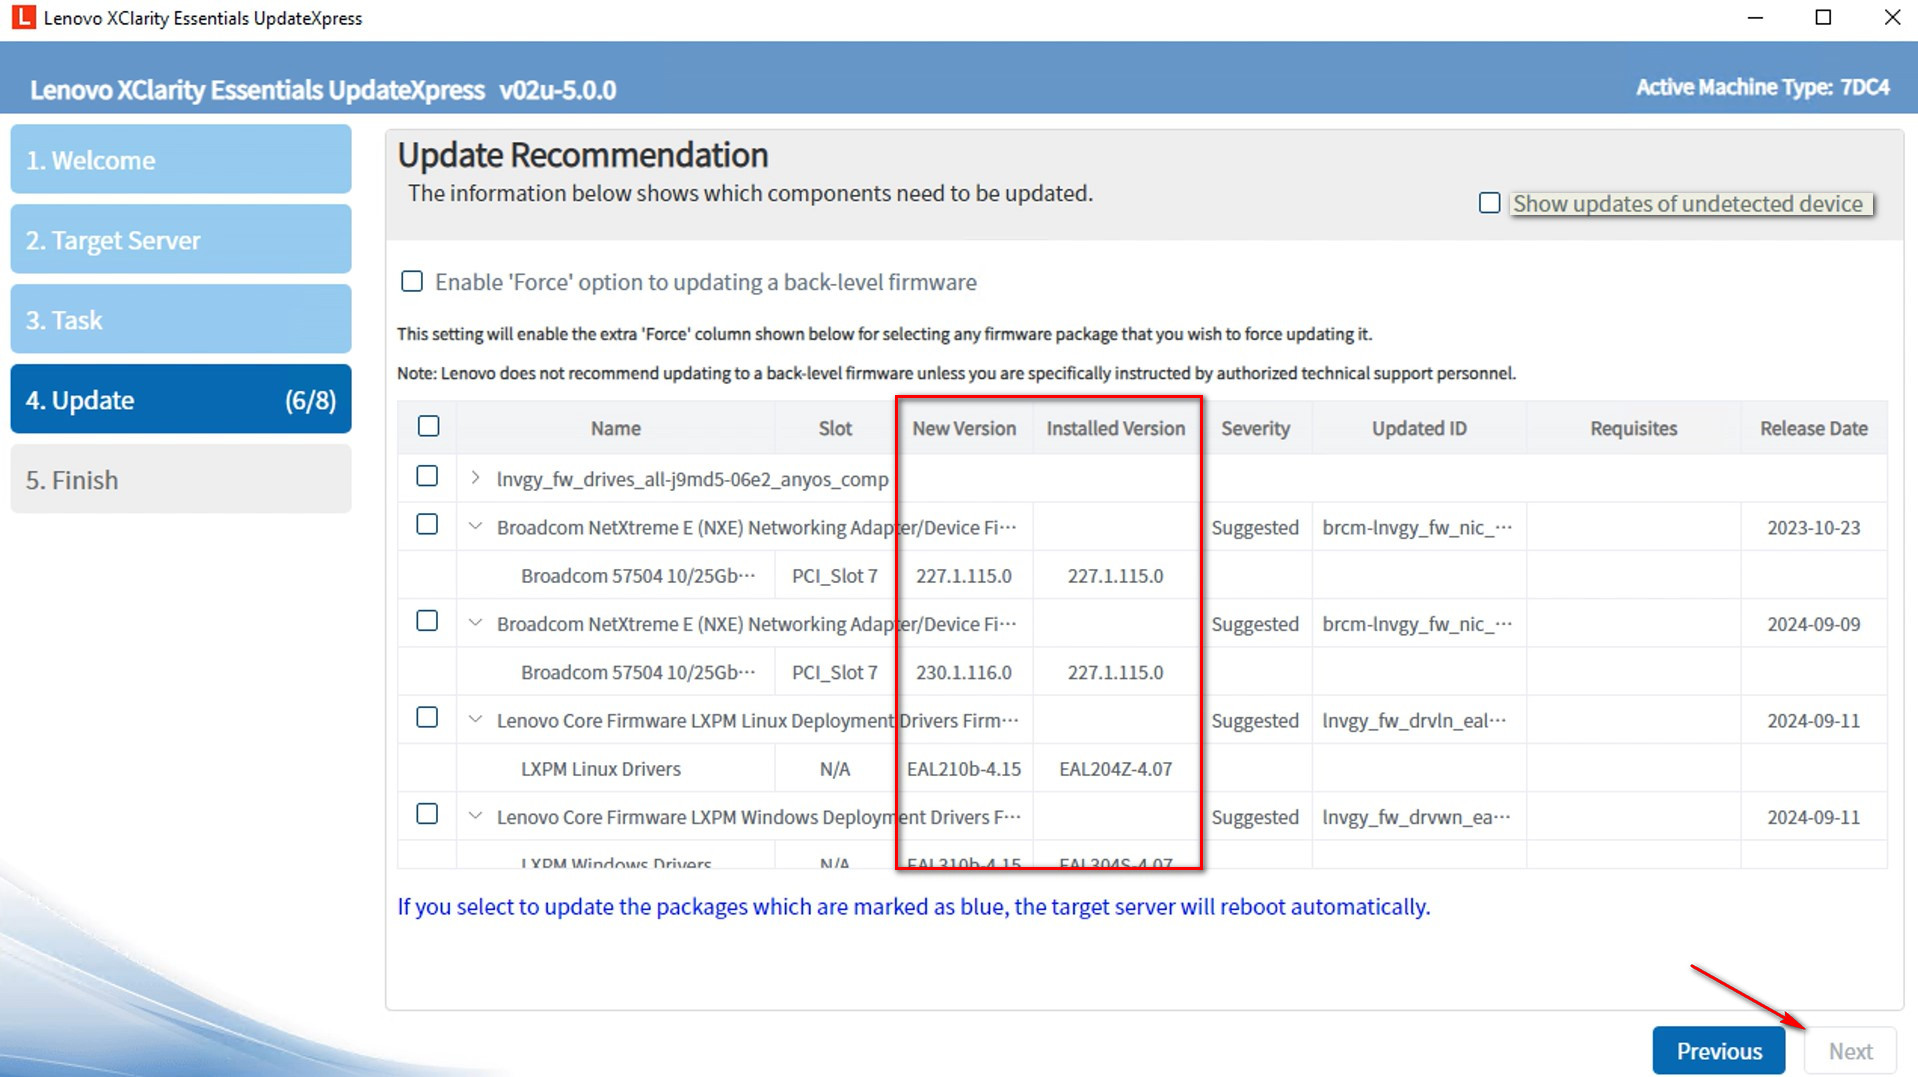
- The utility will list packages, giving details about currently installed component versions and versions now available. Select the packages you want to upgrade and click Next.
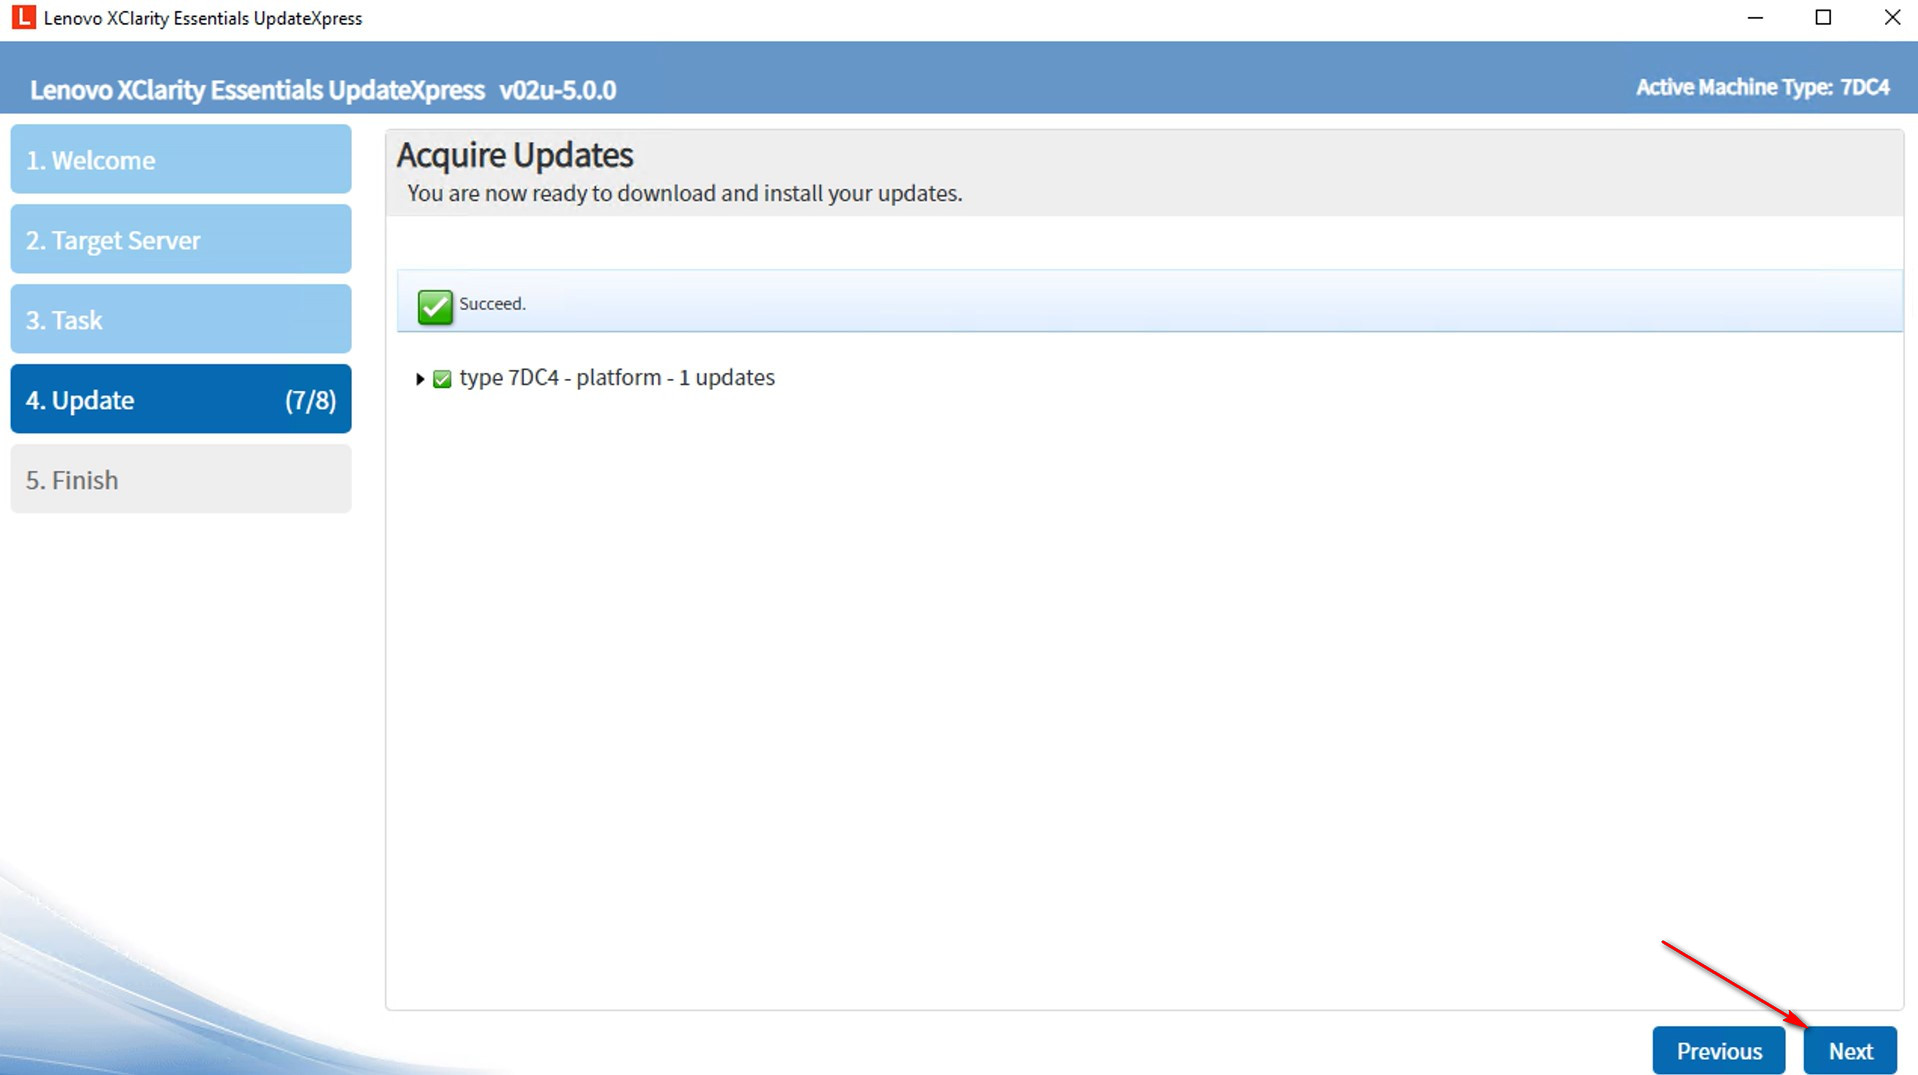
- In the Acquire Updates window, a download progress bar will be displayed. When the downloads are complete, click Next.
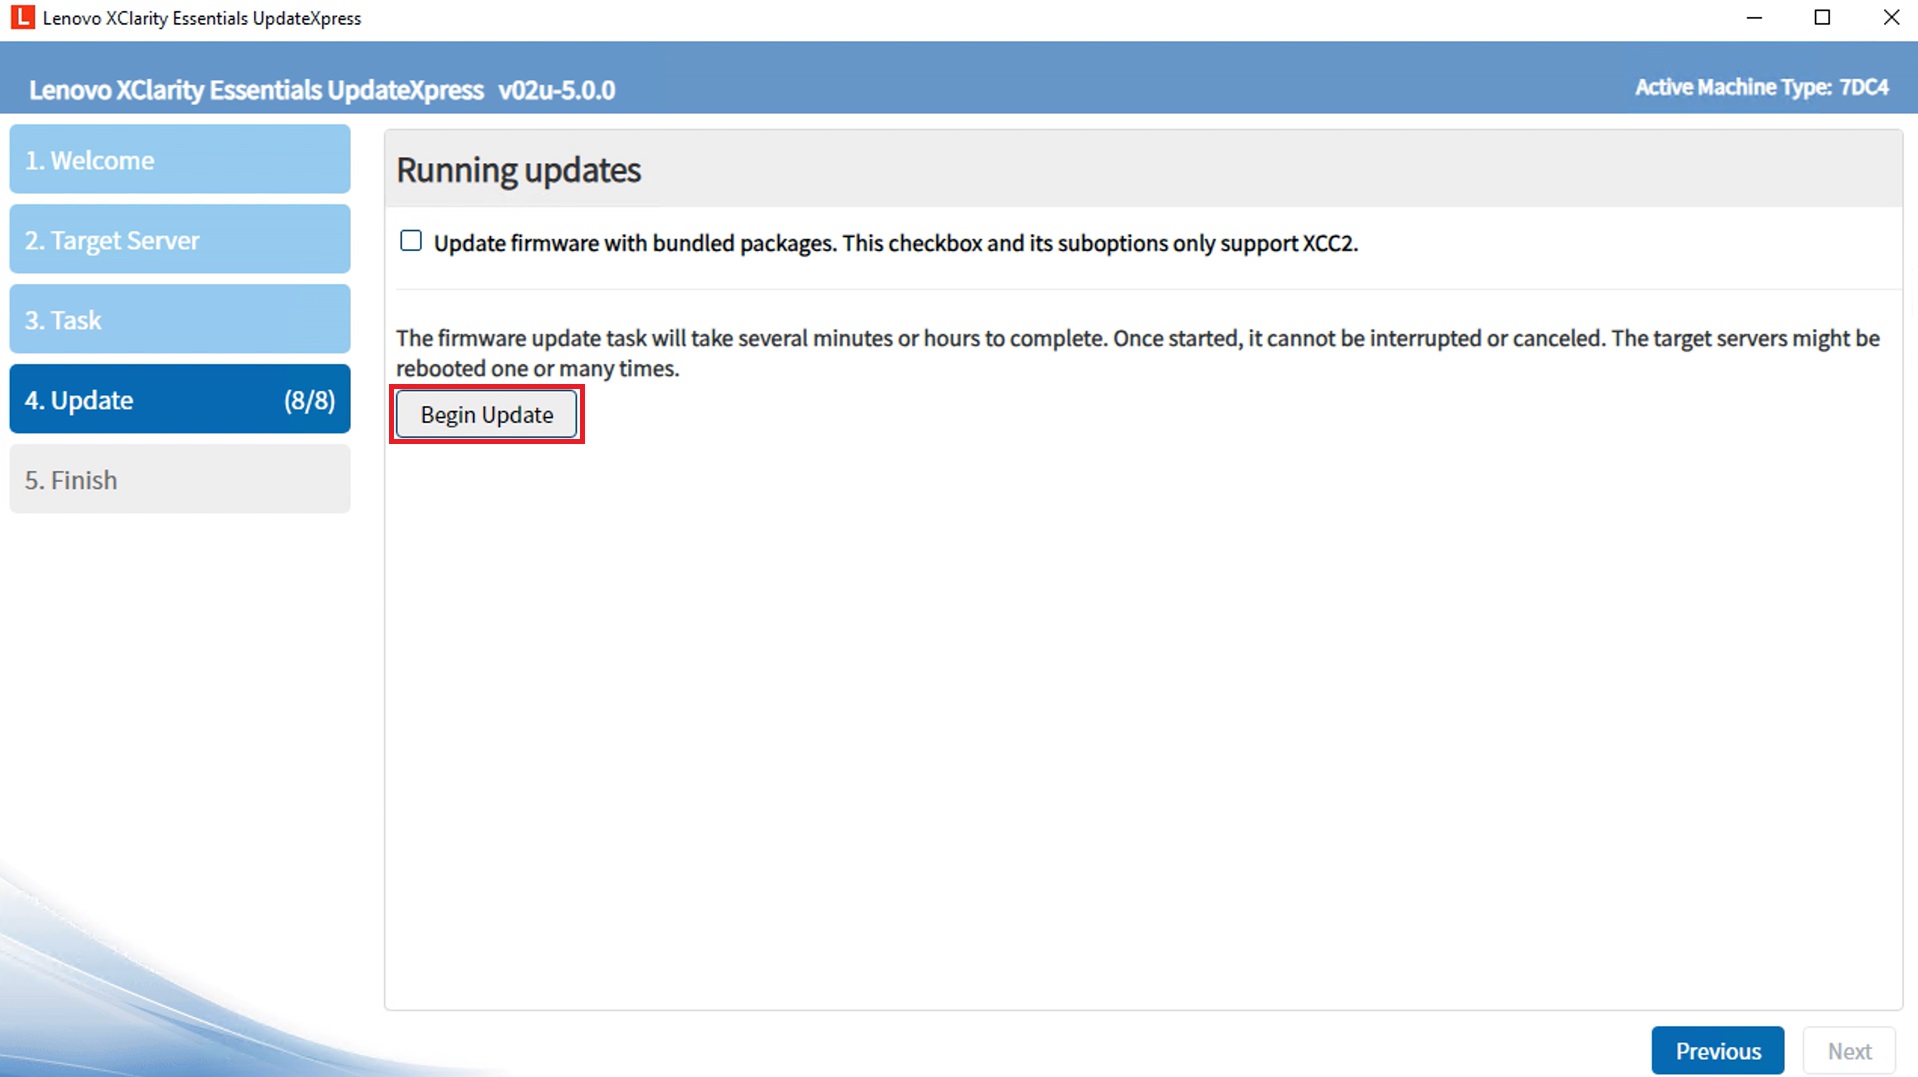
- In the Running updates window, click Begin Update to start updating the packages. Optionally choose Update firmware with bundle packages if the target server supports XCC2, and select the apply time of this update action.
 .
.
- The execution table displays the package's upgrade progress.
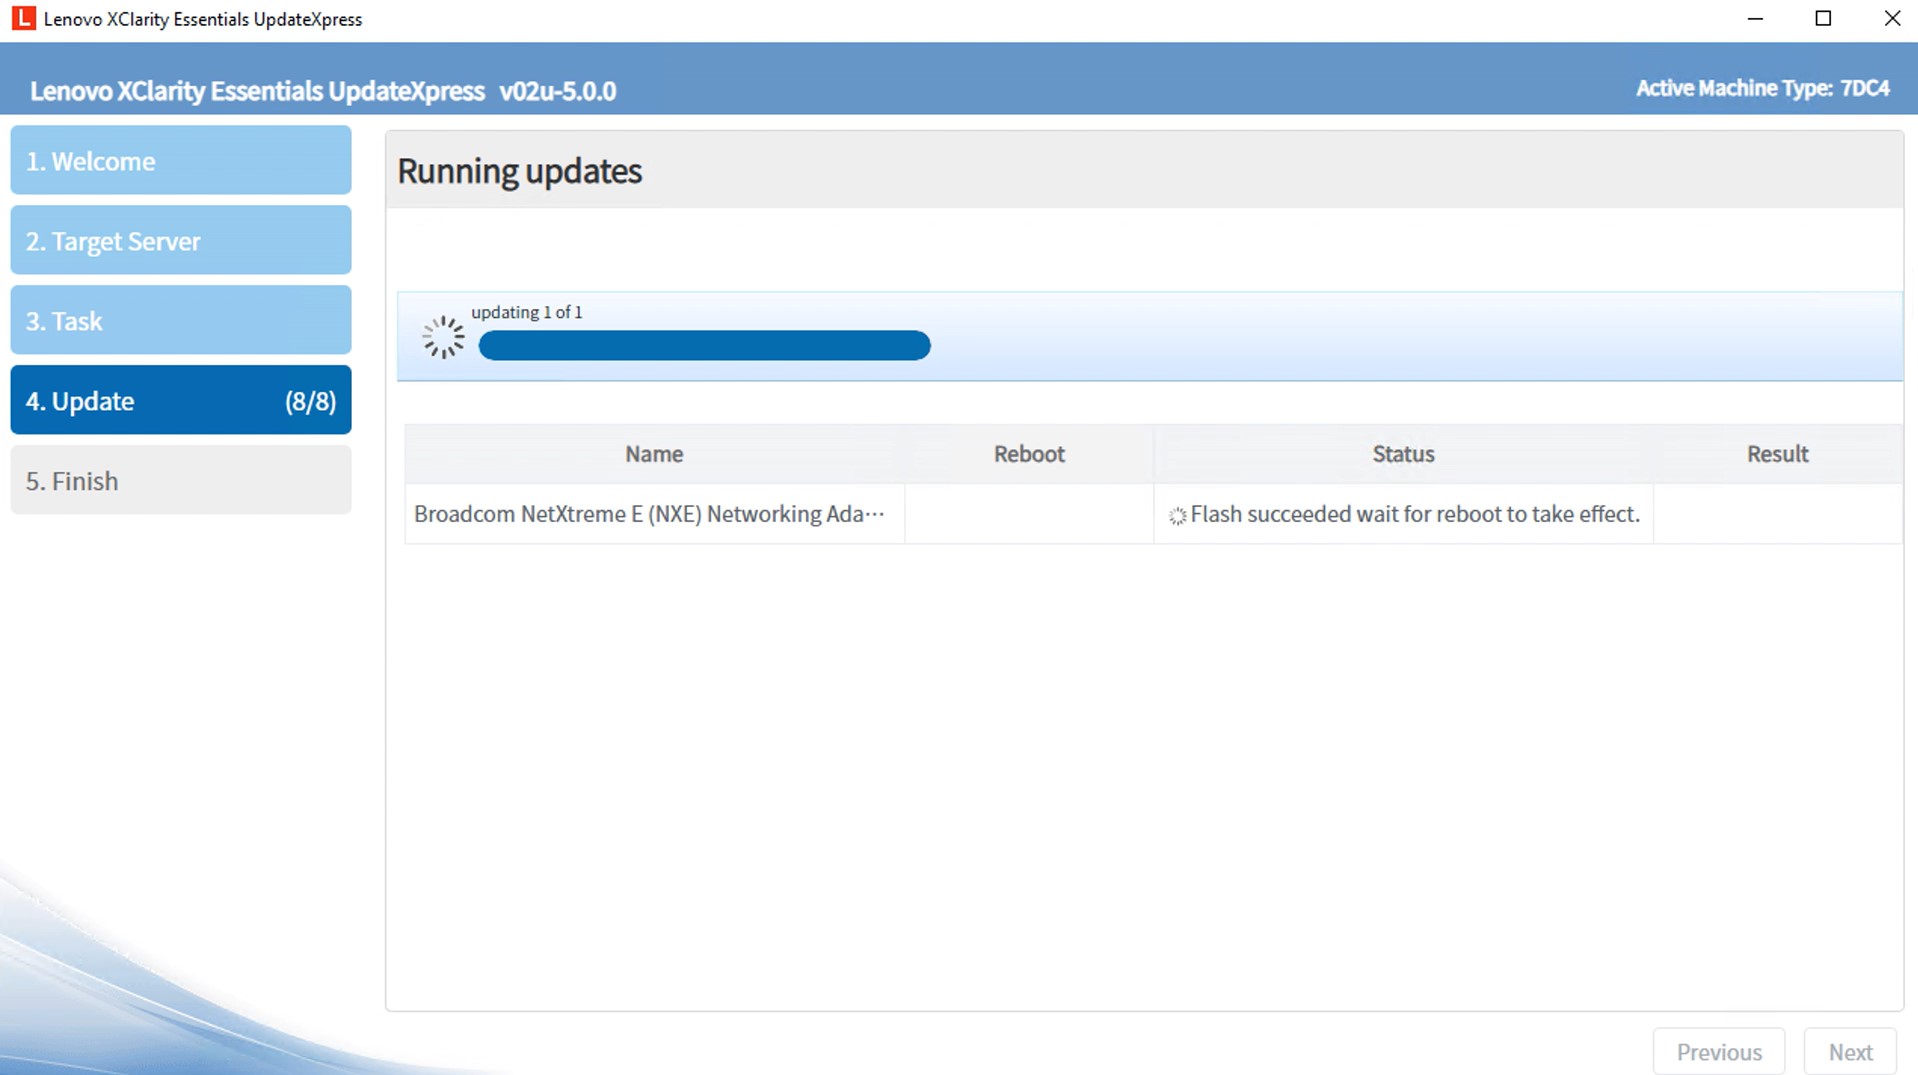
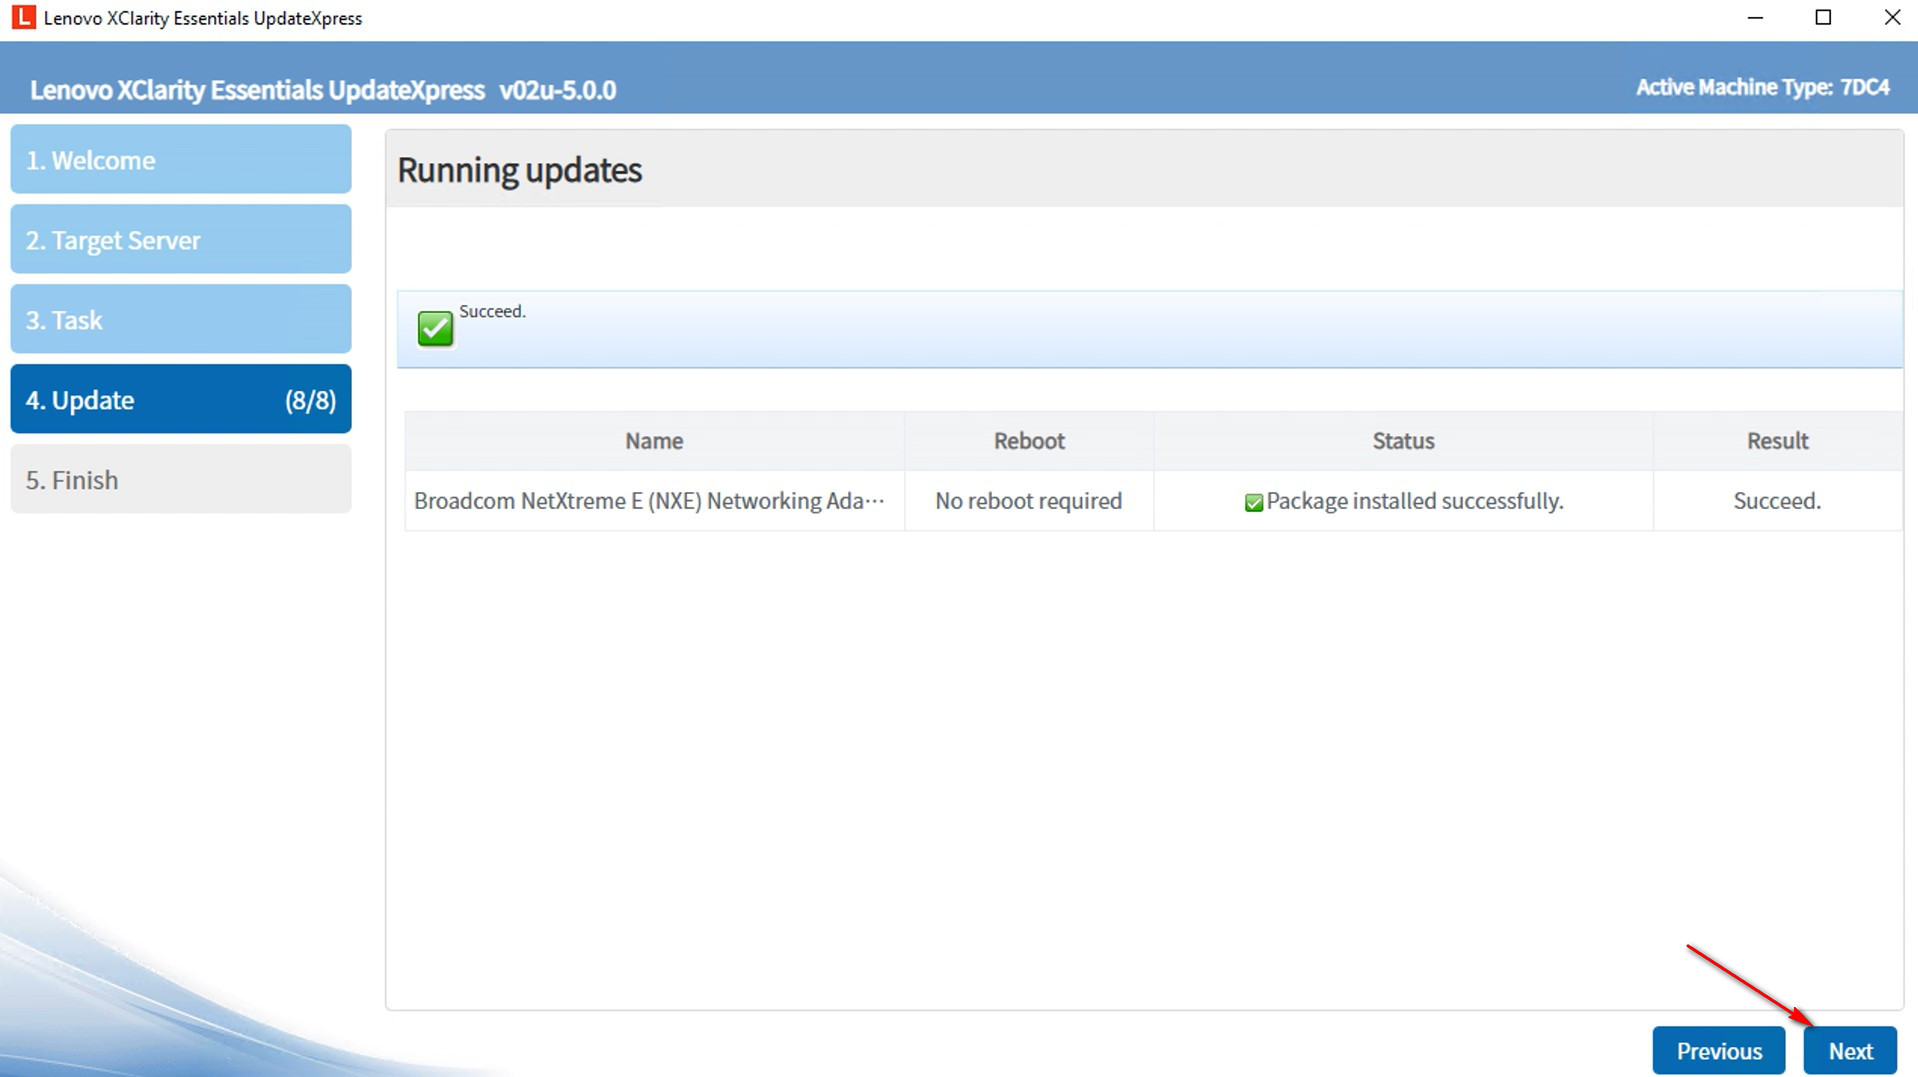
- When the upgrade progress is completed, click Next.
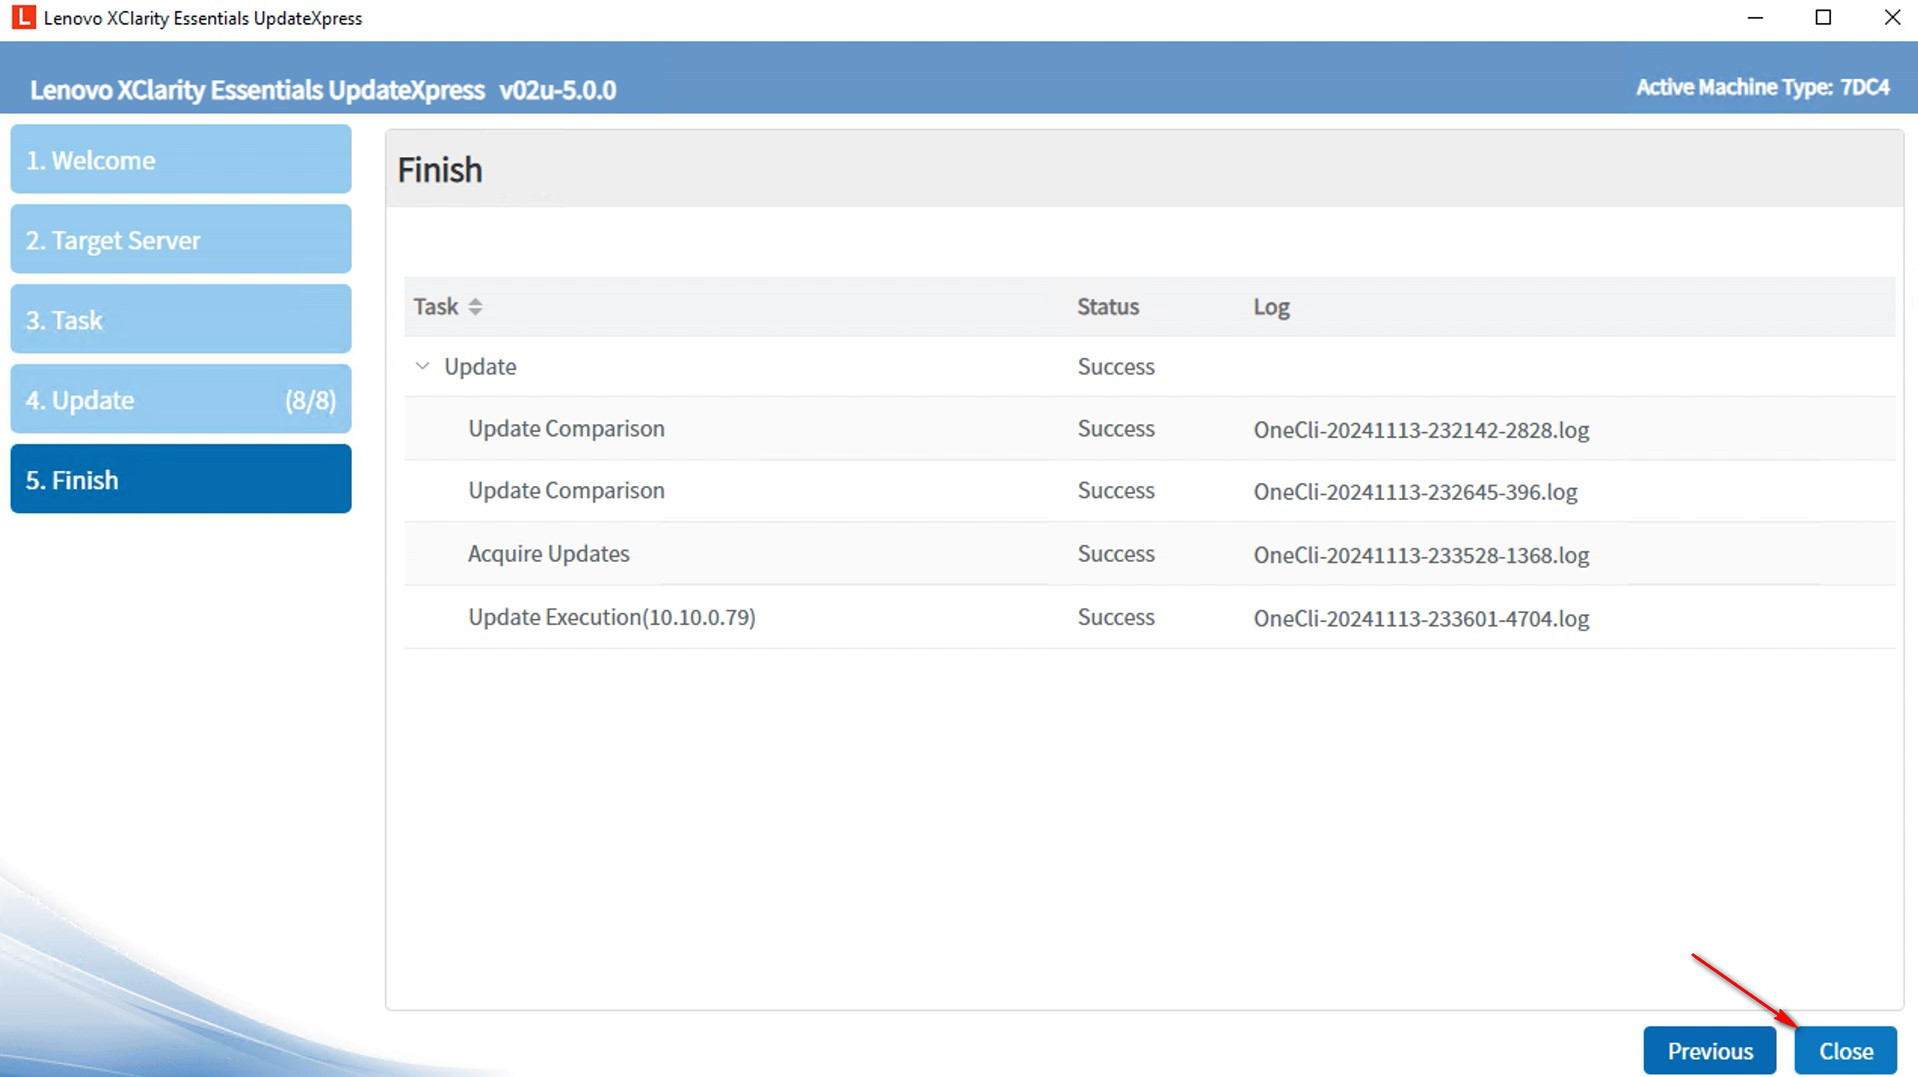
- In the Finish window, click the log to check the upgrade log and click Close to exit.
Create a repository of updates from the Website
In this video, we will show you how to use LXCE UpdateXpress to create a repository of updates from the Lenovo website.
If you prefer written instructions, work through the following steps:
- In the Welcome window, click Next.

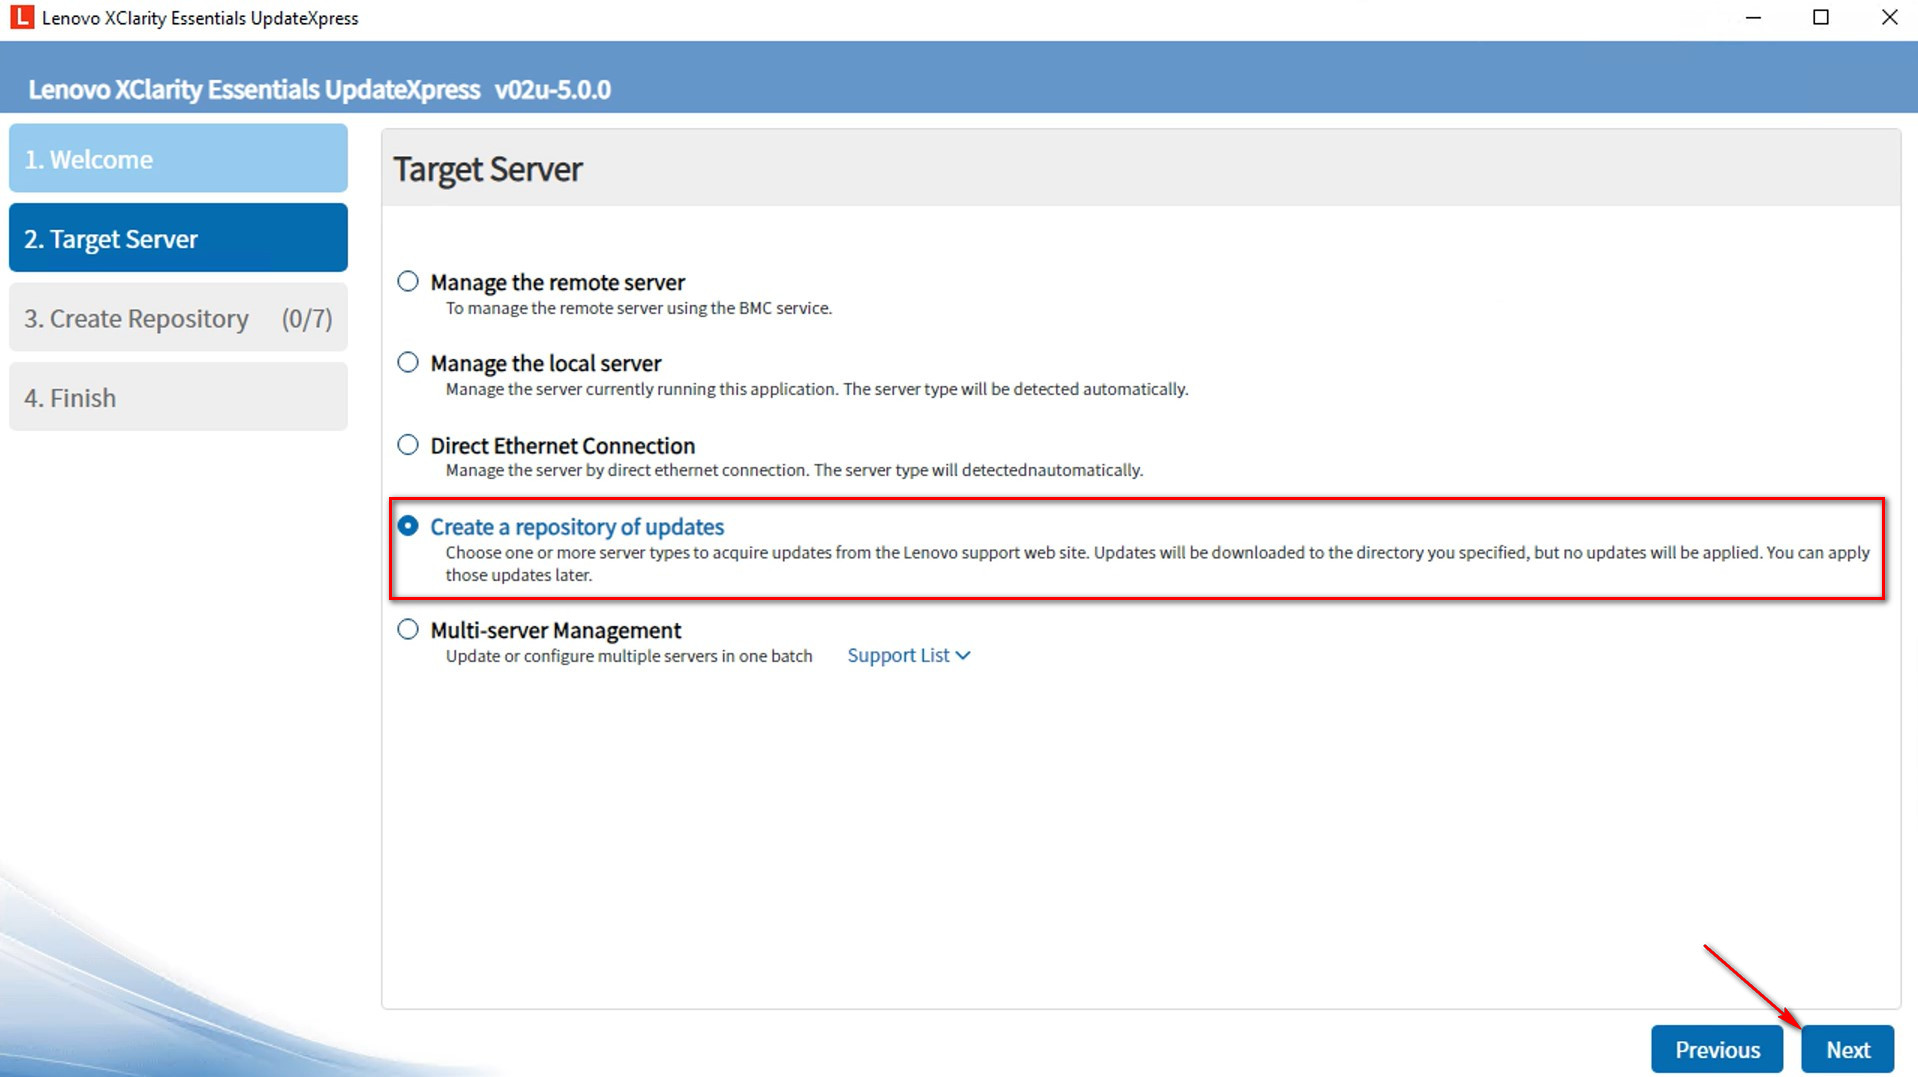
- In the Target Server window, select Create a repository of updates and click Next.
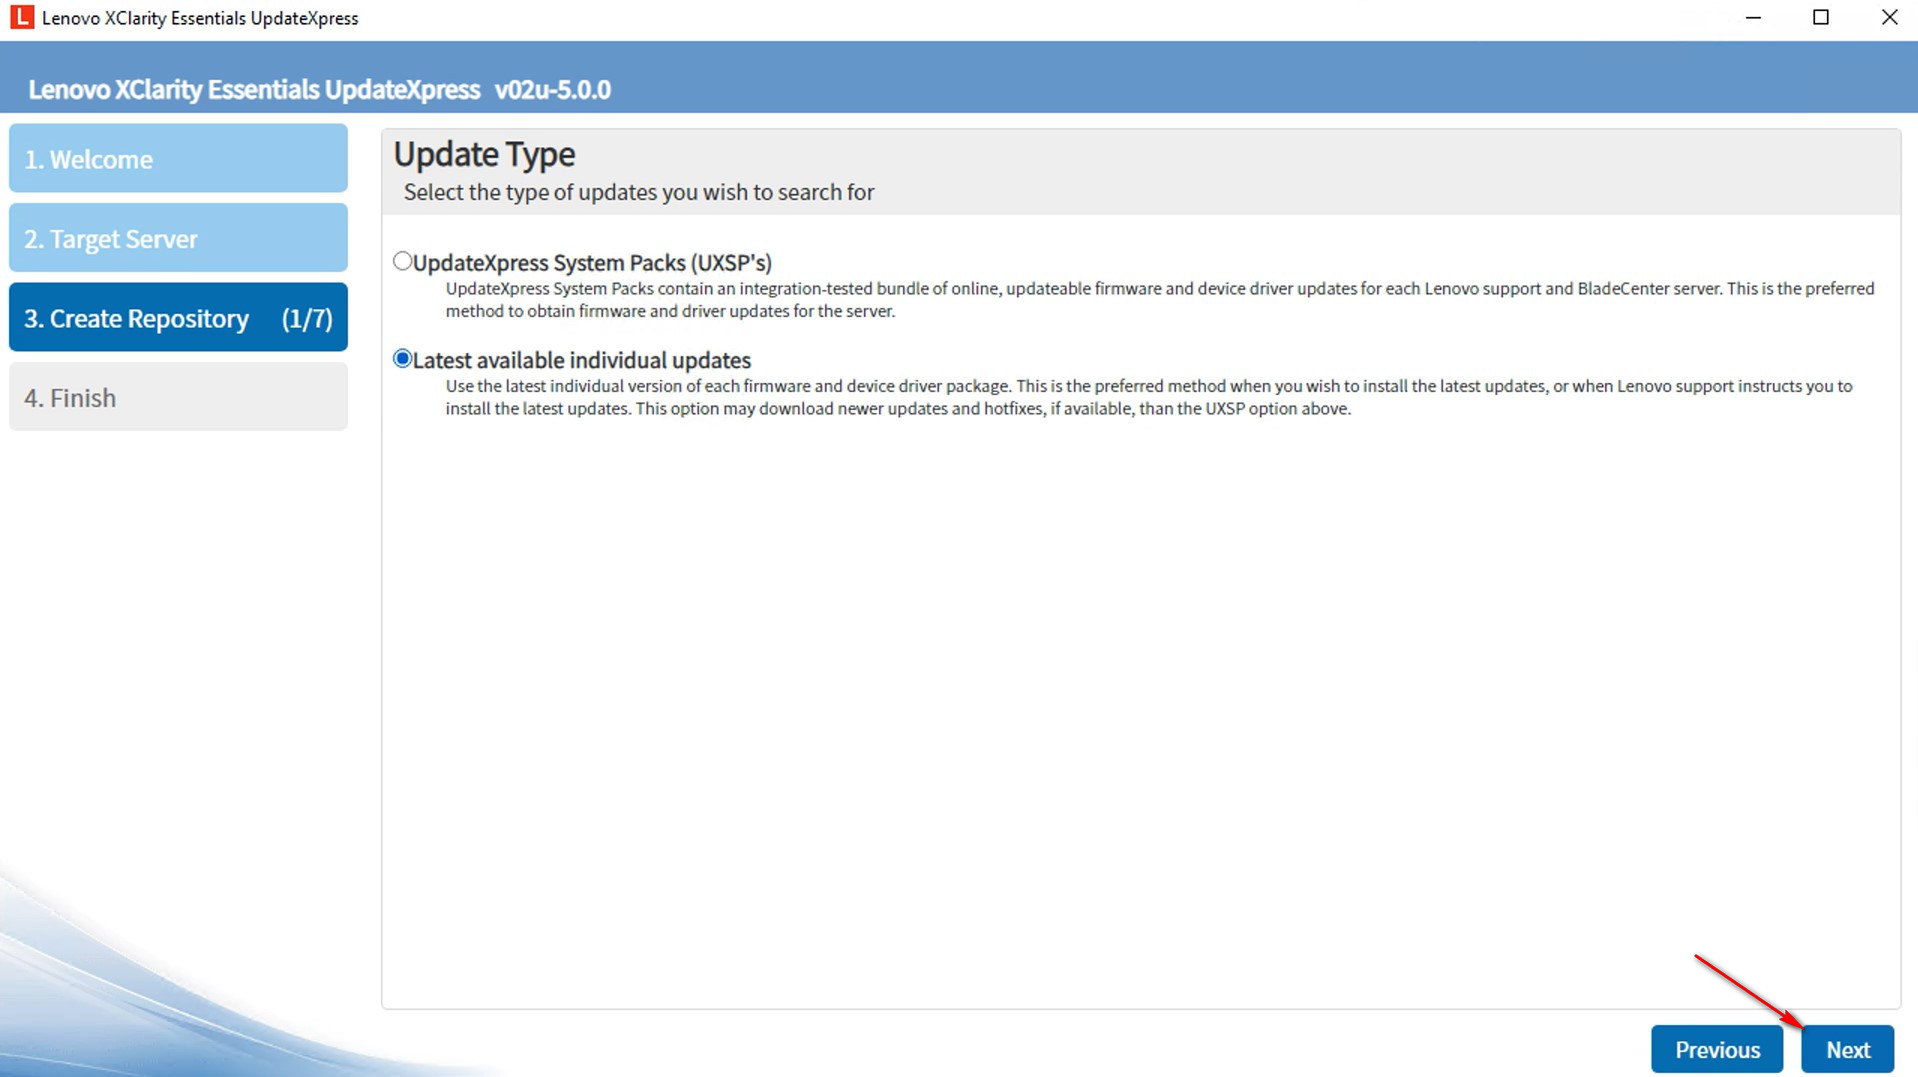
- In the Update Type window, select the type of updates you want to acquire, and then click Next.
- Select UpdateXpress System Packs (UXSPs) if you want to update UXSPs. If you select this option, the Update Selection window will be skipped, and all the UXSP packages will be downloaded.
- Select Latest available individual updates if you want to update individual packs. If you select this option, you will need to choose the packages to be downloaded.
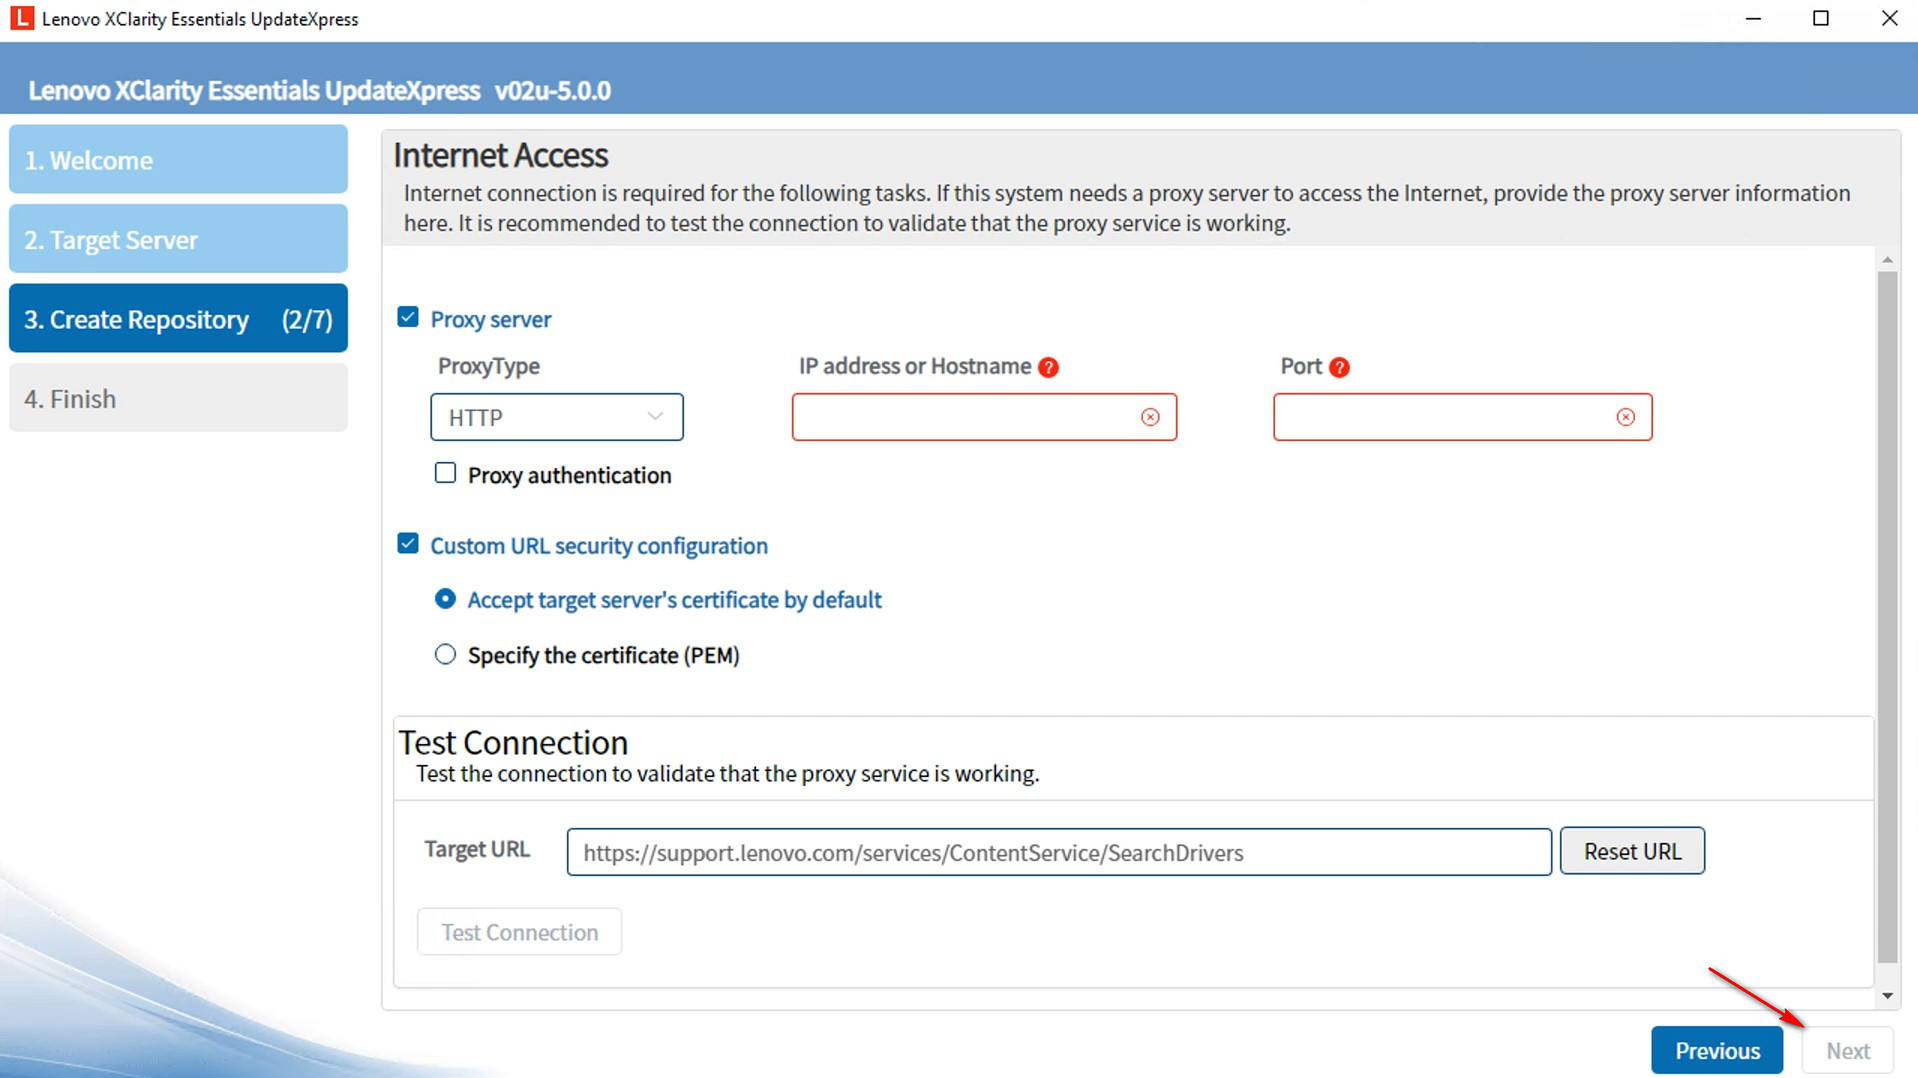
- In the Internet Access window, specify proxy server information or custom URL security configuration if necessary. You can click Test Connection to test the availability of the proxy or the custom URL settings. Click Next.
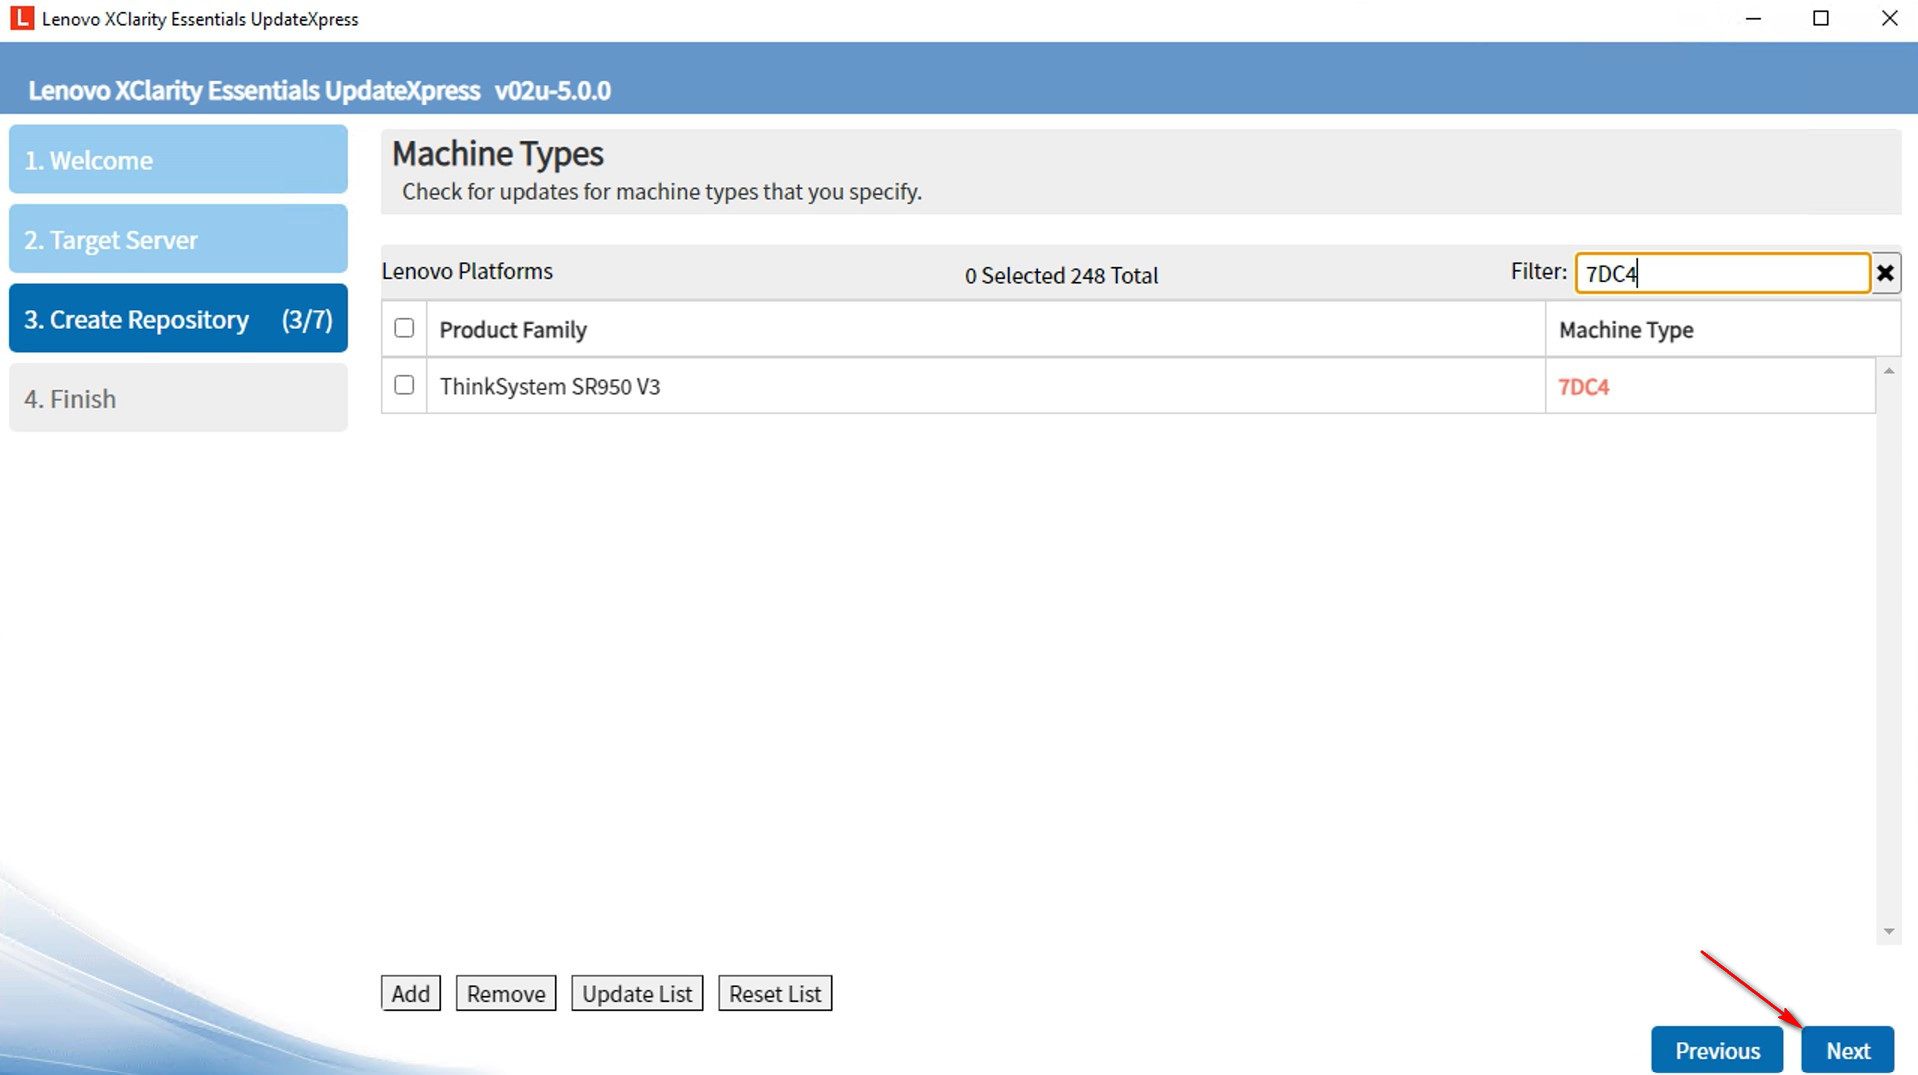
- In the Machine Types window, select the machine types you want updates for, and then click Next.
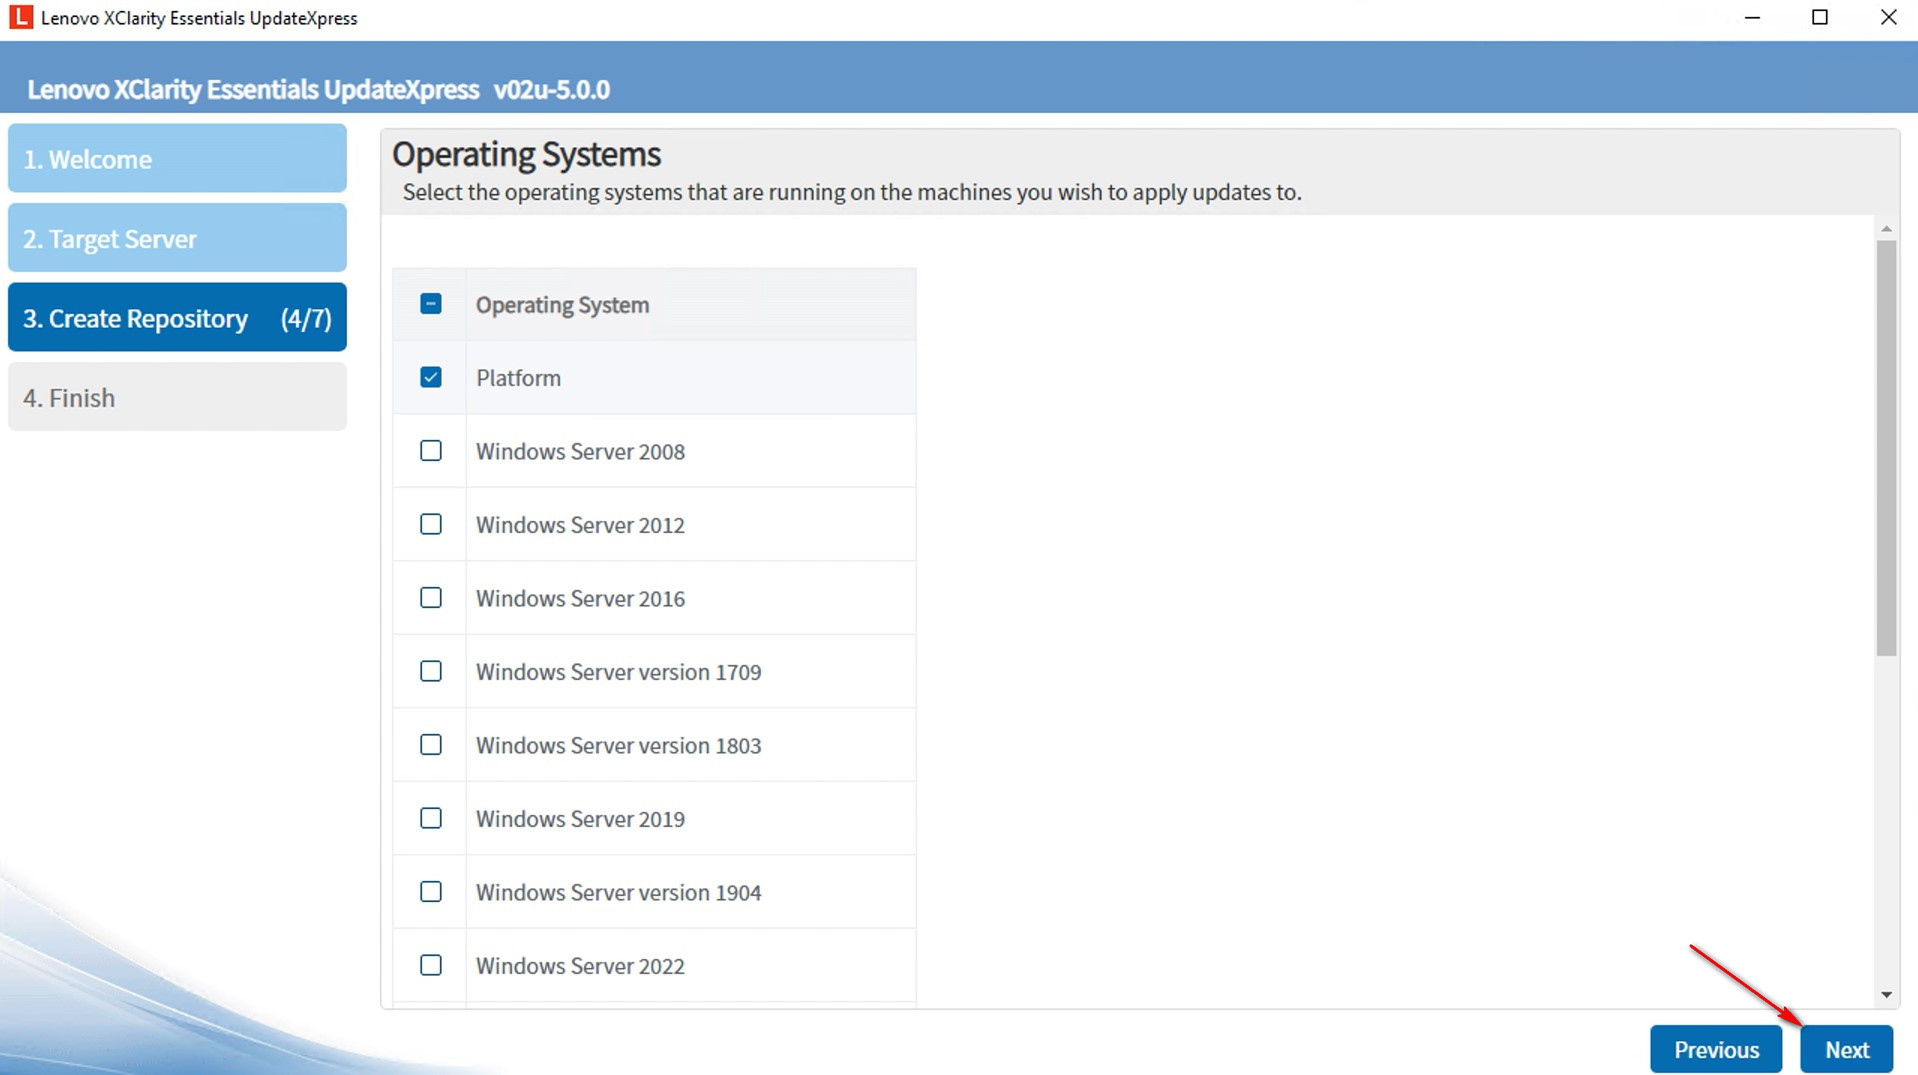
- In the Operating Systems window, select the operating systems you want updates for, and then click Next.
- In the Target Directory window, specify which folder you want downloaded updates to be saved in, and then click Next.
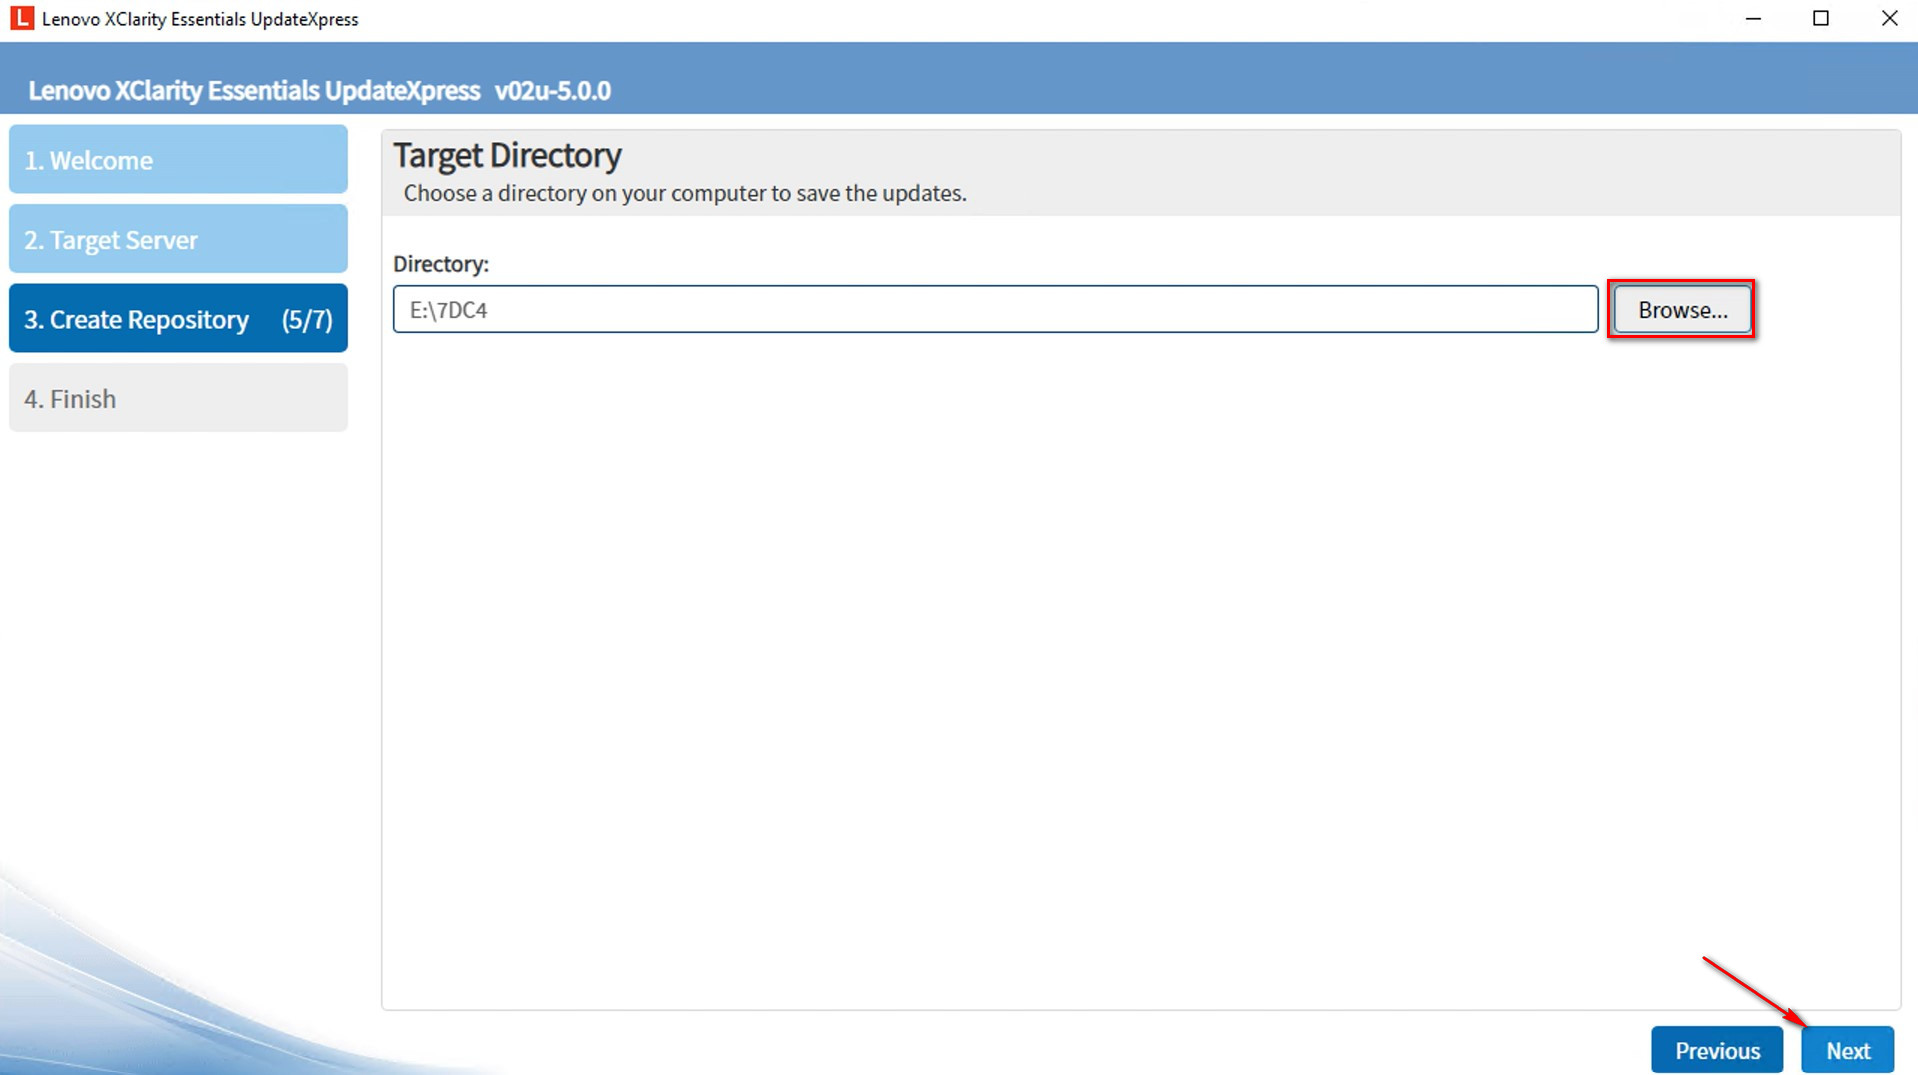
- If you select Latest available individual updates, the Update Selection window will be displayed. Select the updates you want, and then click Next.
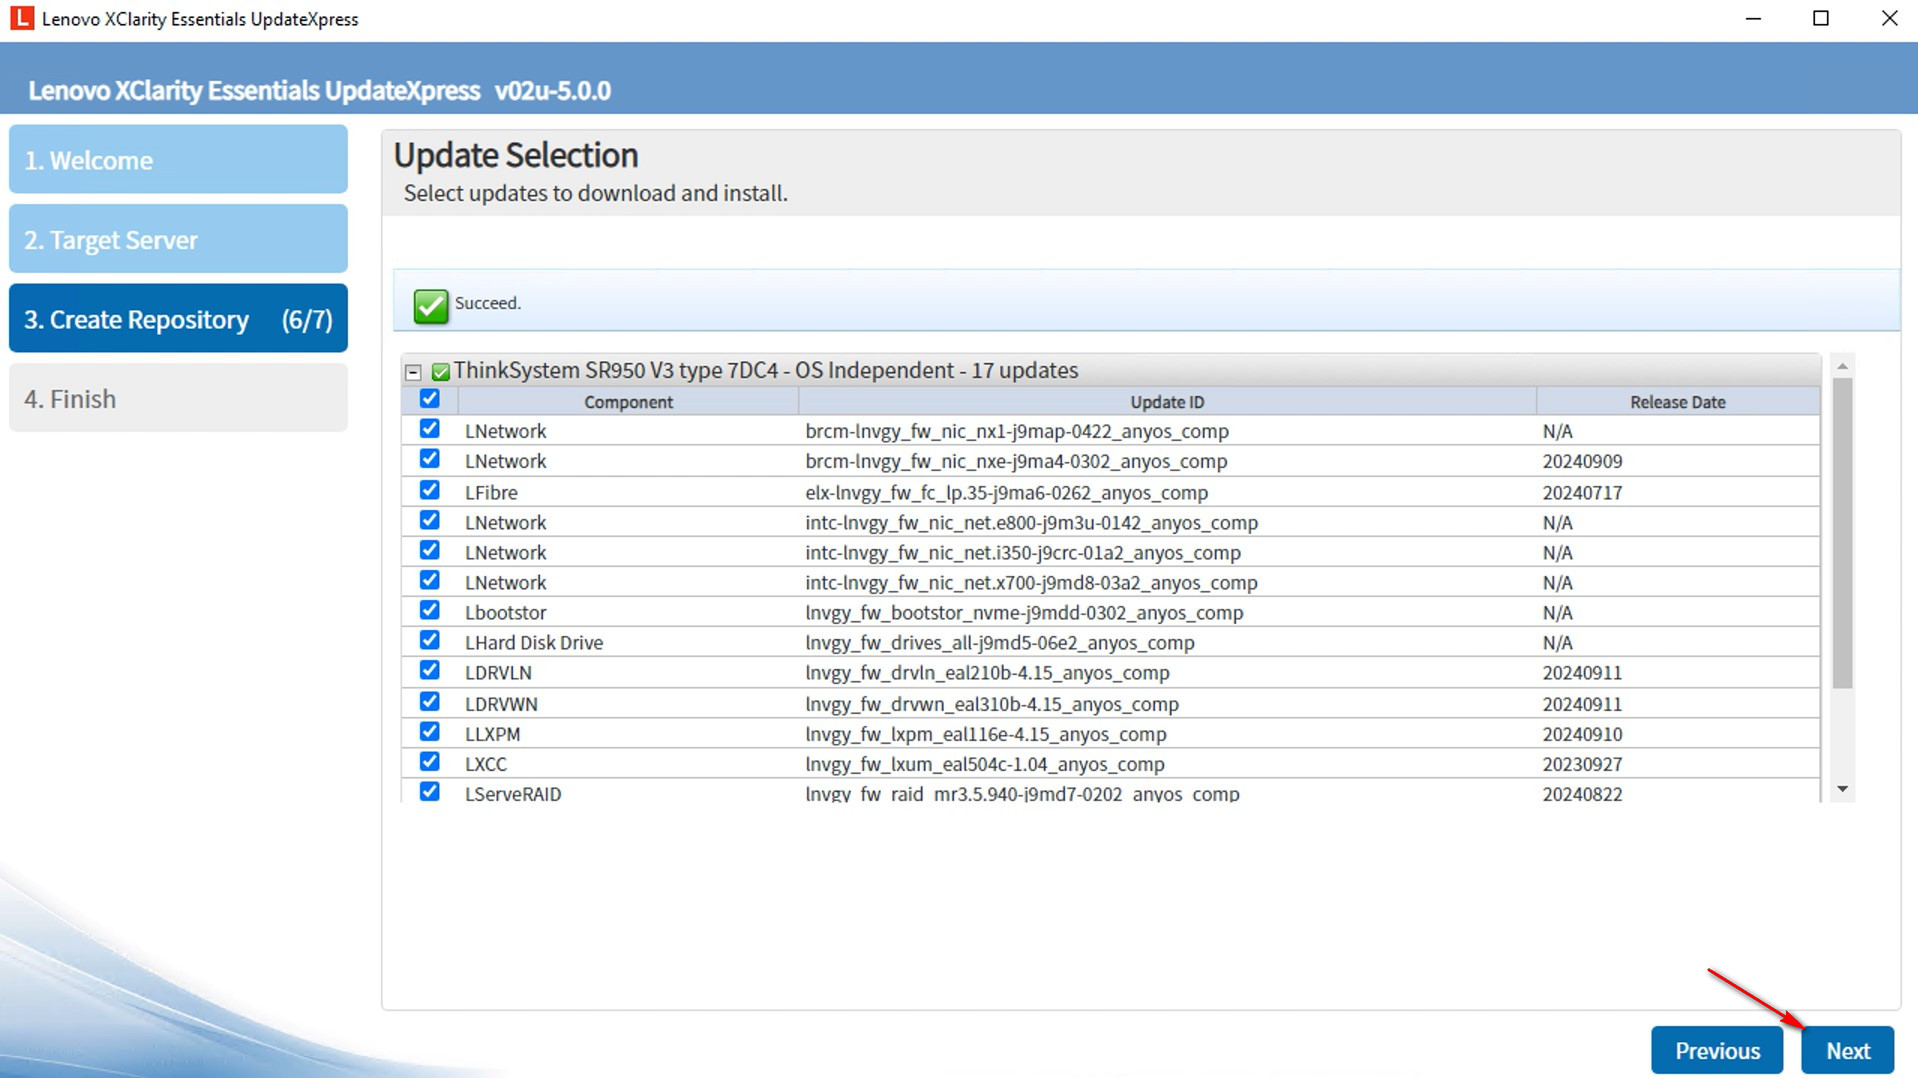
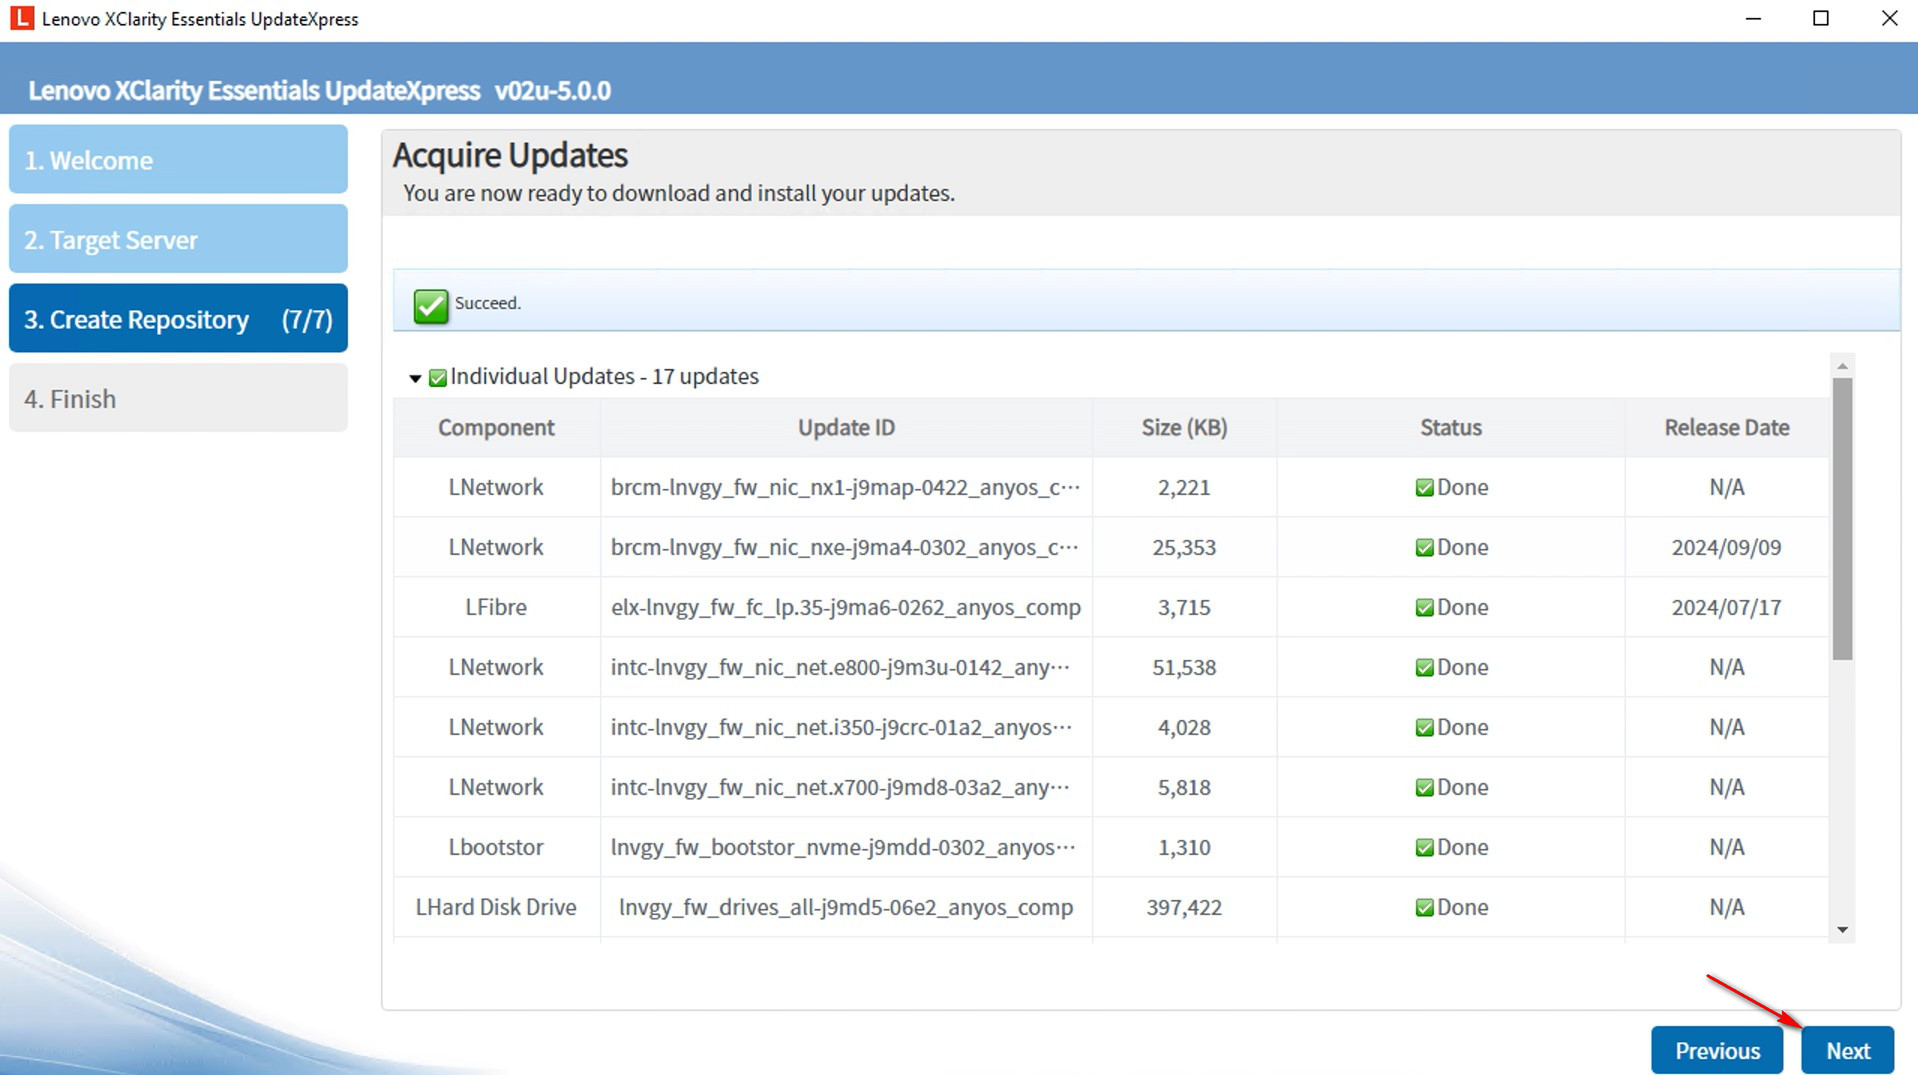
- In the Acquire Updates window, a download progress bar will be displayed. When the downloads are complete, click Next.
- In the Finish window, click on the log to check the upgrade log and click Close to exit the application.
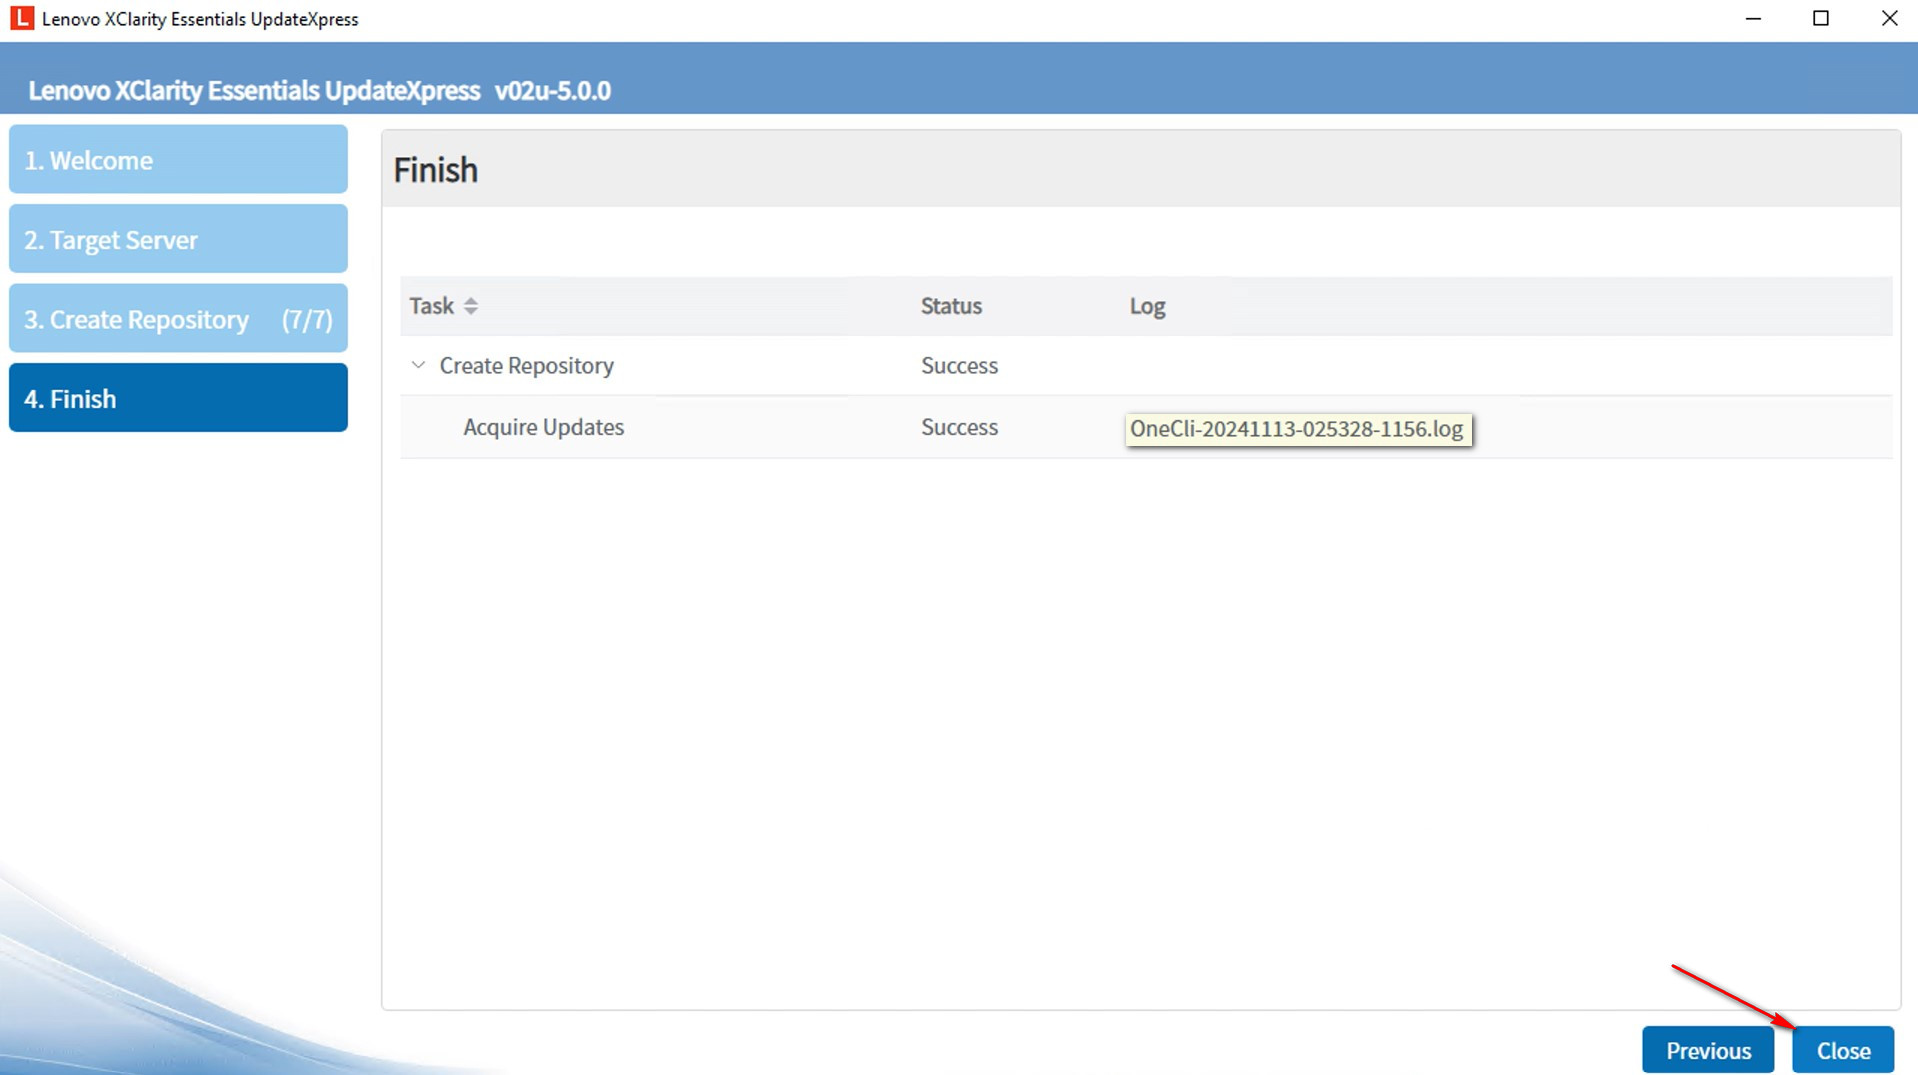
- The repository of updates has been created.
Update a local machine from a local directory
In this video, we will show you how to use the LXCE UpdateXpress to update the local machine from a local directory.
If you prefer written instructions, work through the following steps:
- In the Welcome window, click Next.

- In the Target Server window, select Manage the local server. If the Input BMC access information setting is selected, input the BMC information if necessary. Click Next.

- In the Task window, select Perform updating on target server. Click Next.

- In the Update Setting window, to upgrade the backup system firmware, select Only update the backup image of the BMC (and UEFI where applicable). Click Next.

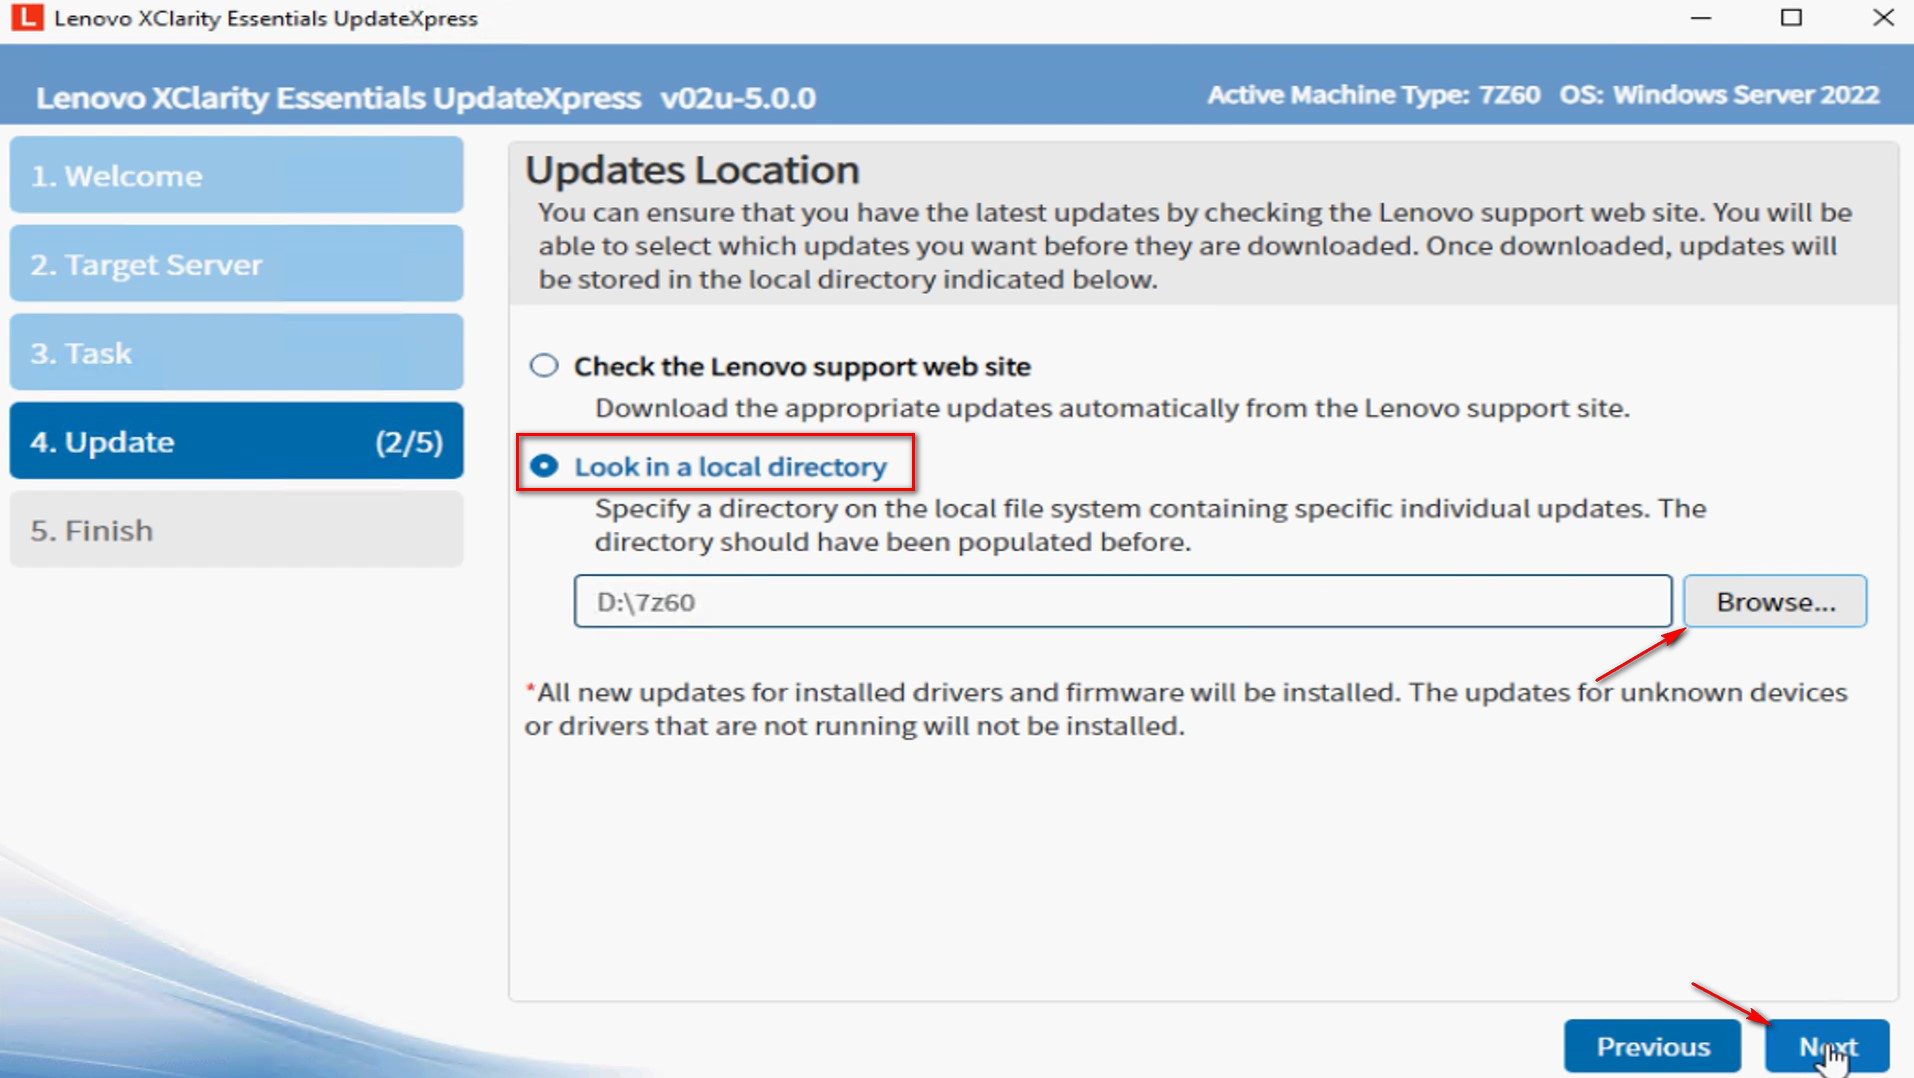
- In the Update Location window, select Look in a local directory. Click Browse to choose the specified folder and click Next.
- In the Update Type window, select the update type you chose when creating the directory.
- UpdateXpress System Packs (UXSP’s): This is the preferred method to obtain firmware and driver updates for the server. If you select this option, the Update Selection window will be skipped, and all the UXSP packages will be downloaded.
- Latest available individual updates: This is the preferred method when you want to install the latest updates, or when Lenovo support instructs you to install the latest updates. This option might give you newer updates and hotfixes, depending on their availability, than the UXSP option above. If you select this option, you must choose the packages to be downloaded in the next Update Selection window.

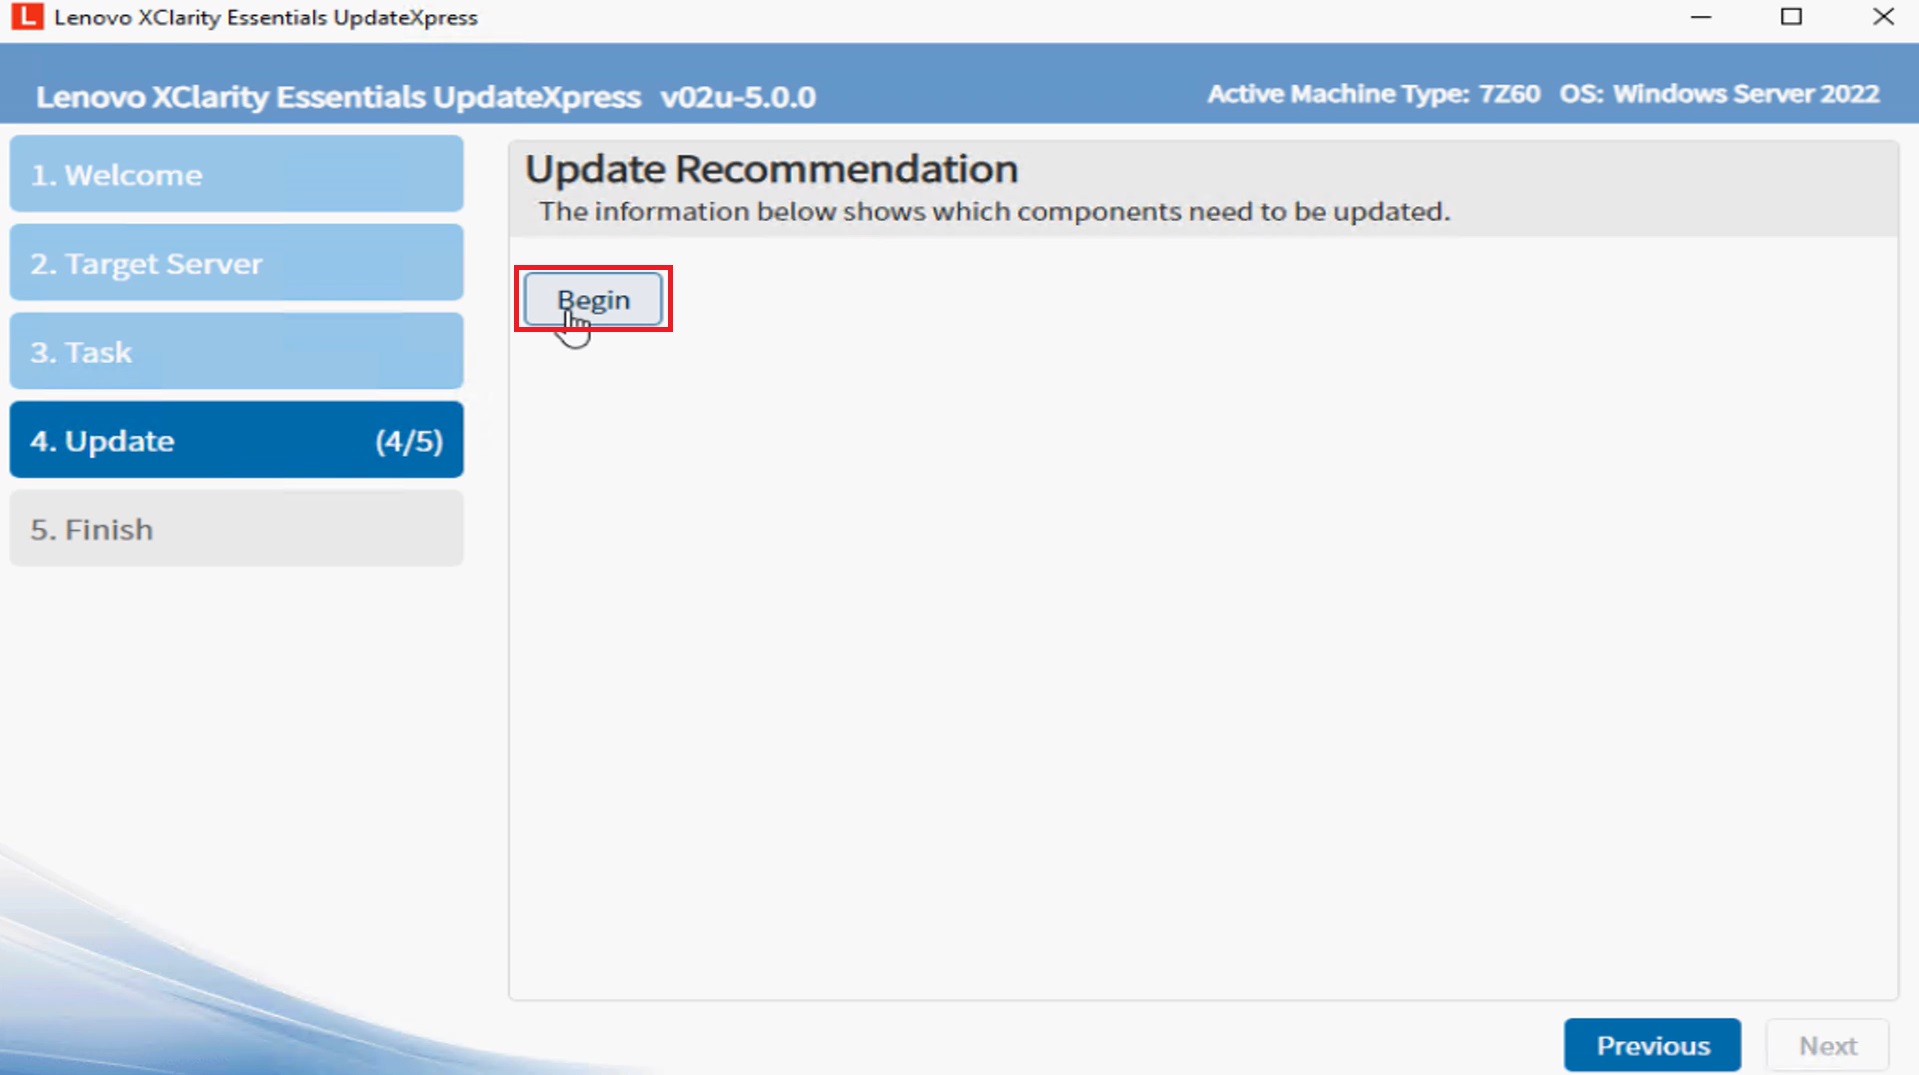
- In the Update Recommendation window, click Begin to compare the currently installed component versions and versions now available.
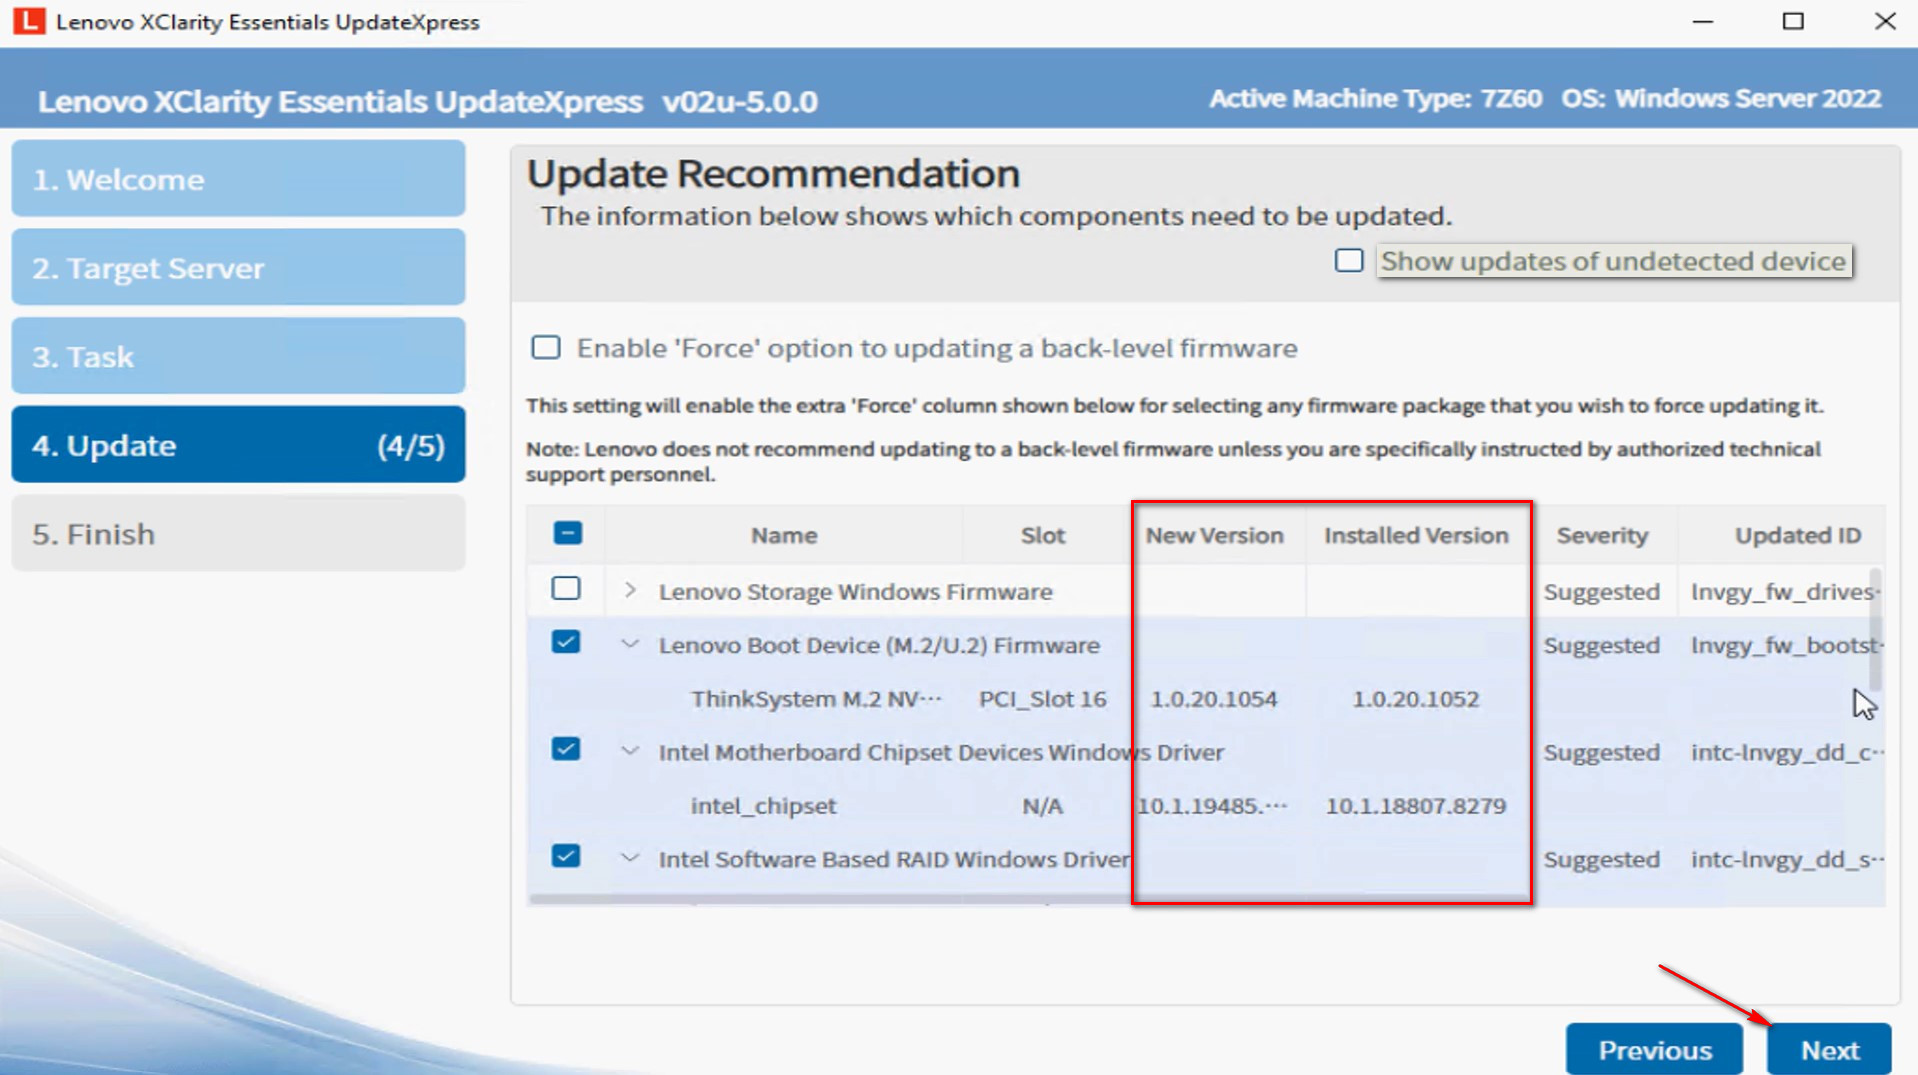
- To display all update packages, select Show updates of undetected devices. Select the packages you want to upgrade and click Next.
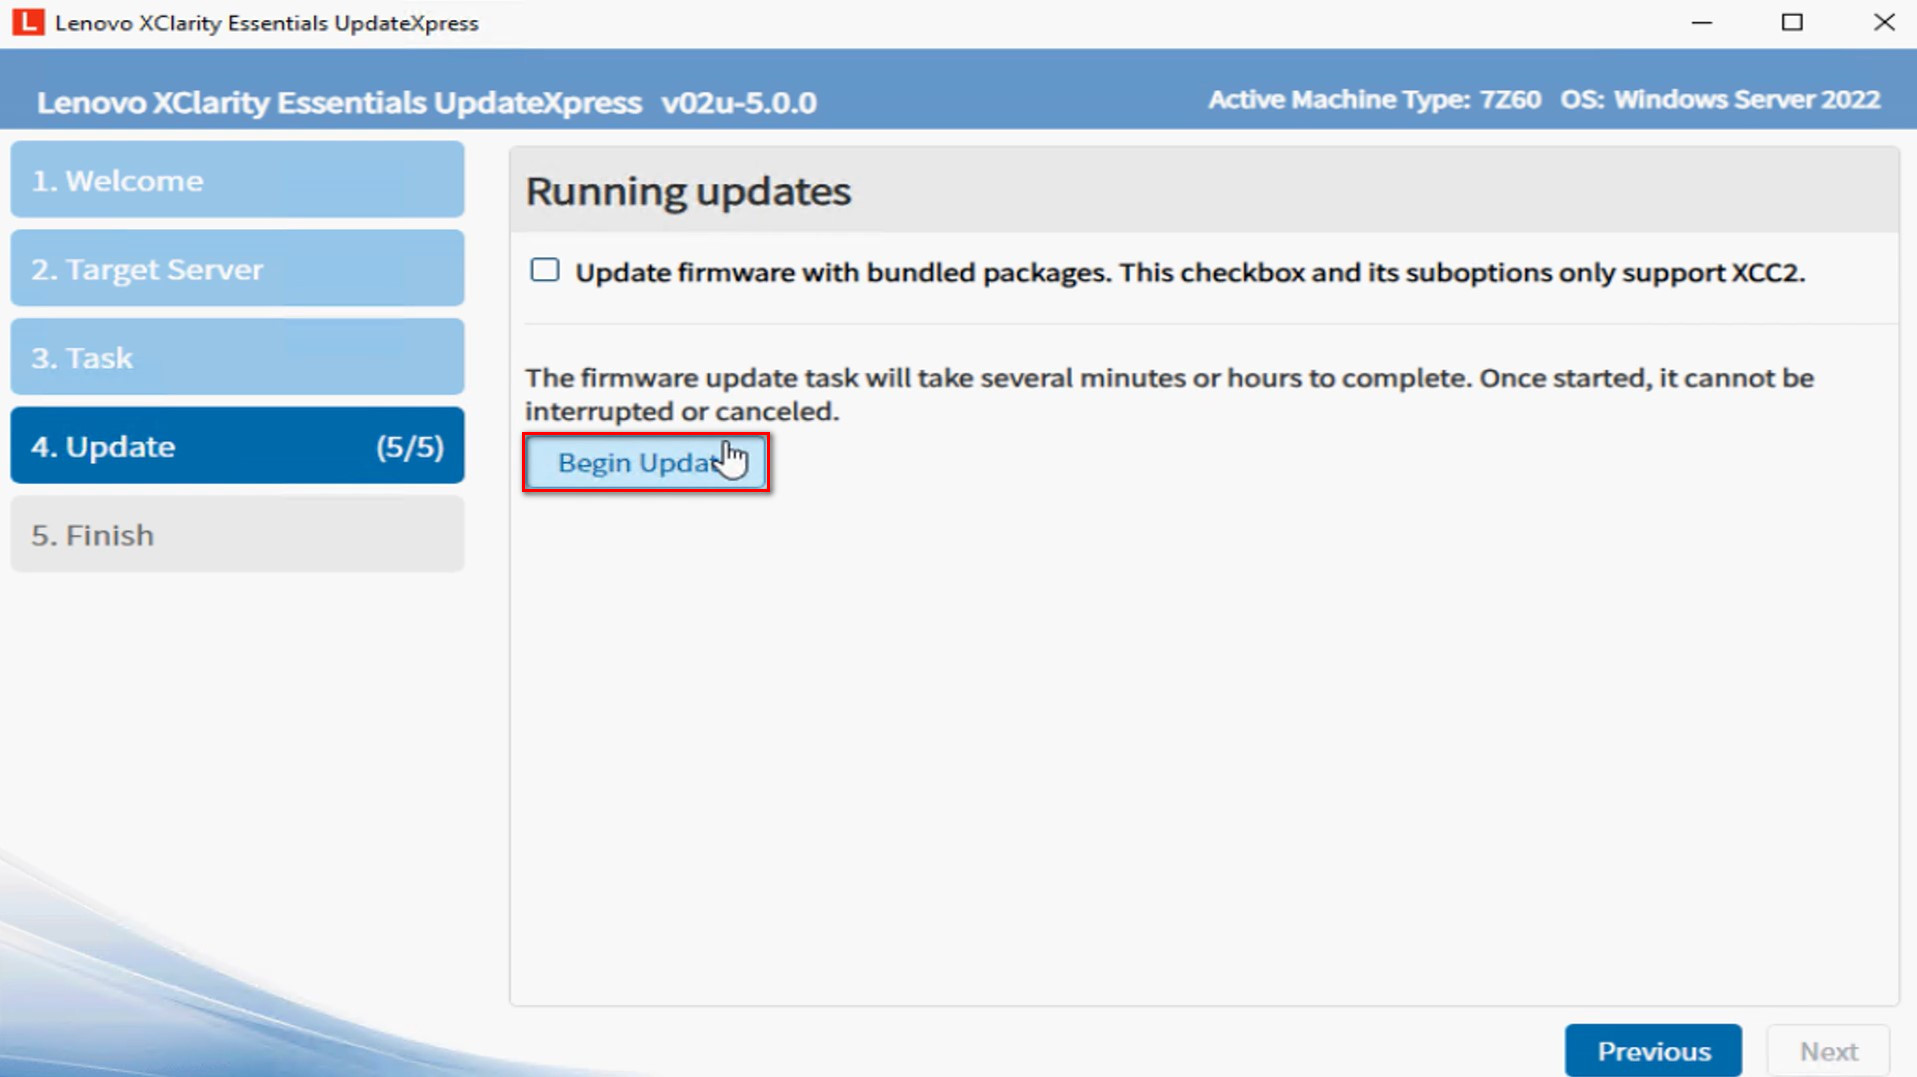
- In the Running updates window, click Begin Update to start updating the packages.
- The execution table displays the packages's upgrade process. When the upgrade progress is completed, click Next.
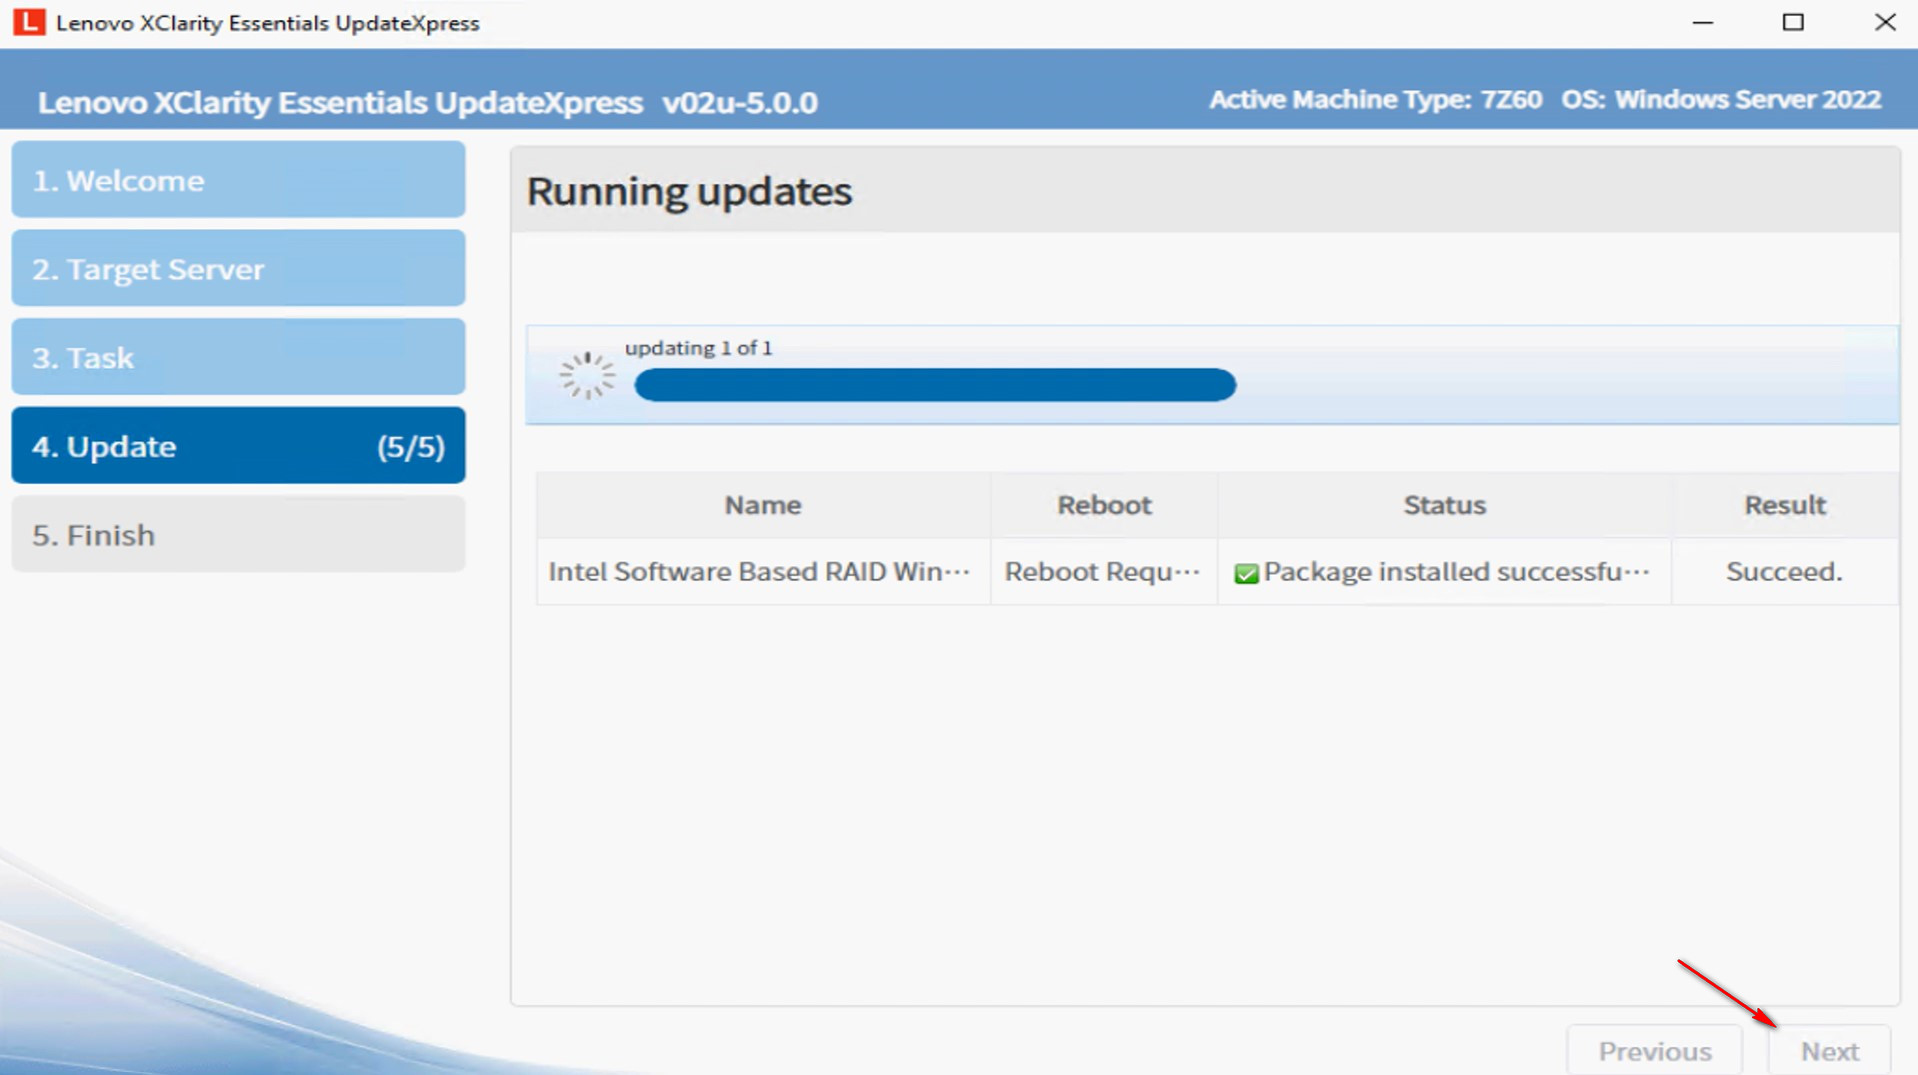
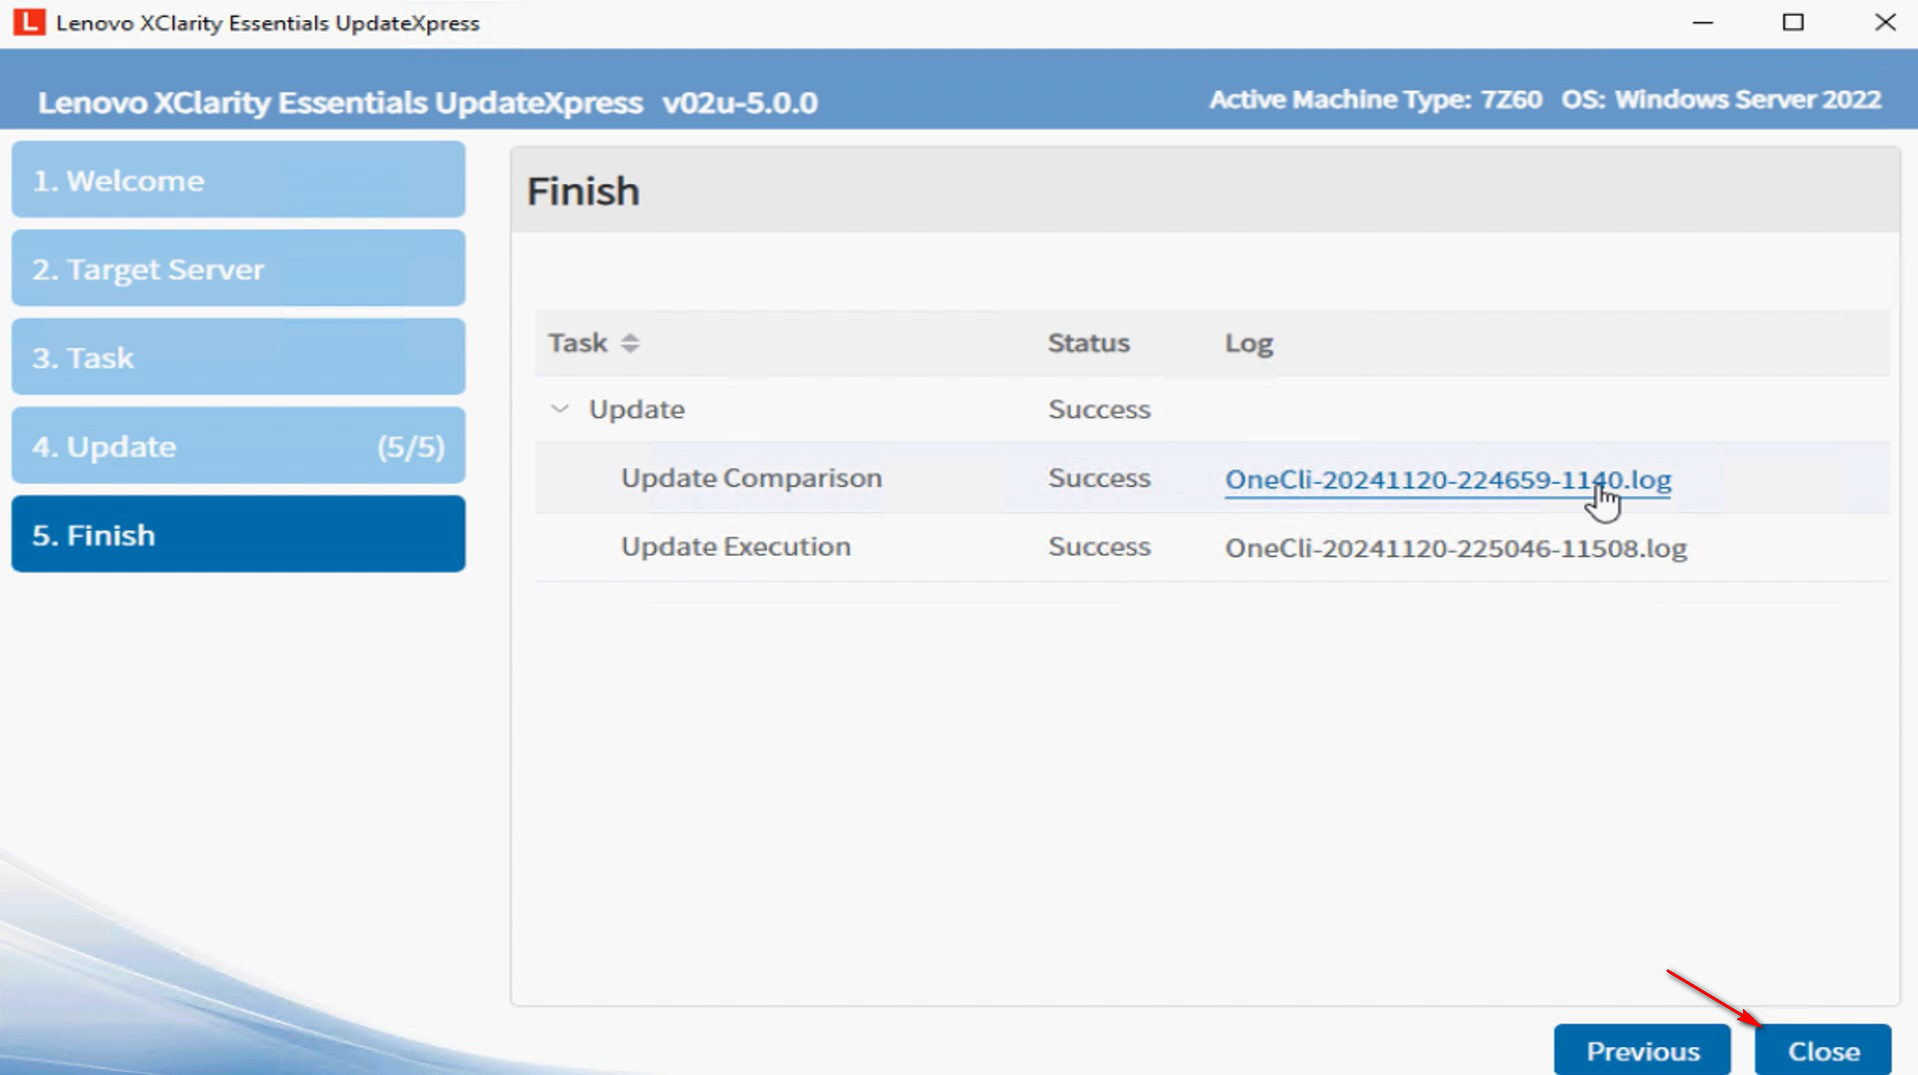
- In the Finish window, click the log to check the upgrade log. Click Close to exit the application.
Update a remote machine from a local directory
In this video, we will show you how to use the LXCE UpdateXpress to update a remote machine from a local directory.
If you prefer written instructions, work through the following steps:
- In the Welcome window, click Next.

- In the Target Server window, select Manage the remote server and enter the BMC connection settings. Click Next.
BMC Setting
- IP address or Hostname: The BMC IP address or hostname of the target system
- User Name: The BMC user name of the target system
- Password: The BMC password for the target system
- CIM port: The BMC port number - if you do not input a port number, the default port will be used

Note: If you do not want to check the BMC server’s certificate, select the Accept BMC server's certificate by default checkbox, and then click Next.
- In the Task window, select Perform updating on the target server. Click Next.

- In the Update Setting window, select one or more of the options.
- To use a separate remote server instead of BMC one is selected, enter the following information:
SFTP/HTTP/HTTPS/FTP Setting- IP address or Hostname: The IP address or hostname of the server
- User Name: The user name of the server
- Password: The password of the server
- Port: The port number of the server - if you do not input a port number, the default port will be used
- Remote Directory: Input a full path on the server where update packages were saved, for example, /upload.

- To upgrade the backup system firmware, select Only update the backup image of the BMC (and UEFI where applicable).

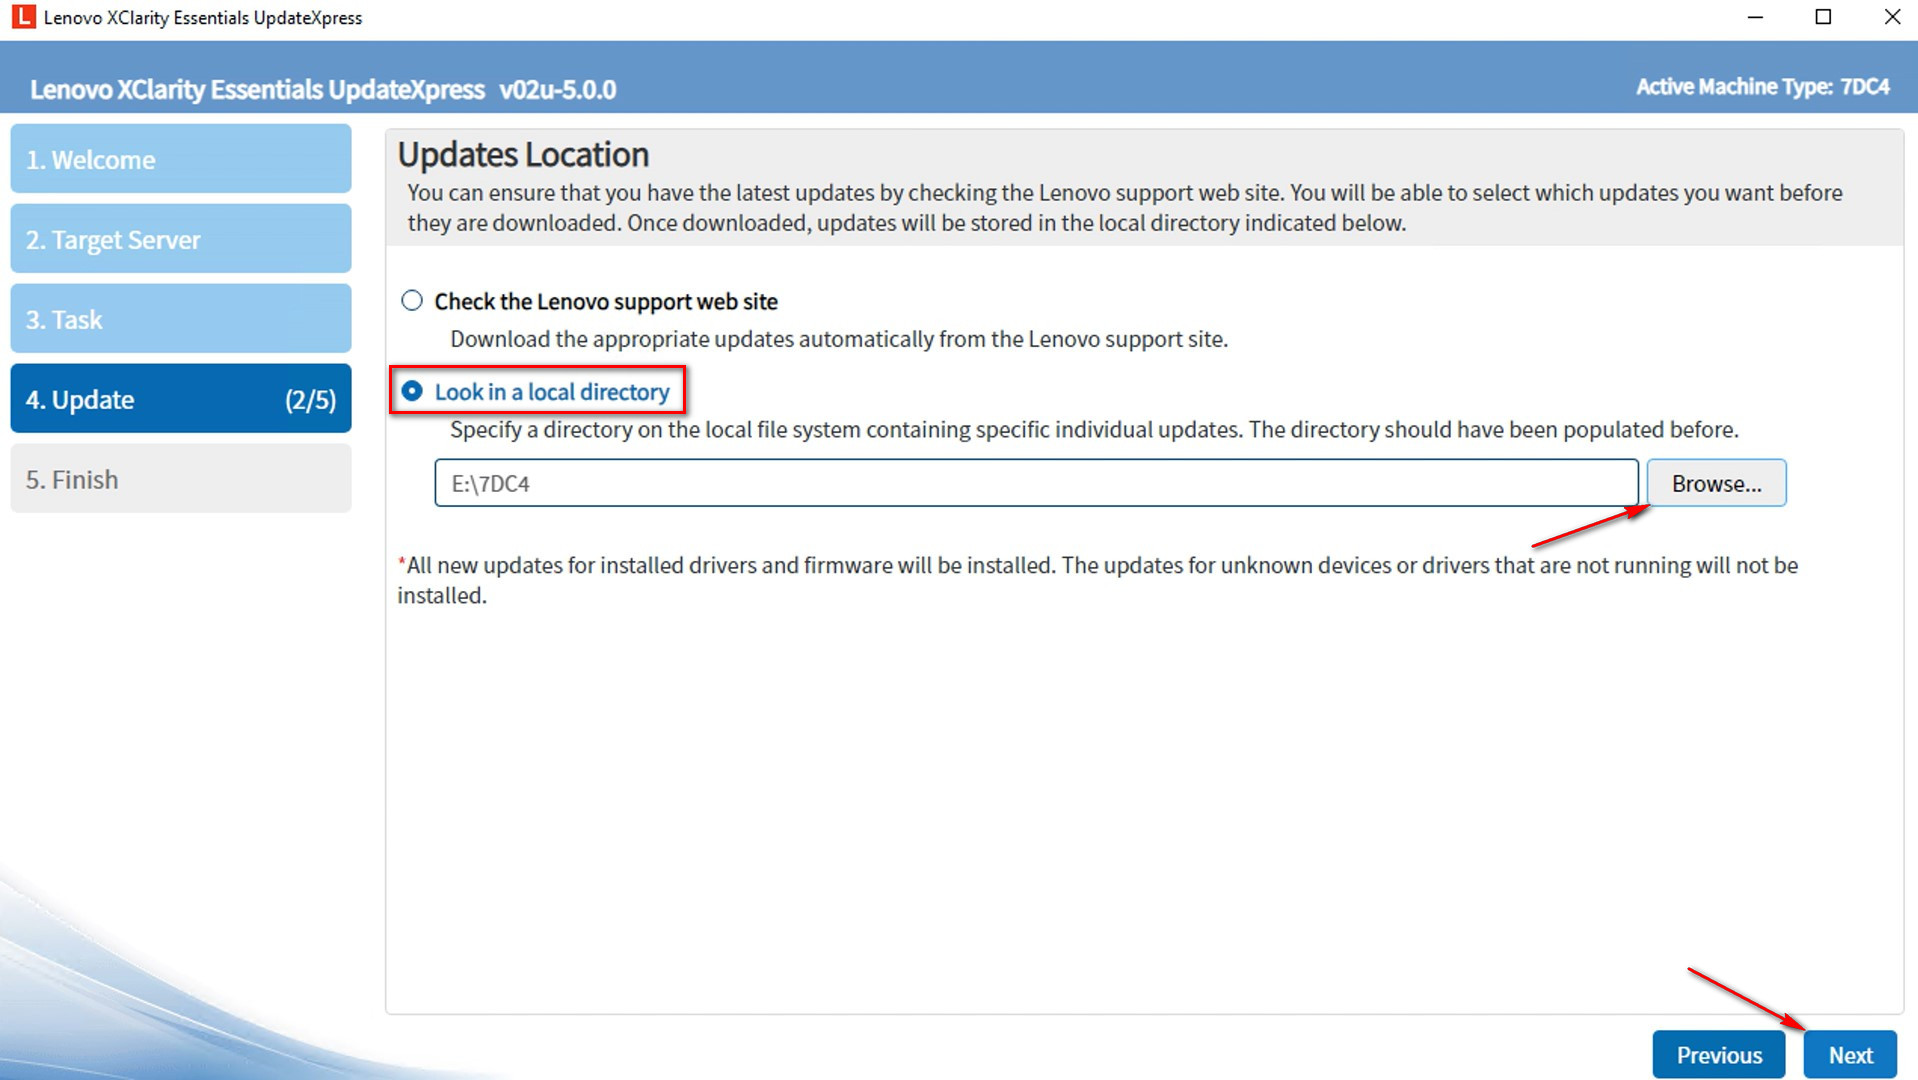
- In the Update Location window, select Look in a local directory. Click Browse to choose the specified folder and click Next.
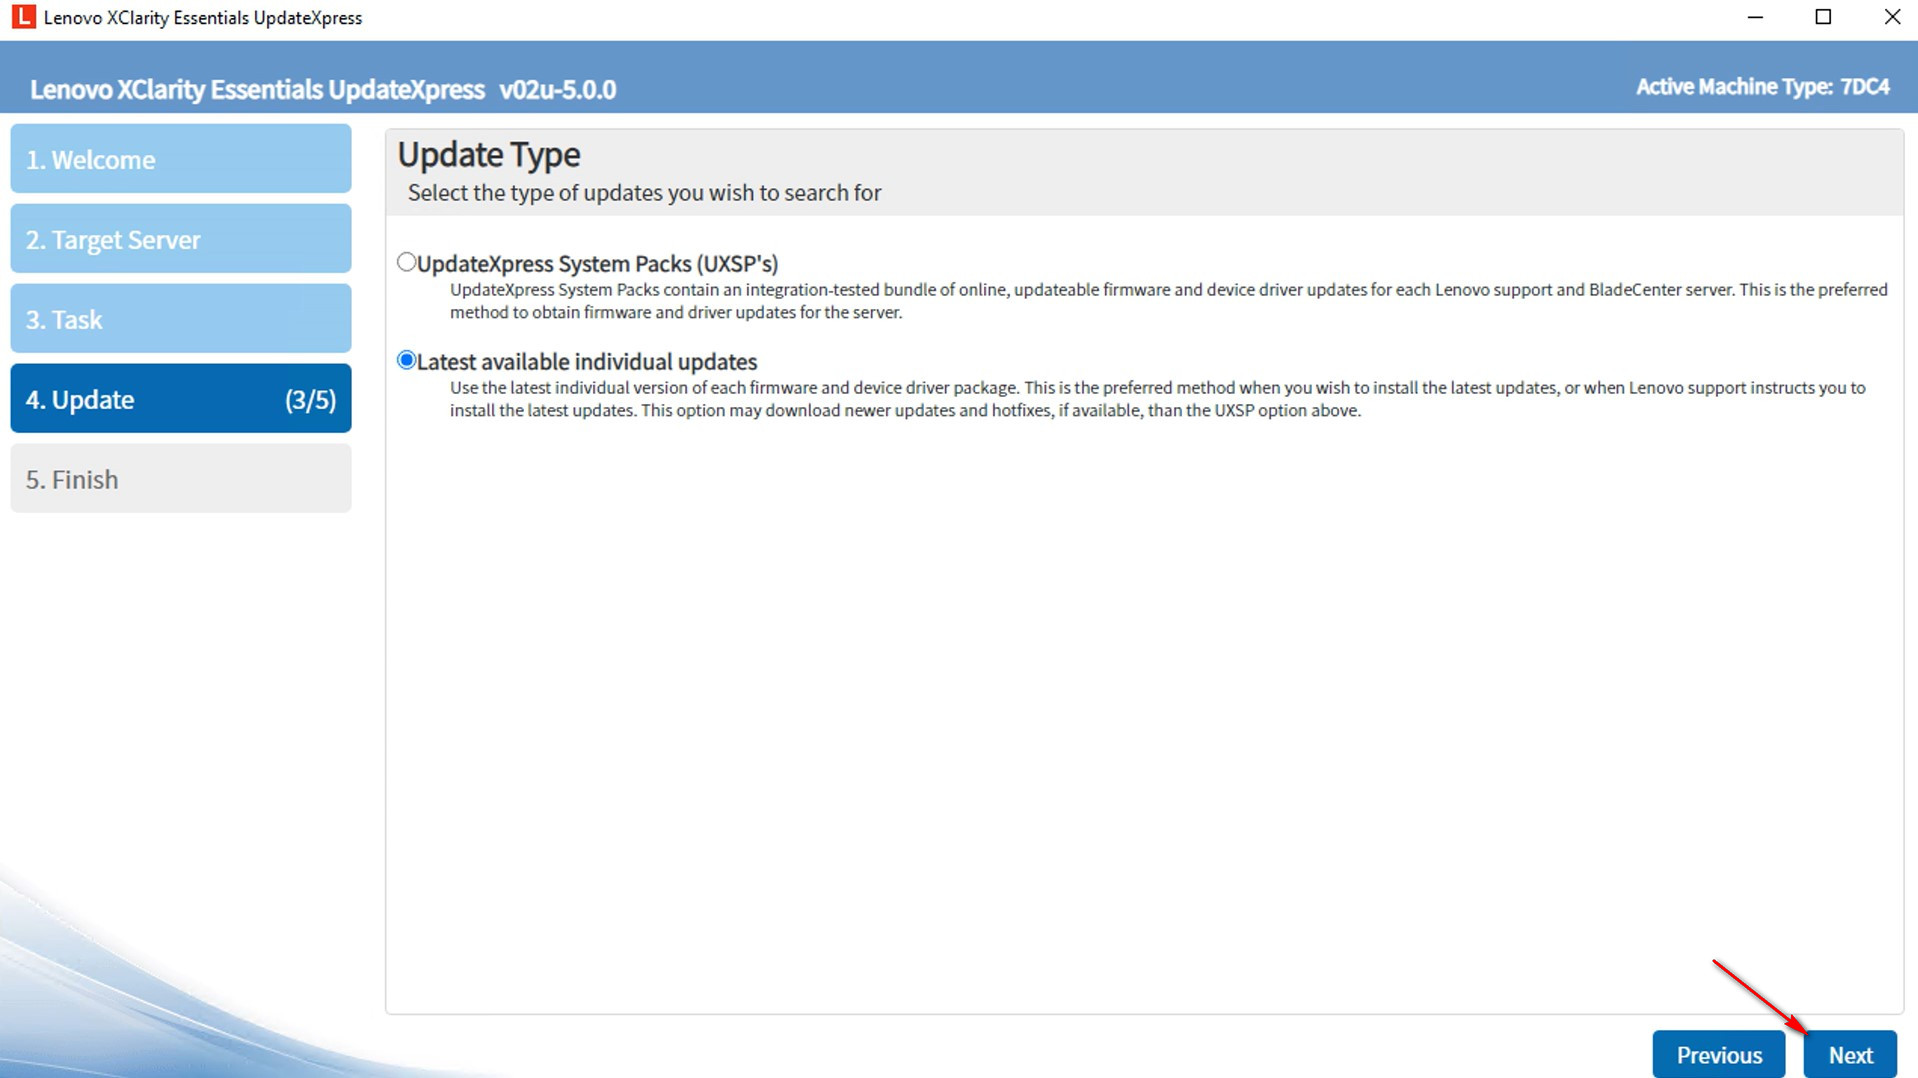
- In the Update Type window, select the update type you chose when creating the directory.
- UpdateXpress System Packs (UXSP’s): This is the preferred method to obtain firmware and driver updates for the server. If you select this option, the Update Selection window will be skipped, and all the UXSP packages will be downloaded.
- Latest available individual updates: This is the preferred method when you want to install the latest updates, or when Lenovo support instructs you to install the latest updates. This option might give you newer updates and hotfixes, depending on their availability, than the UXSP option above. If you select this option, you will need to choose the packages to be downloaded in the next Update Selection window.
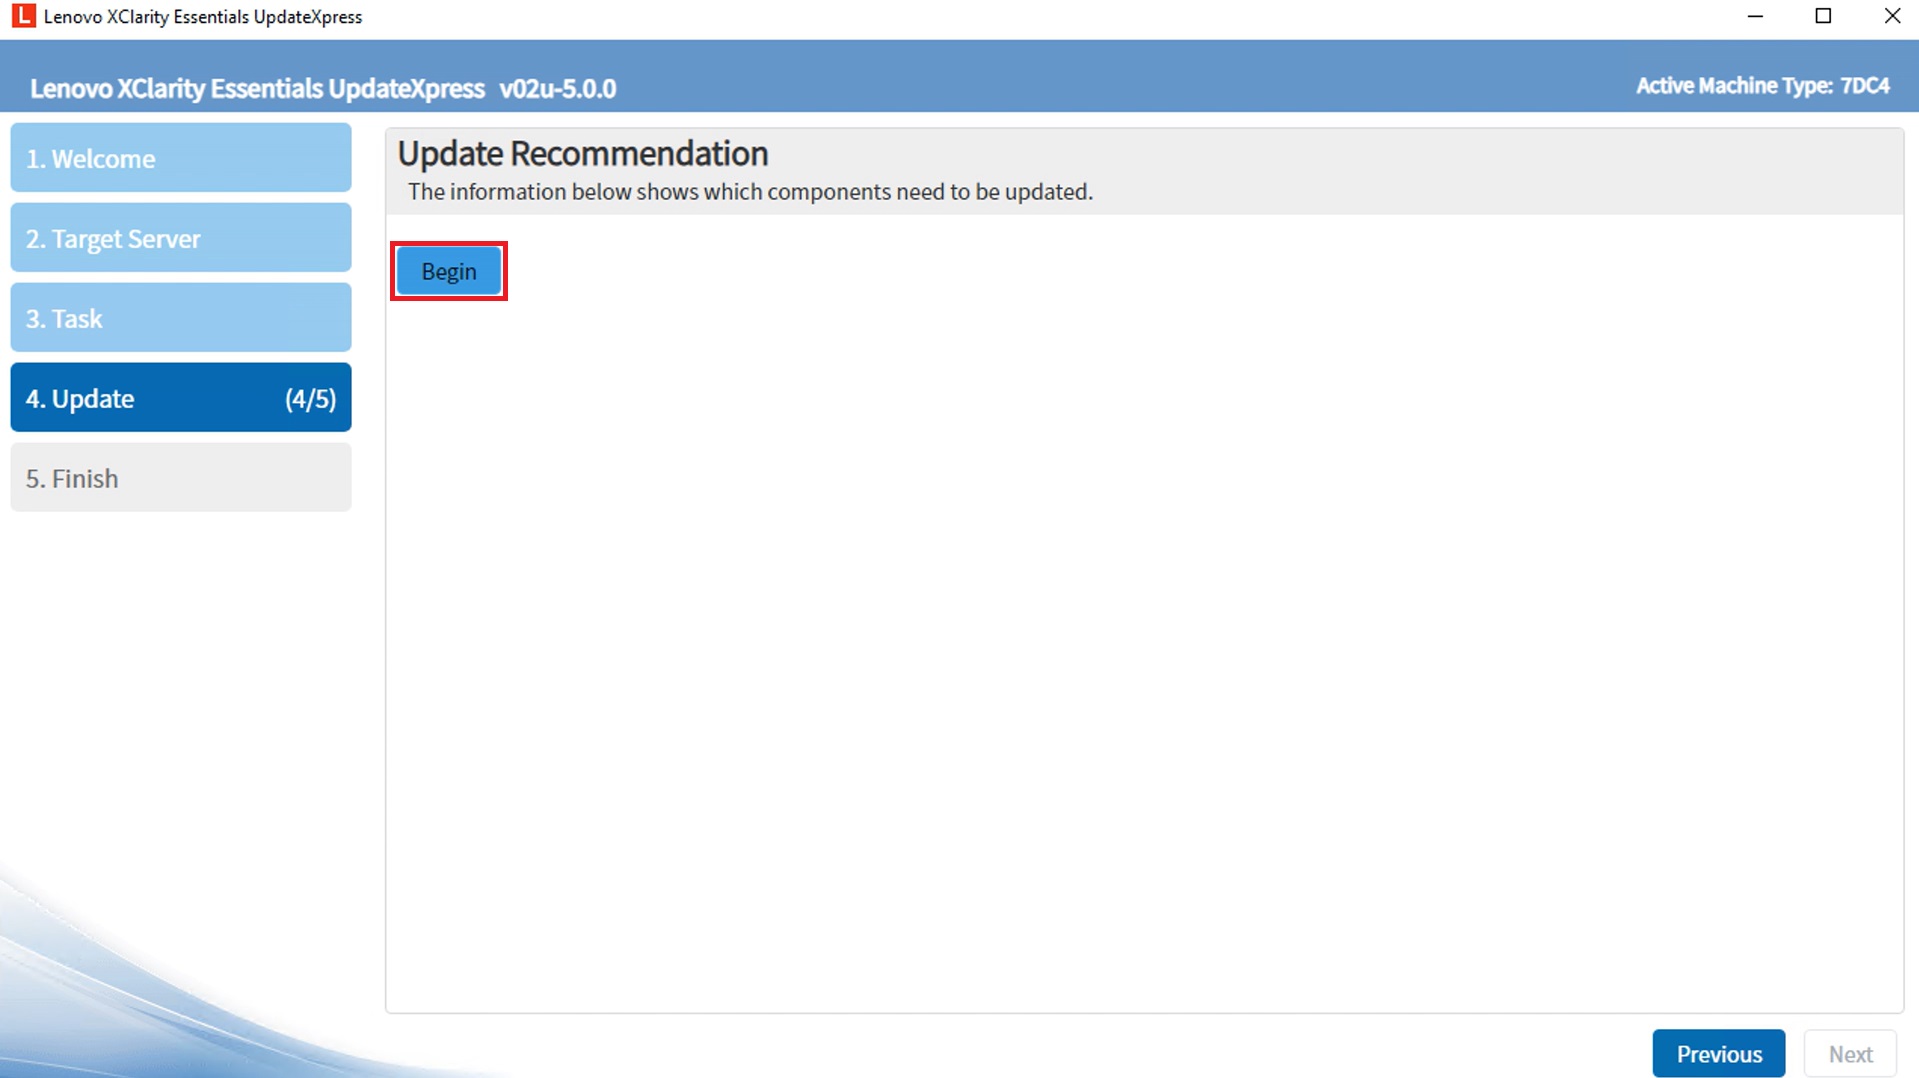
- In the Update Recommendation window, click Begin to compare the currently installed component versions and versions now available.
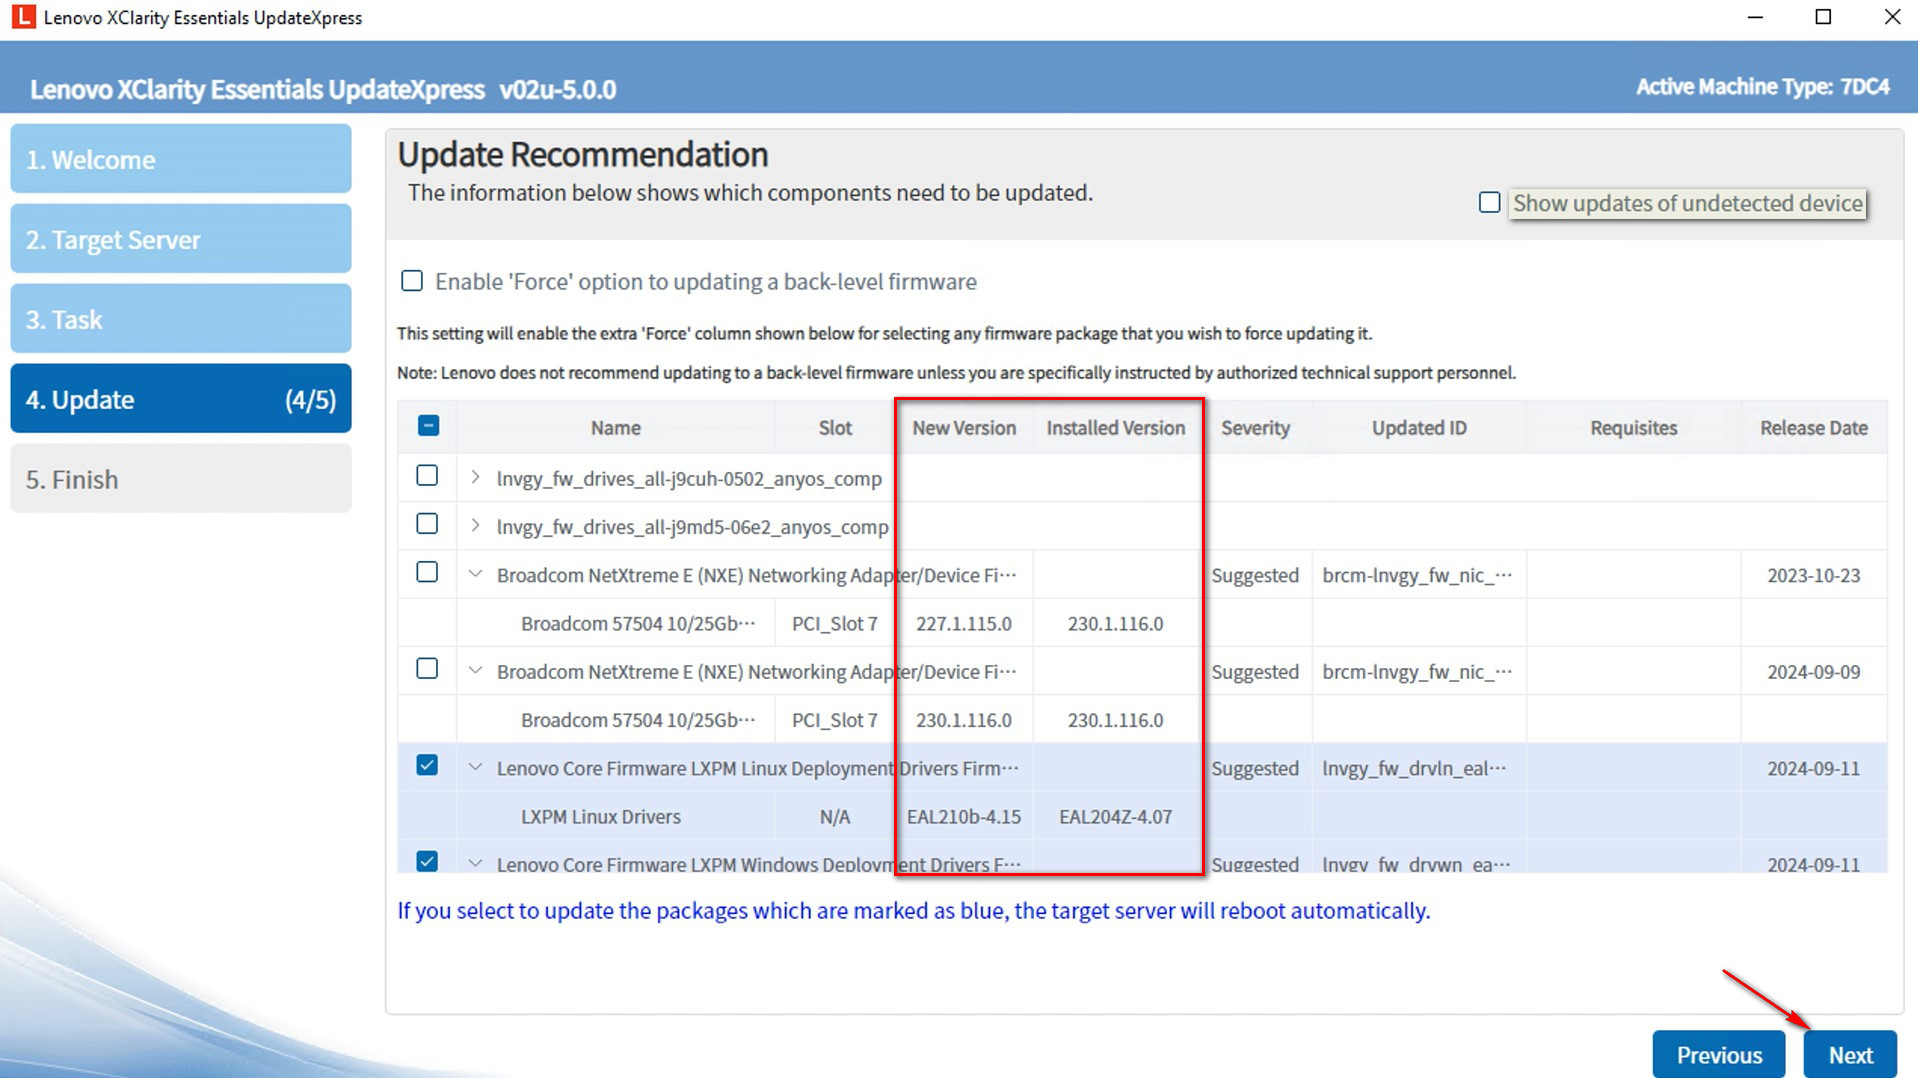
- To display all update packages, select Show updates of undetected devices. Select the packages you want to upgrade and click Next.
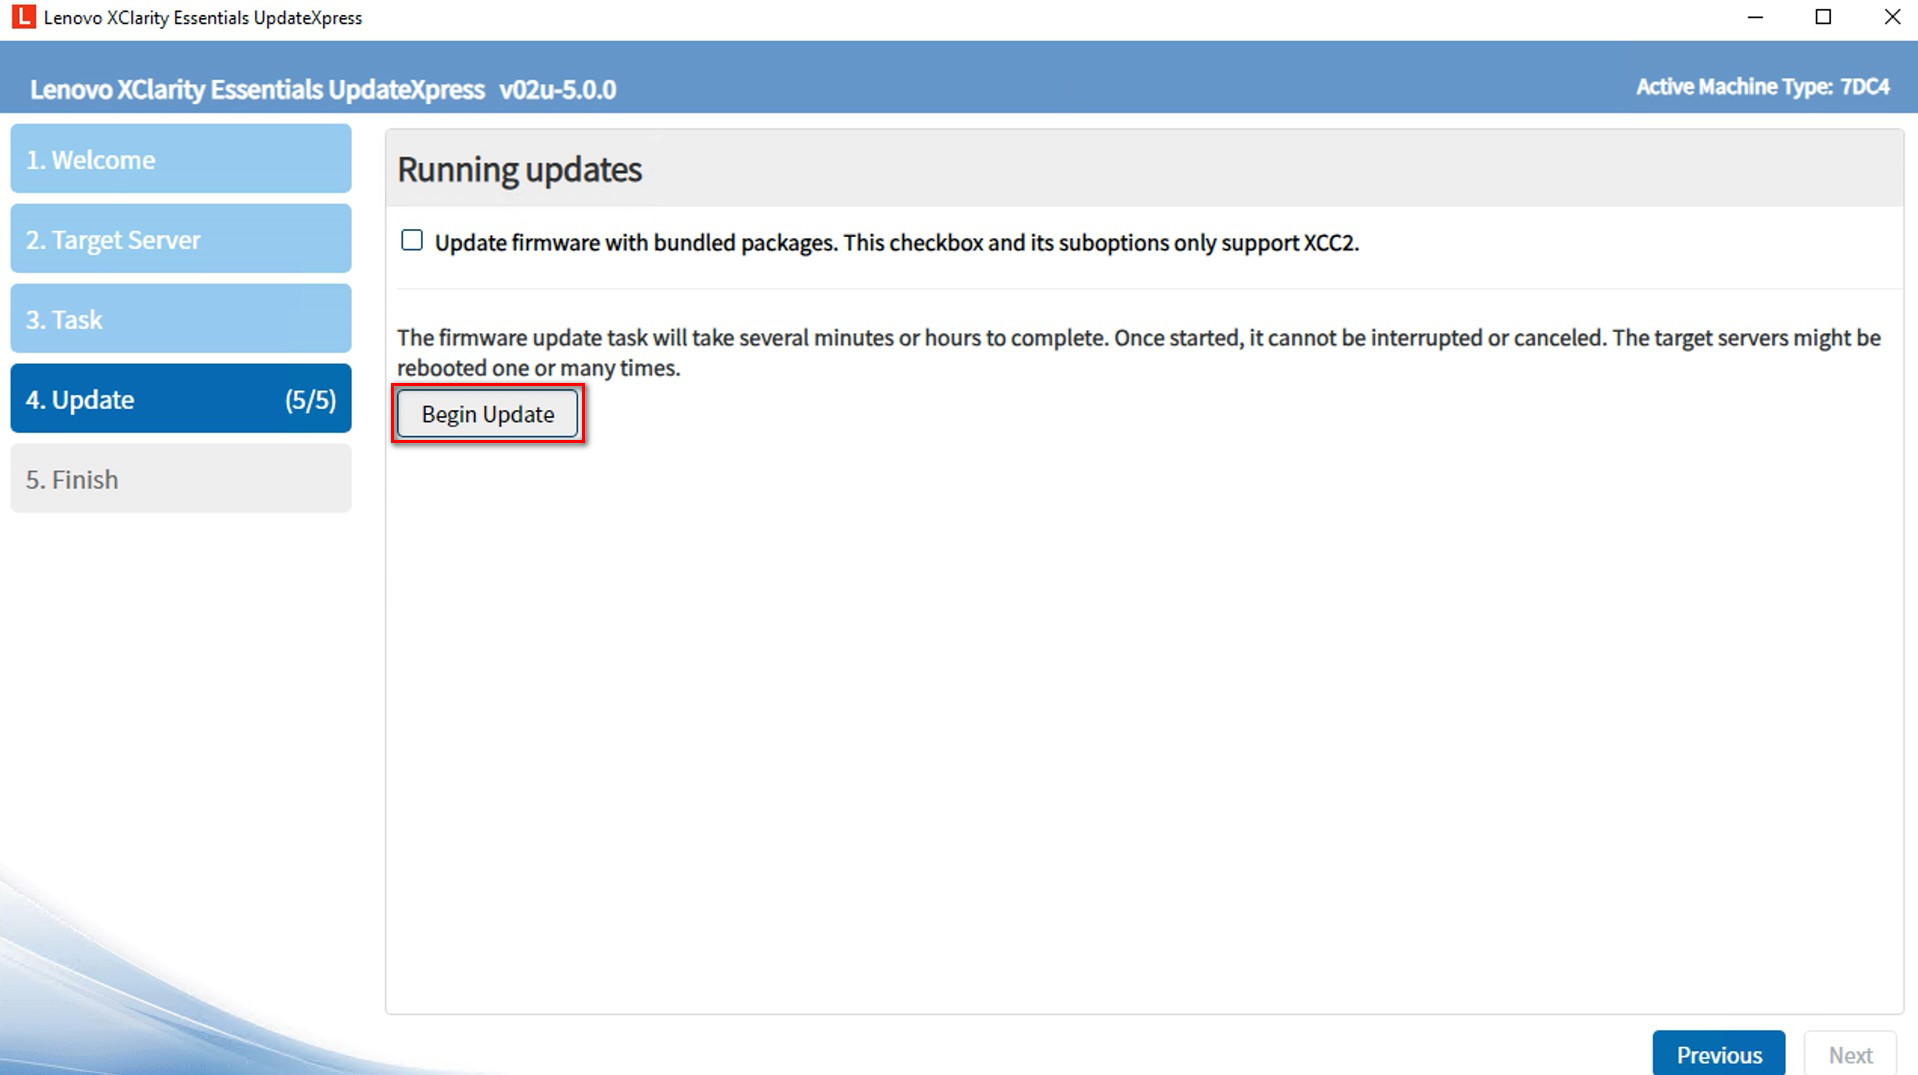
- In the Running updates window, click Begin Update to start updating the packages.
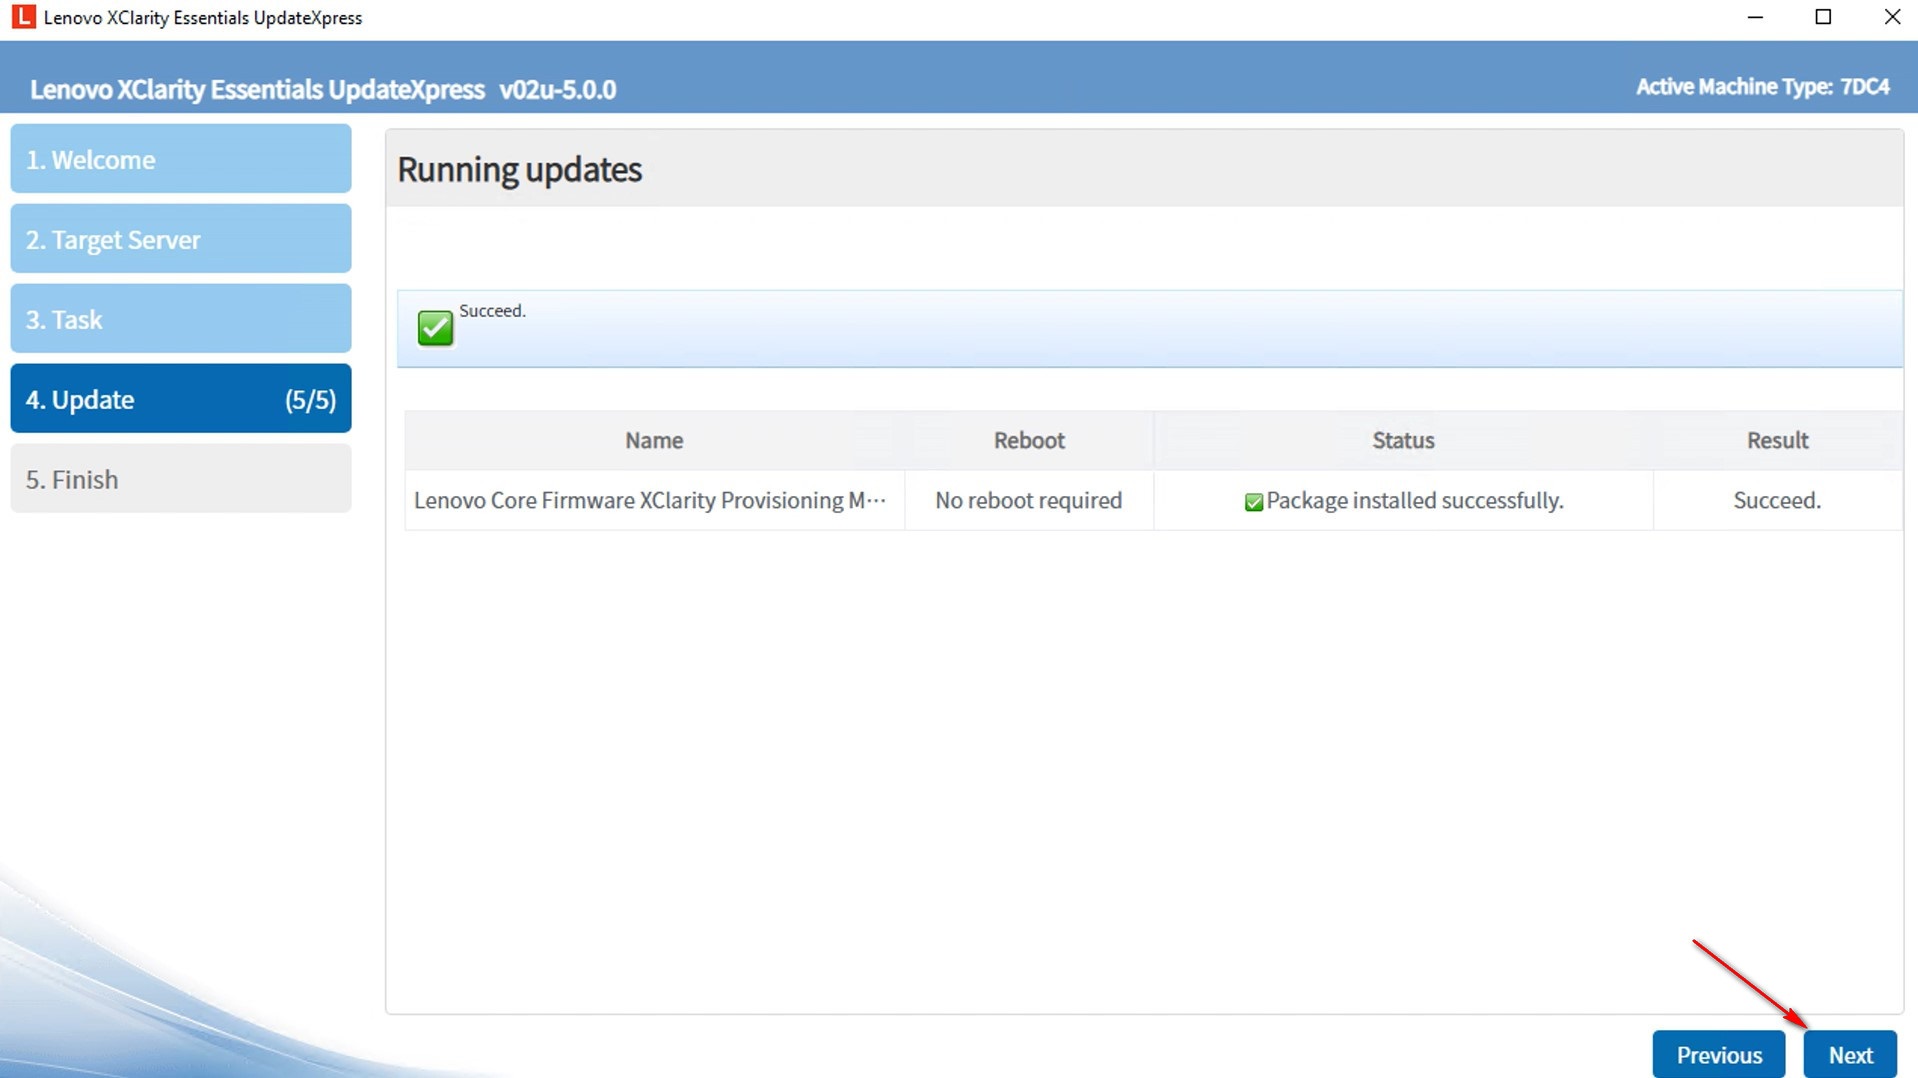
- The execution table displays the packages's upgrade process. When the upgrade progress is completed, click Next.
- In the Finish window, click the log to check the upgrade log. Click Close to exit the application.
Additional Information
- Using the UpdateXpress application - Updating Servers
- Lenovo ThinkSystem V3 and V4 Server Firmware and Drivers Update Best Practices - Advanced Guide
